Apocrypha: the Pathfinder Adventure Card Game goes to a Secret World

This is a good point, and a frequent decision I feel like I’ve had to think about. As for now I decided not to sit and grind any of my Nexuses for gifts. One reason is that unless I’m positive there aren’t any basic threats left in the pile, I’ll probably be using as many gifts as I find just to clear those out. Another reason is that, like you mentioned, it doesn’t really seem to matter much in these early missions. Unless I have one particular character that just took a bazillion damage (it hasn’t happned yet, but only because of a lucky card here or there) and is about to start accumulating deaths, I haven’t felt the need to fill my hand in order to keep myself from drawing cards from a (nearly) empty Saint deck.

I don’t have a hard rule when it comes to Doom Omens, because each turn can vary widely. But there are a few things I’ll do. If I happen to have a Saint with a hand of 5 cards, and 3 or 4 of those are Doom Omens, yea, I’ll start trying to give them away or discard them so I can refill with fresh draws, but other times if I’ve got good support from applicable Saints (or I’m sitting at a low threat Doom Nexus), I’ll just play them one after the other to get them out of the game. I really don’t anticipate this being a win-friendly option going forward, especially after all my hope Omens are permanently Stashed (and removed from the game forever) as I accumulate Enduring fragments from mission to mission–which is one way the game will naturally increase its own difficulty over time.

It is an issue. At least for me. I think it’s less about the individual missions and more about the overall structure of the game. I’ve got a way of addressing it that I keep meaning to post to BGG as a variant, but I have to finish writing it up. And I have to think of a snappy title. Tom Chick’s Make Apocryphya Hard Mod?

-Tom

Oh, and I think one thing that makes the game “easier” for a solo player is that there’s never any push-back from another Saint when I want to take all their best cards for one roll or another. If I were playing with a group of strong-willed independent thinkers, I’m sure there would be times where someone would be more than happy to see me eat five damage rather than me “taking” their card(s) and screwing up some glorious combo they’ve been setting up for fifteen minutes, regardless of which option is 7% better for the success of the mission overall.

Not to mention how much easier it is for mistakes to happen when players 3 or 4 don’t know the game half as well as players 1 or 2, and they’re constantly misplaying or not seeing (in their hand or halo) and announcing certain options available to the party as the game goes on… without some other player constantly hounding them and looking over their shoulder and calling out their best moves to them, which is never fun for anybody.

Playing at 100% ruthless efficiency has its advantages.

I’ve completed 3 more missions since my last post. Two of these missions were the last two I hadn’t yet played in Candlepoint, and the third was my first foray into the Swinwalkers campaign.

The Candlepoint missions were very straightforward and I blasted through them pretty quickly. The Skinwalker mission was Loop Garou, a mission about riding the subway around town and fighting whatever Lycanthroes I find around there. This mission was also very straight-forward, with the only new twist being the optional free moves my Saints could get by riding a subway car (that stays on the move throughout the game) at the end of each turn. The only other twist was a new Lycanthropy mechanic in this campaign, but I’m still too early in the campaign for it to negatively impact me just yet.

By the end of the Swinwalker mission I had two characters that ended up with one Lycanthropy point each, one guy because of a spectacularly bad roll against a Skunkshifter, and the other because of an enduring fragment I earned for winning the mission, which also has the side effect of infecting its user.

That first mission didn’t feel any harder than your average Candlepoint mission, but I can see that changing by the end of the campaign if I end up accumulating a ton of Lycanthropy, as it will interfere with my draws and halo. The biggest difference in how I approached this mission compared to all of Candlepoint was that I found myself assisting quite more often, forcing me to mutate much, much more often. So far I’ve been pretty lucky with mutations, but I did have one particularly bad roll where I had to spawn a bunch of clones of some Raven threat that wreaked all sorts of havoc over my entire party. But so far that has been the exception to the rule.

I’m much, much more comfortable with the game now, and I’ve got a good routine going. I look forward to seeing just how each mission will try to turn the screws on me more and more as I progress.

I’m currently sitting here in the middle of the Skinwalker mission, Jackhammered, and an interesting situation has come up: I can never run out of time. Once I’ve depleted all but my last card from the clock, that last card will keep returning to the clock when I am finished with it.

  • The clock in Jackhammered is made up of 24 random threats.
  • One of these threats ended up being, That Which Follows.
  • My structure card tells me to return Clock cards to the clock if they tell me to place them in a Nexus.
  • Both the Win and Lose conditions for that threat returns it to the clock, ready to be drawn again.

https://youtu.be/sEj8lUx0gwY

I love sussing out these kinds of loopholes. Let’s see, a couple things come to mind here.

But it’s trumped by the chapter itself, right? Which explicitly says to NOT follow the instructions on the structure card when you win vs. a card from the clock.

When you win vs. That Which Follows it actually goes into another nexus. If you can’t follow the instructions, I’m pretty sure you would sacrifice it.

I seem to recall something about the distinction between the clock and a nexus for certain edge cases like this. Let me see if I can find that.

-Tom

It does say not to follow the “Win vs Card” portion of the While Danger Remains Structure, but the rule I was looking at on the Structure card was for the entire Confrontation as a whole, which also encapsulates Lose.

This does bring up another question though, does Terminate fall under the Confront umbrella, or is it a wholly different sub-step for Investigate? I only ask because you don’t terminate after the Avoid sub-step, just confront. But based on indentation, I would assume Confront encapsulates everything following Initiate, until step 4, Sanctify. Which means it should apply either way, because the Win vs Card rule on the “While Danger Remains” Structure card just relates to your next investigation.

I had later considered this, which means that this loop would work only as long as I have at least 2 Nexuses on the board.

Skinwalkers: Jackhammered completed.

I don’t want to add an extra mutation die just for one extra Rage die so I skipped on the enduring fragment for this one and grabbed the other 4 temporary ones instead. I picked up one new Lunacy on a Saint this go-round.

Terminate is a sub-step of Confront. Page 16:

If you continue to Confront, there are three steps within
it: Initiate, Act, and Terminate

The updated rules are a lot clearer with their indenting too:
image

Oh, yea that formatting is much clearer than the gameplay card I use. Glad I haven’t been screwing anything up all this time in that regard with a weird initial interpretation or something.

Thanks for pointing that out. I’ll have to remember to check the PDF going forward in certain edge cases.

Just finished a couple more missions over the last 2 days. Both went by pretty quick, with Mission #3: “West Side Story” over and done in record time. It took me longer to set up and put away the game than it did for me to actually play and finish it.

Mission 3 has a unique mechanic in that the clock is built from 14 cards (in a game with 4 player characters) instead of the standard 24. These 14 cards are the threats and True Threat Archetypes that would typically get shuffled into the nexus locations. As you defeat minions in the clock, the game allows you to simply Recycle an Omen or Gift to investigate the clock again. There are a few ways to break this cycle (losing a fight, or investigating your Nexus instead of the clock are a couple of these), but the easiest way it to just use up your entire hand so you can’t complete the investigation step, allowing you to move on to the next Saint.

I could see Mission #3 being a total bear, because the Master is temporarily unkillable until your clock is empty. When you defeat him he gets shuffled back into the clock. It’s technically possible you could face him turn after turn after turn if he keeps being shuffled in as the top card, but as luck would have it he was the bottom-most card in my clock. By the time I dug him out I didn’t have to shuffle him back in because the now-empty clock deck didn’t meet the criteria. So it was a super quick and easy mission thanks to some lucky shuffling.

I did gain a couple more Lunacy that game because I drew a couple lycanthropy cards that had been shuffled into my decks due to Enduring Fragments. You know, since I’m free to sacrifice Enduring Fragments any time I want between games (instead of slotting them) I could keep myself from ever gaining Lycanthropy this way, in addition to keeping my Enduring Fragment count low enough to keep from being forced to Stash Omens of Hope every time I hit a threshold. I’m torn between wanting to play smart vs wanting to ramp up the difficulty.

One mission left in Skinwalkers, then it’s time to bust open box two and start a new campaign.

Man, that final mission in Skinwalkers (The Moon Palace) just about ended in complete failure. Had I not finished the mission on the very last card in the clock I would have timed out. And even if I’d had the time, had I not also defeated that very last card in the Nexus a Saint would have Faded (and cost me the game) because of all the damage they’d all already taken throughout the encounter.

This particular mission has one Nexus card/location, but 4 Nexus decks worth of cards (one per Saint) combined into one. That means this particular Nexus deck has 16 random standard threats, 6 True Threat minions, and 1 True Threat master. This wouldn’t normally be so bad if I could use some card or turn trickery to move particular Threats or Saints around to other Nexuses, but I couldn’t do that. And unfortunately for me, I had some killer difficult Threats shuffled into that nexus which kept coming up and defeating a saint, then coming back and defeating them again, and so on. And this is on top of the Pack for this mission cloning themselves and forcing me to fight 2x of them every time one came up.

The biggest issue for me this match were some Bruin threats that kept defeating me, getting shuffled back into the nexus, and showing up again.

Screenshot_20200727-201719

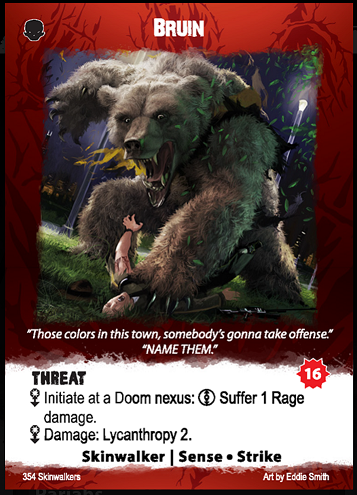
Bruins are huge Rage-based threats that force everybody at the nexus to take 1 rage damage every single time time I’d encounter one. This had two negative effects on me, first is that I was already taking a lot of damage from the clones of the main pack for the mission so my party was already hurting, and second, the very few rage cards I could even scrounge up were the very same cards I would need to defeat these Bruins (given the rage bonuses I would get from them). So it hurt to have to dump them all the moment I needed them. And because nobody in my party specializes in Rage (I have a couple Rage 3’s at best), I could never QUITE get (or manipulate) the target of 16 I needed to kill these bastards off once and for all. So they’d show up, hurt everybody in my party, weaken our main line of attack against them, and then run back off into the nexus when they were done with us, only to show up again a few turns later. And just my luck, I kept drawing the stupid things with Dr. Zeez, who could pretty much do fuck-all againt tthem!!!

All this losing ate up my clock like it was nothing. One of my Saints (the 13-year-old roller-skating social media darling, Ruby Doomsday) has the inherent ability to Avoid encounters, but I was already losing so many fights that I couldn’t afford the time it would take to waste Omens on Examining/passing or Avoiding anything, ever. Because of bad RNG, an inefficient party composition for this particular encounter, and some nasty Lunacy I picked up throughout the mission, I pretty much had to take the fights as they came if I ever wanted to reach the end before time ran out.

I really enjoyed the horrible circumstances I’d found myself in this mission because I had to use every single turn phase, positioning, and card to its ultimate advantage in order to succeed by the end of it. Up until this point the mission difficulties have mostly felt pretty average, if a bit tame. But thanks to a nasty combination of bad roll RNG, bad Nexus RNG, bad draw RNG, and a party composition that was anything but min/maxed for this encounter, this final mission for the Skinwalkers campaign felt about 5x harder than anything that had come before it.

Next up, extracting a bunch of Skinwalker cards from the box and replacing them with, uh, Golems. I think’s it’s time to visit the West Coast.

I had no idea this morning that when I chowed down on a Carl’s Jr Western Cheeseburger at 9am that it would turn out to be so freaking advantageous for my adventure party in Apocrypha tonight.

Playing Detox and just closed the Nexus with Watchdog next to it. Question, what happens to Watchdog? I made the assumption that if a threat or gift is “won,” then the damage step is skipped and Watchdog stays put. However, then does the Watchdog just go away if the Nexus is closed? Then it really doesn’t do much except maybe a one time get out of damage. Any one else encounter this and have thoughts?

Yes, he leaves when you close his Nexus. He can move around, though, so you can get damage prevention out of him more than once.

-Tom

So, move him to a new nexus randomly?

That’s what the card says, right? You can probably check it more readily than me, but Watchdog runs around the Detox scenario. There are instructions on the card for moving him after he does his damage prevention. But if you close the Nexus while he’s there, he’s out of the game.

-Tom

I’ve blasted through the first three Golems missions within the last 24 hours. This campaign has a certain effect that can make certain encounters much harder or easier depending on earlier successes. And at the moment I’m steamrolling everything. Not counting setup, the most recent mission I played only took about 45 minutes to complete.

Oh, also, since I switched chapters from Skinwalkers to Golems I also created a new party. I kept Ruby Doomsday, mothballed everybody else (wrote down and then boxed their decks), and then recruited three new Saints who are most geographically local (in their bio) to the Golem territories: Alice Moon, Sam Yee, and Bobak Zakluzny.

It’s nice having a 4-rage Saint like Bobak, but I’ve got a ton of keyword overlap between these 4, so some threats have taken a little extra luck (thanks to smaller dice pools) to defeat. But nothing has come anywhere near the danger posed to me by the Bruin threat I kept running into at the end of Skinwalkers.

Apocrypha is currently on sale for 50% off at the developer’s website: