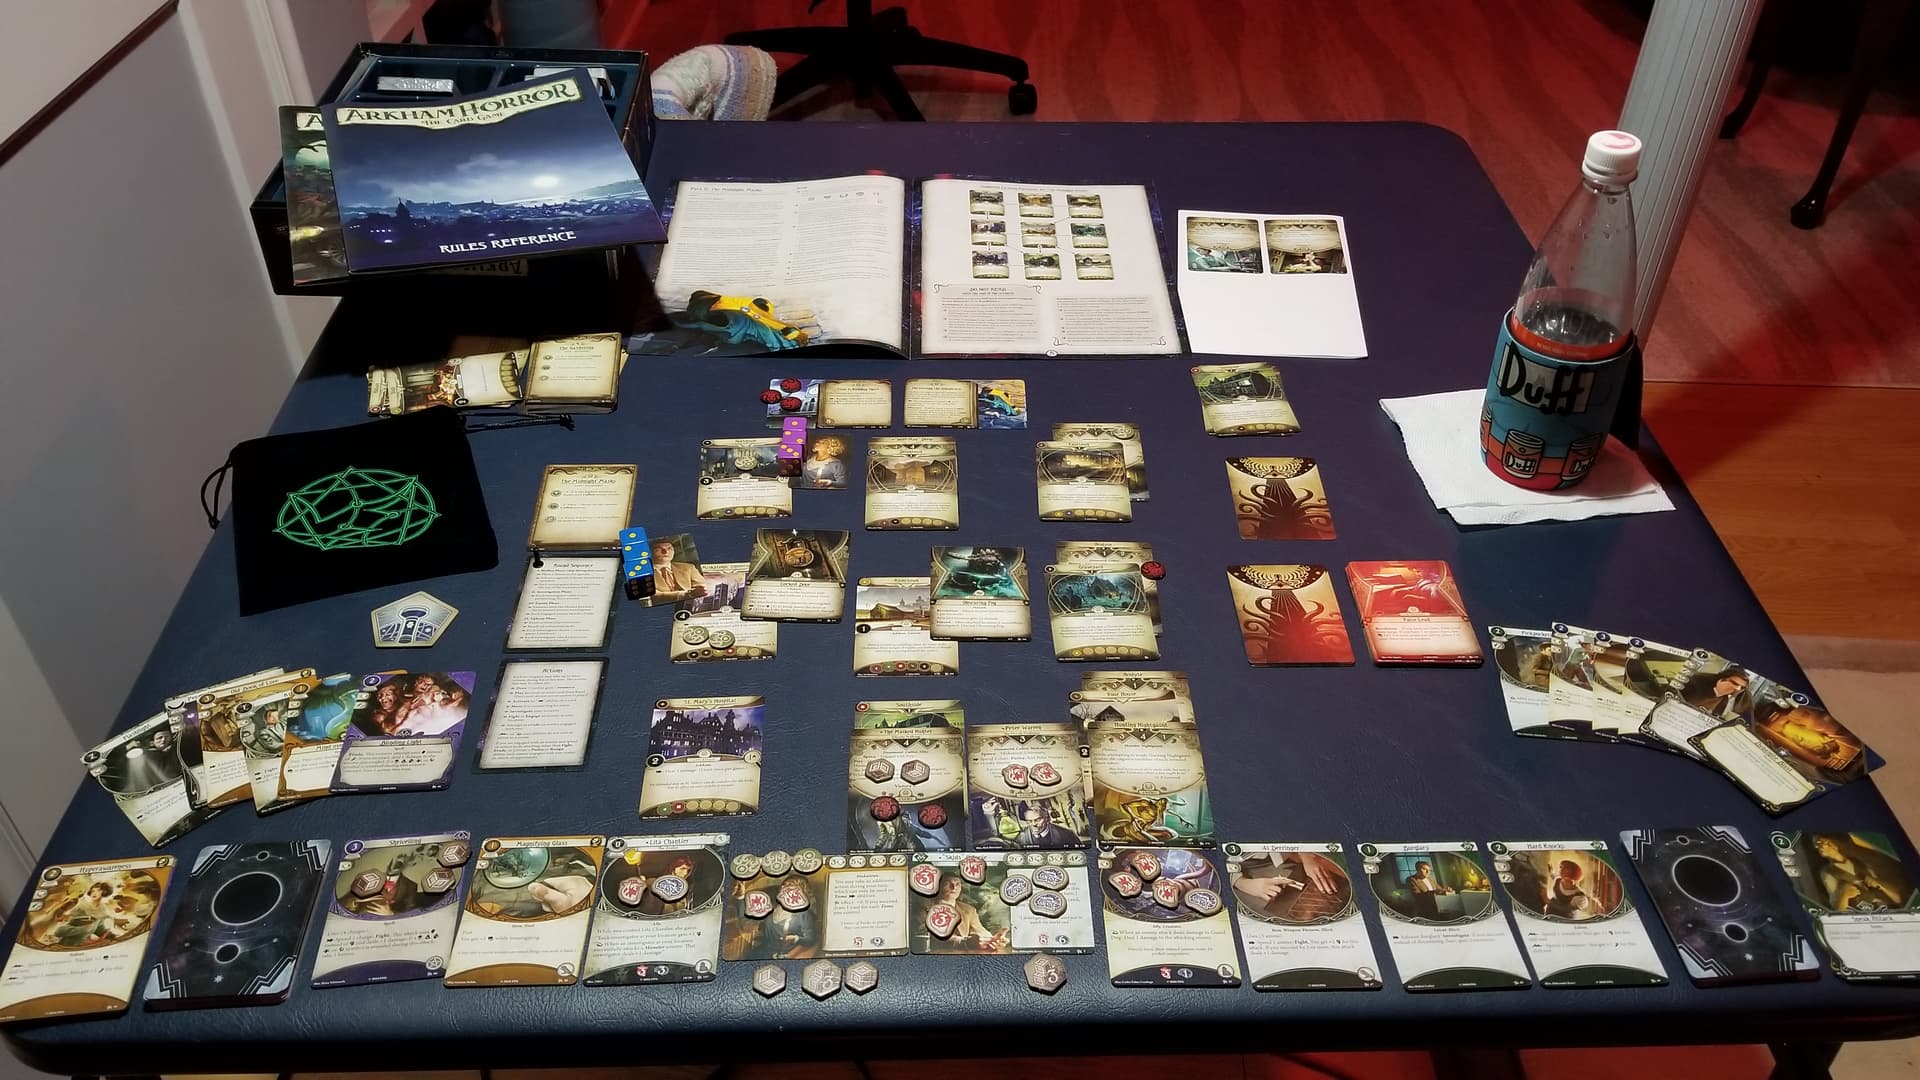
I decided to take all y’all’s advice to just keep going into The Midnight Masks. I just finished the scenario with Daisy and Skids (barely) making it out alive and three cultists in the victory display.
Late in the game I finally realized how important evading is… I know, duh, but I’d been neglecting it and kept trying to fight my way through enemy encounters. I wasted time and resources doing only partial damage to The Masked Hunter and Peter Warren before I shifted my strategy.
I hope I played the On Wings of Darkness encounter card correctly because it saved Daisy’s bacon. She was engaged with The Masked Hunter at Miskatonic U when I drew it. The nightgaunt swooped in and disengaged her and then dropped her screaming into the river outside Rivertown.
This gave Skids time to check himself out of St. Mary’s Hospital after getting patched up. He sensed Daisy was in danger so he yanked his IV and his catheter out and then moved north to go pick a fight with the Masked Hunter. With the two of them distracted, Daisy did a ‘move, move, parley’ turn to sneak back through the Miskatonic campus, head up to Northside, and convince Victoria Devereux to join us.
After that, Daisy moved south to parley with Peter Warren who was engaged with Skids then they both resigned from the game. I hope I was right that an investigator can parley with an enemy who is engaged with another investigator. Good thing we got out cuz Skids was in serious trouble as you can see.
Skids dug a grave for his Guard Dog right after I took this pic.
It was very cool to see a more elaborate scenario with a proper map to investigate. But, holy hell, my card layout needs work. I didn’t allow enough room for a threat area and assets near each investigator OR enough room around each location for cards. Next time I’ll shove everything further back on the table and spread it out more.
Great game, this! I can see why it’s so well-loved. The chaos bag is a cruel mistress.
This is a fantastic encounter to draw for investigators who are waylaid by (non-Nightgaunt) enemies and are either ill-prepared to fight/evade or whose actions are better spent on other things–seekers mainly, but anyone who just doesn’t have the right cards in hand or in play can appreciate a helping claw from our favorite blank-faced tickle monsters.
I didn’t have a chance to update after playing earlier this week, but I successfully finished my final scenario, Return to The Devourer Below:
Scenario Spoilers
There were a few interesting Return To… twists, but this scenario is still one of my least favorite in the game. It’s a punishing, kill-the-spiky-monster-with-gobs-of-health scenario if played straight, and even with my Calvin doing reliable damage I didn’t see any way that I would be able to defeat Umordhoth without dying. So Calvin and Ursula patiently gathered clues and found the monster’s den while waiting for Lita Chandler to arrive. Then, Calvin tossed her at the beast and walked away. That’ll teach her to disturb a cult!
I look forward to hearing how everyone else’s night in the woods goes! Thanks for initiating this play-along, @rrmorton!
Sure thing! I’ll share credit with Tom who turned my idea into a party. :)
Daisy and Skids are currently wandering through Arkham woods, bleeding and losing their minds. Something tells me they’re going to bump into trouble before the night is done! (That something is the title of the scenario.)
Well, Daisy and Skids never got to meet the Devourer Below. First, the Screeching Byakhee chased Skids into a quiet glade and drove him insane. Then Daisy ran back to the Main Path and either resigned or got killed, I’m not sure which. Things fell apart.
Time to start over! Hopefully I’ll do better now that I get how to Fight to do damage AND Evade to avoid taking damage during your turn. That’s the theory anyway. I’ve been playing it as one or the other.
Just finished another play-through of Part 1: The Gathering with Daisy and Roland. I was doing really well but made a mistake late in the game by advancing the agenda when I would have been better off waiting and investigating for two final clues.
I teamed up with Lita Chandler and started off thinking I would fight the Ghoul Priest because I had full health and a few weapons. But I had to nope out of that plan almost immediately when I saw his health (10!) plus his Retaliate would do two damage and two horror on every single attack. Yikes.
Glad to hear it went well! Having Lita is going to help a lot in that final mission!
Not sure if this clarification is helpful, but the Retaliate keyword in this game only deals damage on a failed attack, not on every attack action (the opposite of Marvel Champions’ rule, for instance.)
Welp, Roland and Daisy got absolutely stomped on The Midnight Masks. They made it to Rivertown, investigated to uncover the location of Victoria Devereux, then the Ghoul Priest showed up unfashionably early.
Roland had brought out Lita Chantler and his pet Guard Dog. Daisy had an Elder Sign Amulet and her Medical Texts and even a Knife should she need it. They were all geared up so they decided to try and kill the f*cker.
It didn’t work out.
It’s Roland’s first turn. He attacks three times; draws -4, tablet (-3), -4. Daisy heals him up nicely but two turns later, the guard dog is dead and everyone is bleeding and losing their damn minds because the Ghoul Priest has been joined by a Hunting Nightgaunt and The Masked Hunter.
The writing is on the wall. Time to resign.
They don’t call it Arkham Horror for nothing! I’m glad Tom prepared me with the expectation to lose whenever I play. It’s pretty discouraging to have the game be over so quickly after all the time I spent on set up. :/
Just played through The Gathering with Skids O’Toole and Wendy Adams. This time, they didn’t just resign, they got ripped apart by a horde of feral creatures. Dead. Game over. Start again.
Things started getting bad when Skids went down to the cellar and drew Frozen by Fear. Things started getting worse two turns later when he drew another Frozen by Fear. Now he would need to spend three actions to move, fight, or evade. Fortunately I had Leo de Luca for an extra action.
Even though Skids was whimpering in the basement, Wendy was confident she could hold her own thanks to her trusty baseball bat. She pulled it out to whack a ghoul and broke it on its very first use. After that, she ran around the house getting enemies to engage with her and then leading them back to the cellar so that Skids could fire his gun at them in between sobs.
Late in the game, Wendy may have had a chance to advance the act deck but she got greedy trying to find all the clues in the attic. The doom tokens piled up, the clock struck midnight, and it was all over for that hapless pair.
It was really fun though. I’d never played with Wendy before and I was so distracted learning her cards that I stupidly forgot to ever use her main skill. It would’ve come in handy. Time to try again!
Everything was going generally okay for our intrepid heroes until they got walloped in the late game with a double-dose of enemy encounters AND both investigators drawing their weakness cards all in one round. That was when the tide, you might say, turned.
On the plus side, they gathered all the clues from the cellar and attic, plus they killed the Flesh Eater. So that would have been worth three victory points if there was any victory to be had. Would that i’twere.
I think I need to stop going for every clue. Maybe hit the attic before the cellar. I also need to learn when NOT to advance the act deck. I think I timed going from Act 2 to Act 3 poorly and it cost me a whole round.
There’s so much to keep track of in this game! I thought I had done a good job staying on top of every rule and card interaction but then I realized Agnes had a flashlight and a baseball bat in play when she only has two hands, not three.
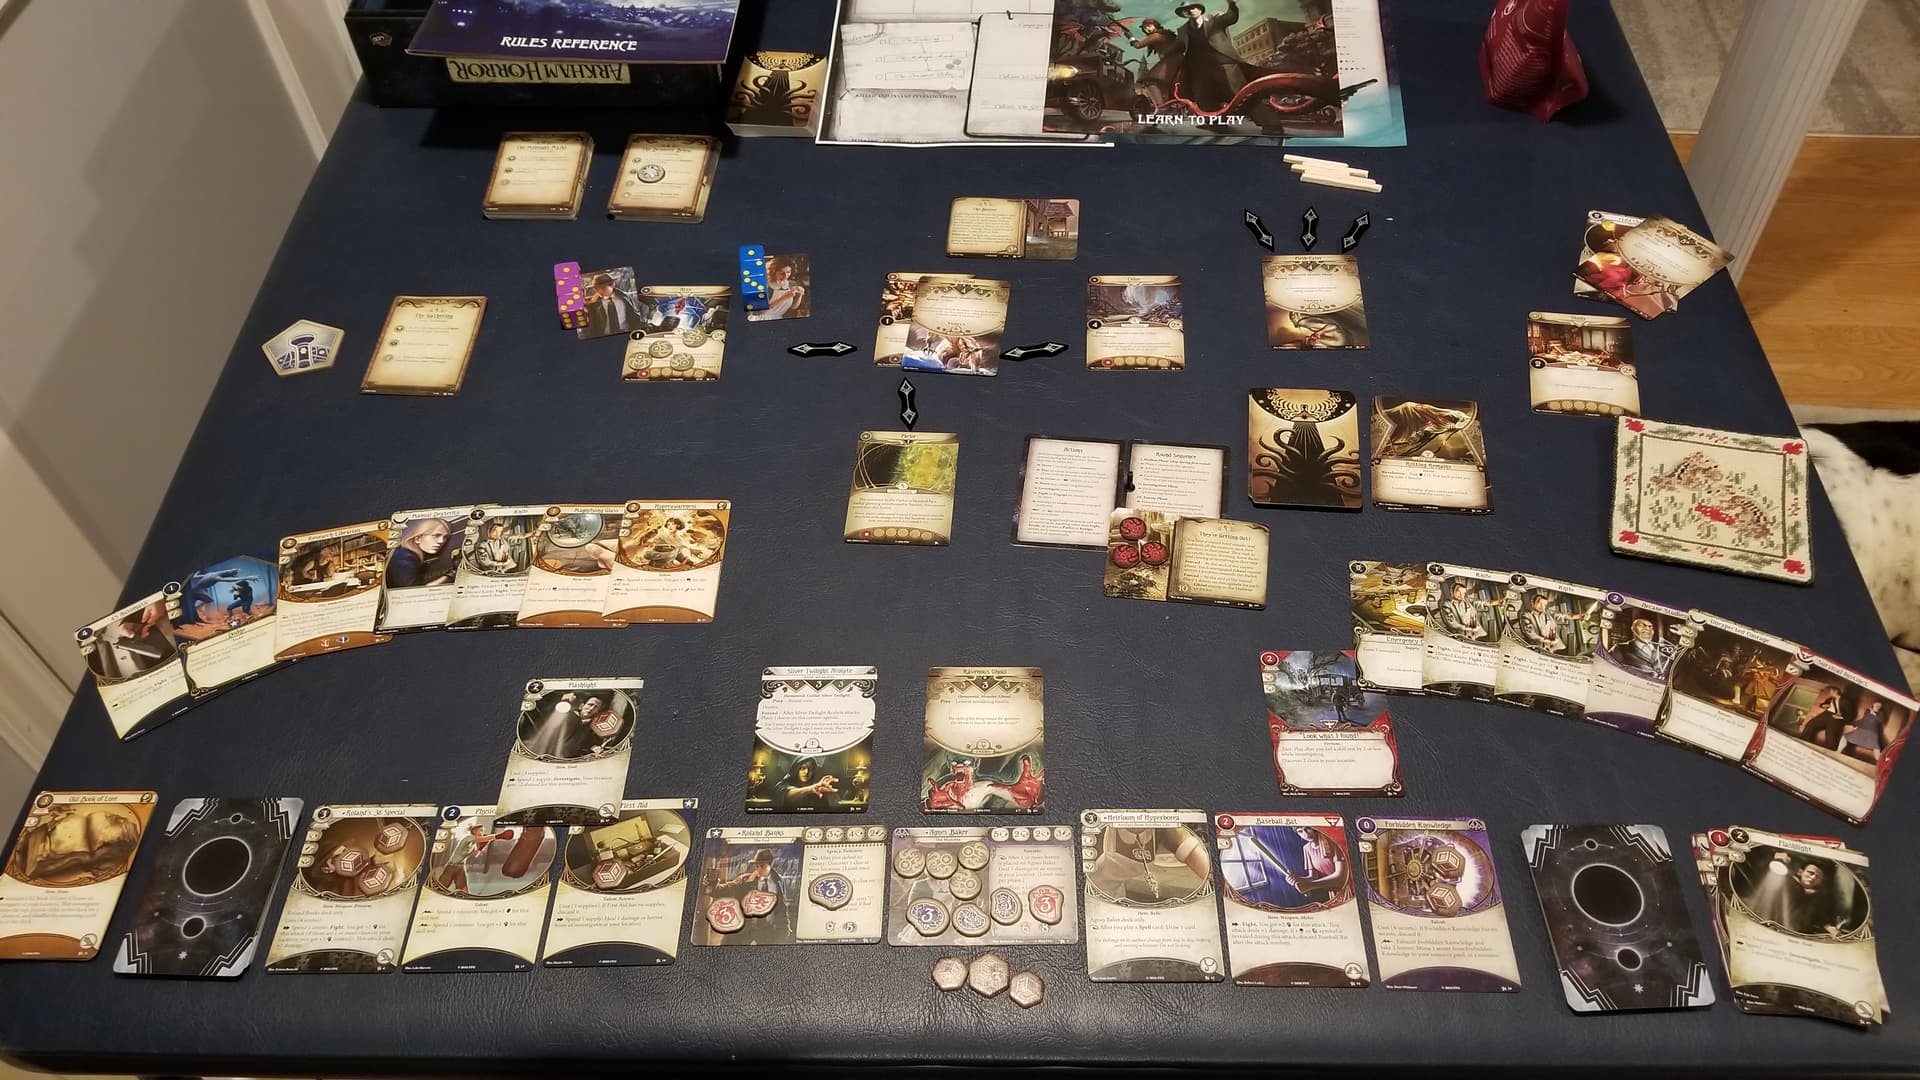
I use those dice to keep track of investigator actions. Each time they take an action, I slide the 1, 2, and 3 across their cards from left to right. Then, rather than flipping the mini cards during the upkeep phase, I just slide the three dice back to the left side of each card.
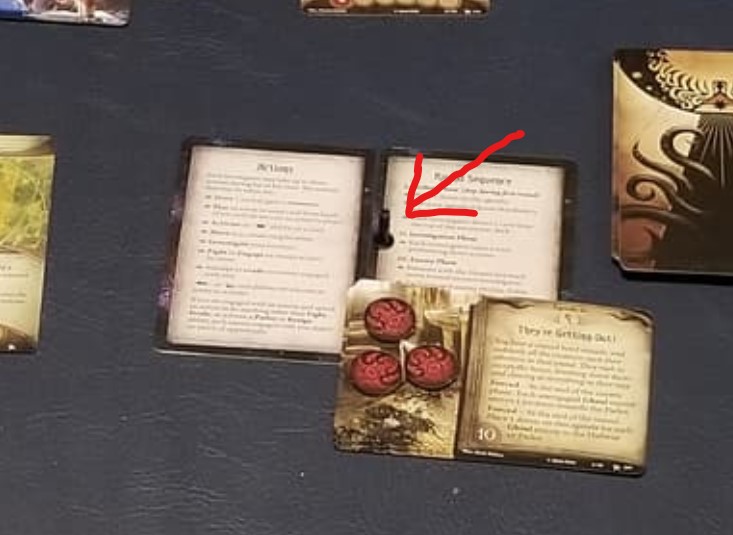
I also had to move the Actions and Round Sequence cards where I could see them. I’d been neglecting attacks of opportunity with engaged enemies so I had to put the cards right under my nose to remind me.
I use the coaster for stiff drinks.
This was my first time playing with Agnes. Very satisfying to let her take a secret (a resource) from Forbidden Knowledge so that she can take one horror and deal one damage to an enemy at her location. Handy, especially when her partner has a gun!
The interface issue that constantly trips me up is taking monsters off the map portion of the board and putting them in an investigator’s “play area” to show she’s engaged (this is an issue in various Fantasy Flight ranging from this to Marvel Champions). It’s not a problem when there’s just a ghoul or two running around, but when you’re tracking the movement and location of different monsters, and especially when you’re playing more than one investigator, pulling them off the board and situating them among a player’s cards is a surefire recipe to skip the monster’s activation.
My own interface idiosyncracy is to leave monsters out on the board and just lay them across an investigator’s minicard, basically “locking” the investigator so I don’t forget it’s bedeviling any given character.
(BTW, my friend @justaguy2 is beginning his first (?) Fantasy Flight lifestyle odyssey by diving into the Lord of the Rings card game. I’d love for him to start a thread here or even just jump into this conversation to compare notes with those of us deeper into our own odysseys.)
Okay, if I’m being perfectly honest, I’m stumped how you could actually manage to lose with such a strong team. :)
Well, allow me to explain. It’s just my patented blend of terrible strategic planning and crappy card draws. Throw in a fickle chaos token bag and now Roland is situated inside a ghoul’s tum-tum.
I’ve been splitting up my team when they should be sticking together. I’ve been rushing for clues when I should have been bringing out assets. (While the opposite strategy screwed me up during my last run through of The Midnight Masks. Gotta hustle through that one.) You name it, I can mess it up good! But I’m learning… I think.
I ran another quick one last night with Skids and Daisy at their most reckless. Skids led the way up into the attic and found some clues and then Daisy made an impulsive move down to the cellar where she got attacked on turn two by the Icy Ghoul. Skids raced down to help but in all the demonic hubbub, he shot Daisy. Two more ghoul minions came out while they were trying to deal with that icy first guy and soon it was GAME OVER.
So that was a quick, stupid run. But the times before, late in the game, I kept thinking I had a decent amount of time left before 10 doom tokens would accumulate. But all it takes is three or more ghouls on the table and that doom bucket fills up mighty fast. So that’s caught me out a few times now.
Enemy placement and engagement can trip me up too. I hope I’m playing it right but there are lots of tricky variations to think through. Hunter, Prey, Spawn, “They’re getting out!” Lately I’ve become well-versed in the rules for when an investigator gets eliminated.
I’ve been doing better since developing a system of very intentionally slowing down and carefully going through each step in a phase while scanning the table. That’s what my little, black, inverted screw is helping me do on the Round Sequence card in the picture above.
I have to ask, what do you mean by this:
Do you mean you might accidentally skip an enemy attack or enemy engagement or what? All of the above? (Just want to make sure I’m not missing something.) There are times when an enemy disengages from one investigator but immediately engages another at the same location. I’m not always confident I’m playing that right.
Maybe it’s just my eyes, but I can’t see what you’re referencing. Where on the table is the Round Sequence?
I have my own little turn-order cheatsheet, which is an integral part of how I internalizing a game’s flow. I make myself an aid that reminds me of the things I need to be reminded in as few words as possible. Here’s what I have printed on a tiny rectangle of paper when I play, which I might have already mentioned upthread:
I. MYTHOS
    1. Place 1 Doom
    2. Check Doom threshold
    3. Encounter (ply order)
        A. Peril?
        B. Revelation
        C. Spawn or discard
        D. Surge?
II. INVESTIGATION
    1. Player turns (any order)
III. ENEMY
    1. Hunters move
    2. Resolve attacks (ply order)
IV. UPKEEP
    1. Reset, ready exhausted
    2. Draw 1, resources 1
    3. Discard to hand size
(I’m not sure why it’s printing some things in blue. Thanks, Discourse!)
It reminds me of the stages of the encounter phase, which phases are player order and which are any order, and to draw a card and resource at the end of the round. I don’t even really need to look at it anymore, but it informs the mental checklist I run through, like what you’re talking about. I can look at that little square of paper after being away from Arkham Horror and pretty quickly get back into the rhythm of playing.
All of the above. I feel it’s a tactical interface error in games like this and Arkham Horror Third Edition and Marvel Champions to move enemies from the “map” into a “player area”, especially when there are perfectly good ways to represent engaged investigators without moving the monster out of the main play area. Which I believe is an artifact of this card system since it was introduced (?) with the original Warhammer game.
But I just bring it up as another example of how – like you – I sometimes have to “mod” an interface because I’m having trouble tracking the information the game expects me to track. So I just figure out a better way to do it, like with you and the attacks of opportunity.
Basically, you and I are doing post-release third-party game development. :)
I like how you write up the turn order thing for yourself. My mom calls that ‘whole-braining’ it. I’ve been happy enough with the double-sided ones included in each investigator deck. I used to keep them off to the left side but recently moved them front and center. It was the fine print about enemy attacks of opportunity at the bottom of the Actions card that I was forgetting.
I really like the process of modding to help me play in a personalized way. It gamifies the whole game! It’s almost entirely trial and error and then inventing ways not to forget stuff next time. I need the info where I need it!
Back in December, I asked if Roland, who was drunk on his favorite Irish tipple, could chuck some dynamite from the hallway into the cellar where an Icy Ghoul had appeared. We had a rules discussion about Spawns and Locations that are revealed vs. unrevealed or in play vs. not in play. I’ve been reading up on the rules and wanted to clarify how that all works.
Early in Act 1, when only the Study is in play, if you draw an enemy card that Spawns in the cellar, the cellar is not in play and therefore the enemy would be discarded.
BUT, if you had advanced to Act 2 when the Hallway, Attic, Cellar, and Parlor cards were now in play, then the enemy WOULD spawn in the cellar. This happens because the location is in play. The enemy would spawn there regardless of whether or not it had been visited and revealed by an investigator.
Be sure to get those enemies spawning in your unrevealed locations, folks! No discard for you.
So it turns out drunk-Roland could have totally thrown that dynamite down at the Icy Ghoul in the unrevealed cellar. Which is awesome! I like it when the rules allow me to do the thing that makes the narrative way better.