Yeah, I got that far twice. The first time I put on time acceleration and parked facing the ISD.
Unfortunately I think the craft rammed me, since something collided and made me go all explodey.
The second I stared at it for a bit, and when it wasn’t moving decided to try and ‘encourage’ it to move. It did not appreciate my efforts (a laser to the tail), and I went boom.
FINALLY got some time for this. I played a chunk of X-Wing when these were released and it was fun, but clunkier than I remembered. That’s probably because TIE was such a memorable game and such a nice step forward for the series.
Still only in the first battle, flying naked little Fighters and Interceptors. Rocking it on the special objectives so far because they’re easy, but I know they get harder.
Where I finally was able to get past the mission bug. 22 minutes in it started moving.
Didn’t try the next mission yet. Honestly I really like the Interceptor. Sure I know the T/A and T/D are eventually going to come in, and they thoroughly outclass what I’ve seen so far, but for now the Interceptor is king.
It got really interesting the last mission when my radar broke. I had to try and track down targets, gauging where they were by monitoring the distance between us. Not easy to do, but fortunately they were only Y-wings, and so not a serious threat.
It does make missions sometimes an exercise in trial and error. With the ships I have being eggshells it only takes a bad volley from a shuttle to end your mission. I’ve only had a few missions not end with me exploded while trying to take out the bonus craft.
The mission design in TIE Fighter is very interesting. Usually in the battles* the first 3 missions are fairly easy ‘gimme’ missions. The last 2 missions, however, are hard. Very hard.
See they have designed missions in such a way to make luck a major factor. For example in Battle 3 Mission 4 there is a frigate you need to protect while waiting for the timer to go off for reenforcements. No biggie, standard mission design. The trick is that about a minute in an enemy frigate comes in and launches fighters of their own. The problem? Frequent waves of B=wings, Y-wings, and X-wings all armed with Proton Torpedoes. They will beeline for your frigate, and launch as soon as they are in range.
To counter that you need to charge in on them as they launch, and disrupt their attack. A few shots into their shields is usually enough to get them to peel off. The trick, though, is that in order to get them before they get in range you have to fly point blank to their frigate.
This is bad news in a TIE fighter. You are an eggshell, one good pop from the frigate and your day is over. So luck becomes a major factor in the fight, since at any given moment you can get that unlucky hit. If you try and play more cautiously, and stay out of range of their frigate, they get off too many torpedoes by the third or fourth wave.
So the mission design is very unforgiving, at least so far. It took me probably a dozen tries to get past that mission. That said I like them a lot, minus the fact that the T/F and T/B suck and I’d rather fly literally any craft but them. It is that they have quite a bit of character to them. Compared to a game like Wing Commander the missions feel more alive. More variety, since you do really get the sense you are part of a large space fleet every mission. It isn’t like you are responsible for everything. If you have a bomber, and your goal is to destroy some specific craft, don’t worry about the fighters. If you try and dogfight them before taking on your actual mission goal, you risk losing. There are T/i’s in patrol, their job is to take out the fighters, and they usually do (or at least keep them busy so they don’t shoot you). Every mission I always feel like the best pilot out there, and the one who has to make sure the mission gets completed, and the killboard bears that out, but that’s probably intentional. You have other craft and wingmen out there, but the game wants you to be the star of the show. Other craft are there to do just enough to allow you to win the battle.
I know why people get nostalgic for TIE Fighter, it is a solid game.
Nice thoughts, Craig. With fragile TIEs you are definitely frequently taking crazy risks to win a mission.
I remember Wing Commander being even more tilted in the direction of “you are the heroic superpilot.” Like you said, in the Star Wars games there are more other ships performing their own roles in the battle. Sometimes that’s frustrating because your success can be dependent on them not dropping the ball.
Reading about Craig’s battle where he’s protecting the medical frigate brought back a lot of traumatic memories of X-wing for me. The big difference in this case seems to be that when Craig dies during the mission he doesn’t have to start the campaign over from the beginning like I did for X-wing every time.
I also hated the puzzle-like nature of those missions. You have to know in advance that the enemy frigate will show up in that direction, and you have to book it in that direction before they show up, so that you can take them down quickly after they show. It’s the mission design philosophy of forcing the player to play the mission over and over until they’re familiar with what will occur and are ready for it. (Which makes the decision to make the original X-wing hardcore-only and forcing you to restart the campaign when you died an even more perplexing decision).
Wow, I didn’t know X-Wing did that. I don’t mind hard, or even a mission where you have to have some foreknowledge, when you’re only having to redo a 5-10 minute mission. Restarting a campaign? Forget that!
So I actually finished Battle 3, and it is rather interesting how I had to beat mission 6. This is a mission that I had to really subvert normal procedure.
You have 3 mission critical craft, 2 of which are some squishy patrol craft. They must survive. You, however, are decidedly short staffed for the job. What is coming is really hard to deal with. The problem is you are in a gunboat, and gunboat wingmen are rather useless. First some assault transports come in, and these are not to trifle with. If you send your wingman to attack them, they die quick. Following quick is 2 a-wings, several X-wings, and some B-wings. After that are 3 transports who will make short work of the patrol craft if you don’t get them.
Problem is they stack up quick, so even a perfect mission plan has at least 1 group of craft get in range of the patrol boat before you can get them. Once in range you have about 40 seconds before it dies.
Not good.
Even if everything goes well, and you can get the assault craft dead, you will have about 5 fighters chasing you with no combat support craft. Try and deal with them, and the transports get through and kill the mission craft. Ignore the fighters, and they kill you before you get to the transports.
So eventually I had to come up with a new strategy, one that is very odd, but worked. Swap proton torpedoes for heavy rockets, use as dumb fire missiles. Supercharge shields before enemies arrive. Drop weapon power to 0, have shield on maintenance levels. That gets the gunboat to about 112 speed.
Good.
Tell my wingman to stay home. He is useless with the assault craft. Once they are dead I’ll summon him. So I beeline for where the craft come in at full throttle. I have no lasers, and they hit hard. So do a full speed flyby, dodging as best I can. Fly past, hook around from behind, and launch a rocket at point blank into the engines. 1 shot, 1 kill. Do that for both assault craft.
By now the fighters are closing in. There is a bonus craft I need to disable. Put lasers on recharge enough to use ion cannons. Disable QUICKLY, dump power again, need the speed. Call wingman to take care of the X-wings that are shooting at me. By now the Transports are about 4 distance away from the patrol boat.
So now I play the pied piper. I lead a line of fighters back towards the station. I converge ont he transports shortly before they get in range, Aim well, I’m coming in hot. Slow down and I get blasted. No time for lock on either, just come from behind and launch at about .12 distance. Probably ram the debris. Oh well. Dumb fire rockets from point blank work though, and I got to them before they could take out the patrol craft shields.
Now I fly like normal. Turn lasers back on, and target the nearest craft attacking me. The station helps now, and in short order the fighters are done.
I love how I can’t just rely on one mission style. Kamikaze rockets? Thrilling.
That said it was also slightly annoying. That was a hard mission. I don’t know how they expected that to be possible. There really needed to be more fighter cover, since a dozen tries without much progress wasn’t very fun.
But it tells a story. I had to adapt, in a big way, to the challenge presented. When I can try a new plan every 5 minutes, a loss isn’t very stinging.
Whew, just finished that mission Brian was talking about after I don’t know, couple dozen tries. And like Craig a couple of posts ago, I did it with tactics that differ from my usual. The first batch of assault gunboats are not much of a threat, so while they were attacking I set my laser and shield recharge rate to 100%, dropped the beam down to 0%, and tried to finish the dogfight with full shields and laser charge. Once the Glory arrived I tried to get one pair of missiles off at each of the first wave of T/As, then concentrated on getting every single transport. I didn’t engage with the T/As at all after those first volleys, just tried to evade them as much as I could. I think I ended up eating 6 or 8 missiles myself during the mission, which is no fun but manageable as long as they don’t come in pairs.
I also noticed that The G’nabgib says the same thing over the radio when it finishes it’s mission as it does when it leaves early, which maybe made me abort a couple of still-good attempts. This time I checked the Goals screen before aborting and was surprised to see it’s objective complete. After that it was pretty much just 6 more minutes of not exploding.
I also tweaked my controller script once I got access to the beam:
Updated GlovePIE
// Extended 360 GlovePIE Controller Script for Tie Fighter by Casey Robinson

// Loosely Based on Extended 360 GlovePIE Controller Script for FreeSpace 2 by Attic
// Maps the Xbox Controller to a specific set of Tie Fighter Keyboard and Mouse controls

/* Mapping

Left stick -- pitch, yaw
Left stick with left trigger down -- Roll, throttle

Right stick Up/Down -- throttle
Right stick left -- 0% throttle
Right stick right -- 100% throttle
Right stick button -- Match speed with target

Start -- Pause

Left Trigger -- Fire

A -- SLAM
B -- Target closest fighter/mine
X -- space key (target missle, activate tractor to end mission)
Y -- Transfer laser power to shields // Target nearest attacking me

MODES:
To cram more controls into 5 buttons, there is the ability to select modes
which change the mapping of ABXY.  To change modes, press and hold the right shoulder button
then single press the ABXY for the mode you want.  To return to the primary controls above, release
the right shoulder button.

The buttons for each mode are:
A -- Targeting
B -- Weapons
X -- Memory
Y -- Power

And the mappings in those modes are
Targeting:
A -- Nearest attacking my target
B -- Target next
X -- Target newest
Y -- Target prev

Weapons:
A -- Beam
B -- Select Weapon
X -- Transfer shield power to lasers
Y -- Firing mode

Power:
A -- Beam Power
B -- Laser power
X -- Shield power
Y -- Shield orientation

Memory:
Press and hold one of ABX to remember a target, tap the button to recall it.
Y, held down  -- Request Reload

*/

//////////////////// Always Available Controls /////////////////////////////

// LEFT STICK = Controls movement
// Note that the numeric value affects the speed of the turning, and we use a deadzone of 0.2 to prevent 'twitching'.
var.joyX = deadzone(XInput1.Joy1X, 0.25)
var.joyY = -deadzone(XInput1.Joy1Y, 0.25)
mouse.DirectInputX = mouse.DirectInputX + 25 * var.joyX
mouse.DirectInputY = mouse.DirectInputY + 25 * var.joyY

// RIGHT STICK = Controls throttle only. Push up to increase throttle, down to decrease throttle.
// Left for zero, right for full
// Press to match target
var.ThrottleDirect = XInput1.Joy2X < -0.8 or XInput1.Joy2X > 0.8
Key.Backslash = XInput1.Joy2X < -0.8
Key.Backspace = XInput1.Joy2X > 0.8
Key.Equals = XInput1.Joy2Y > 0.4 and not var.ThrottleDirect
Key.Minus = XInput1.Joy2Y < -0.4 and not var.ThrottleDirect
Key.Enter = XInput1.RightThumb

Key.Escape = Pressed(XInput1.Start) and not XInput1.LeftShoulder

// Shift + Start = Hyperjump
Key.H = XInput1.Start and HeldDown(XInput1.LeftShoulder,100ms)

// Fire Primary
mouse.LeftButton = XInput1.RightTrigger > 0.5

// Roll, cursor targeting, throttle
mouse.RightButton = XInput1.LeftTrigger > 0.5

// New Alt Mode Logic
var.ModeSelecting = (var.ModeSelecting and not Released( XInput1.RightShoulder) and not var.ModeSelected) or Pressed( XInput1.RightShoulder)
var.SelectingWeapons = (var.SelectingWeapons and not Released( XInput1.RightShoulder)) or (var.ModeSelecting and Released (XInput1.B))
var.SelectingPower = (var.SelectingPower and not Released( XInput1.RightShoulder)) or (var.ModeSelecting and Released (XInput1.Y))
var.SelectingTargeting = (var.SelectingTargeting and not Released( XInput1.RightShoulder)) or (var.ModeSelecting and Released (XInput1.A))
var.SelectingMemory = (var.SelectingMemory and not Released( XInput1.RightShoulder)) or (var.ModeSelecting and Released (XInput1.X))
var.ModeSelected = var.SelectingWeapons or var.SelectingPower or var.SelectingTargeting or var.SelectingMemory
var.Primary = TRUE and not var.ModeSelecting and not var.ModeSelected

var.Weapons = Helddown( var.SelectingWeapons, 100ms )
var.Power = Helddown( var.SelectingPower, 100ms )
var.Targeting = Helddown( var.SelectingTargeting, 100ms )
var.Memory = Helddown( var.SelectingMemory, 100ms )

//////////////////// Primary Buttons //////////////////////////

// SLAM
Key.N = XInput1.A and var.Primary

// Closest Fighter
Key.R = XInput1.B and var.Primary

//Siphon to shields
Key.Apostrophe = XInput1.Y and var.Primary

// Yes, target that missile
Key.Space = XInput1.X and var.Primary

//////////////////// WEAPONS /////////////////////////////

// Cycle Systems
Key.W = XInput1.B and var.Weapons

//Cycle Firing
Key.X = XInput1.Y and var.Weapons

// Beam
Key.B = XInput1.A and var.Weapons

// Siphon Shield Power
Key.Semicolon = XInput1.X and var.Weapons

//////////////////////POWER////////////////////////////////

//Adjust Shield power
Key.F10 = XInput1.X and var.Power

//Adjust laser power
Key.F9 = XInput1.B and var.Power

//Adjust shield orientation
Key.S = XInput1.Y and var.Power

//Beam Power
Key.F8 = XInput1.A and var.Power

////////////////////Targeting//////////////////////////////

//Next/Prev
Key.T = XInput1.B and var.Targeting
Key.Y = XInput1.Y and var.Targeting

//Newest
Key.U = XInput1.X and var.Targeting

//Nearest attacking target
Key.A = XInput1.A and var.Targeting

///////////////////Target Memory/////////////////////////////
Key.F5 = var.Memory and Released(XInput1.A) and not Released(HeldDown(XInput1.A, 400ms))
Key.Shift = var.Memory and KeepDown(Pressed(HeldDown( XInput1.A, 350ms)), 100ms)
Key.F5    = var.Memory and Pressed(HeldDown( XInput1.A, 400ms))

Key.F6 = var.Memory and Released(XInput1.B) and not Released(HeldDown(XInput1.B, 400ms))
Key.Shift = var.Memory and KeepDown(Pressed(HeldDown( XInput1.B, 350ms)), 100ms)
Key.F6 = var.Memory and Pressed(HeldDown( XInput1.B, 400ms))

Key.F7 = var.Memory and Released(XInput1.X) and not Released(HeldDown(XInput1.X, 400ms))
Key.Shift = var.Memory and KeepDown(Pressed(HeldDown( XInput1.X, 350ms)), 100ms)
Key.F7 = var.Memory and Pressed(HeldDown( XInput1.X, 400ms))

Key.Shift = var.Memory and KeepDown(Pressed(HeldDown( XInput1.Y, 350ms)), 100ms)
Key.B = var.Memory and Pressed(HeldDown( XInput1.Y, 400ms))
Not so much plowing for the last handful of missions. More slogging, with a side of Hail Mary.
I had this notion that it might be possible to make the music even better by playing with the MIDI synth somehow, so I went googling around for Dosbox imuse midi. I found a link where someone explains exactly how to do that, and even includes a video to show it off. And holy crap it’s the mission that Brian mentioned being stuck on. I’ve got to show Brian this, I thought. Scroll up to copy the url and… it is Brian! I need to try this when I get home.
I did, earlier this year. Almost weekly until we ran into one Balance of Power rebel mission that we just. Couldn’t. Beat. Sometimes these missions are too much like a puzzle.
Beyond that it’s great fun and works splendidly on GameRanger.
Thought about putting this in the nostalgia thread from 2010, but then I remembered people bump the Imperialism 2 thread every couple of months so this one makes more sense.
A few months ago, I was reminded of the existence of mission creation tools for TIE Fighter. With how much time I’ve logged in T/F over the years, I had heard of these tools but had never committed myself to actually learning them. Through an hour of research, I was able to uncover two sets of mod tools and a handful of tutorials that guided me through making a basic mission, at which point I decided I was ready to try making a few missions of my own. These experiments were largely successful, though I quickly found myself bumping up against the limits of the dated engine which are hardcoded into it. Nonetheless, I was able to craft a few standalone missions that did interesting things I hadn’t found in the base game, but this wasn’t the crowning achievement I was looking for.
While the game itself includes 13 battles, the system was actually designed with space for a maximum of 25 battles if the appropriate files were added.
I wanted to make a new battle, just for the hell of it.
In need of a plot idea, I did the only reasonable thing anyone with my limited creativity could do when confronted with a question about a space game.
With a horrendously absurd premise in hand, I went whole hog on the idea, deciding that every party involved in this operation was going to throw an inordinate amount of manpower and ordnance at a stupid Sith artifact. There’s more fanfiction-tier midi-chlorian writing in the briefing text for this battle than I ever wanted to have to think up. There is old-canon validation for the use of the word “Piggy”. This premise was still dumb, but it could be made to work in a tongue-in-cheek fashion.
In the end (reinvigorated by the release of Rogue One after stalling out for a few weeks), there were five missions designed and tested over the last couple of months. The first two are basically a warm-up, while the last two are considerably more difficult to handle. The early test versions of most of these missions were completely out of control and had to be tamped down a bit but the balance should be much better now.
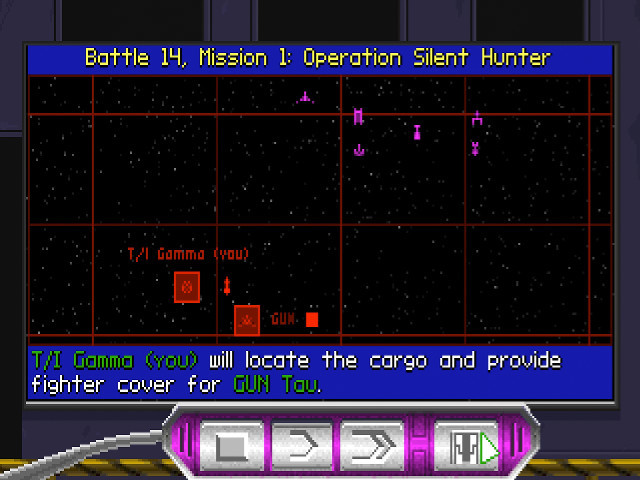
You are Maarek Stele, between Battle 6 and Battle 7. You are on an assignment to train a TIE Interceptor crew on an Outer Rim patrol ship and get entangled in something far greater than… well, anyone could have imagined.
You will fly the TIE Interceptor (1 mission), Assault Gunboat (1 mission), TIE Advanced (2 missions) and TIE Defender (1 mission). There is no Missile Boat and I didn’t feel like fudging the mission design to make more missions in unshielded fighters viable (the core game missions in unshielded fighters are all hardcoded to make it easier than it should be). There is only one escort mission and it lampshades a conventional escort mission rather heavily. Three of these missions show the absolute upper limit of what the TIE Fighter engine is capable of in terms of number of ships in the game at one time. Most of these should clock at 10 minutes or less except Mission 4, which will average around 15.
You just need to extract the archive to a GOG TIE Fighter folder (the Mission and Resource folders should merge with the equivalents in the game directory and the pilot file stays in the base directory). While these will technically work with the 1998 version, I only playtested one mission there and strongly encourage the use of the 1995 Collector’s CD version instead. These missions will NOT work with the 1994 release as it has a lower hardcoded ship cap than the other two releases.
A handful of general notes in case anyone cares to try these out.
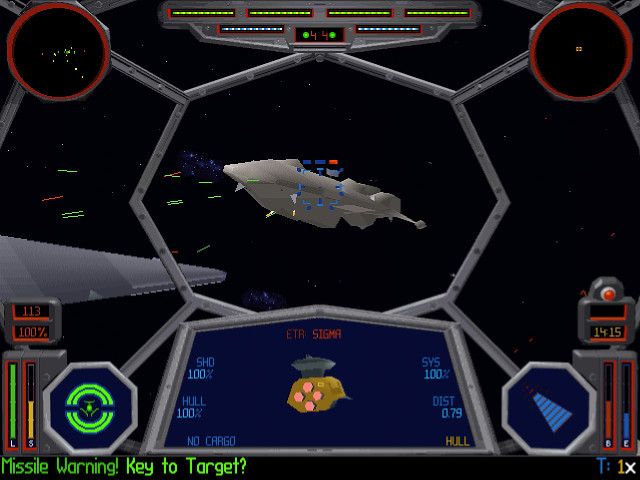
If you use the reload craft that I give you in several of these missions, it is imperative that you keep the reload craft targeted while it reloads you. There is an engine bug that will sometimes cause other craft to have their orders glitch out if you target them while you are being reloaded (the ship will return to its start point and will try to act like a reload craft as well). Keeping your reload craft targeted prevents this from happening.
Some of these missions have so many ships on screen at once that the game will try to compensate by making random polygons invisible until the screen is less populated. I structured these missions to cut back on that as much as possible, but the engine starts to choke when more than two capital ships are on screen at a time. It’s a hardcoded engine limitation that is not affected by CPU power. The base game avoids this by never putting more than a couple of capital ships in close proximity, so you simply don’t notice it happening. I think it’s worth it, personally, to make the battle around you feel bigger.
I have not implemented any difficulty level changes, so these missions are exactly the same on easy or hard. You are not penalized for calling reinforcements, though, which is my way of letting you choose your difficulty in Missions 2-4. Mission 1 is rather easy already and Mission 5 is supposed to be tough since it’s the last one (though is significantly easier in its current form than when I was testing it).
The archive includes a TOPACE13 pilot who has the base game’s missions fully unlocked but has not beaten Battle 14, which lets you play the battle from the New Battle screen right from the start.
Try not to change the warheads you’re assigned. I can’t stop you from doing so, but you are intended to perform your role while your allies perform theirs. If you’re given missiles, you’re supposed to be dogfighting, not taking out capital ships, so don’t switch to bombs and change your own assignment. Mission flow can be broken if you do so, and you’re never expected to do everything personally (I’m looking at you, Missile Boat missions).
You are expected to complete all primary AND secondary objectives to maintain plot continuity. Bonus objectives are just there for additional challenge. The final mission has no bonus objectives since there’s no nuance to it (blow up everything, no ships to capture, no reason to inspect anything, etc.)
Yes, this is all supposed to be extremely dumb. Tens of thousands of Imperials and Rebels will die over a stupid MacGuffin. These missions were really just an excuse for me to finish learning my way around the mission editing tools, not to create high art. I figure there’s nothing to lose by sharing them in case anyone is curious.
I liked the game well enough back in the day, but the existence of uber nimble TIES with decent hull, powerful shields, missiles and torpedoes kinda broke the canon established in the movies, that of quality vs quantity. We obviously know why though, being in a ship that can only take three or so hits was stressful and didn’t allow for too much mission complexity beyond basic survival (as it should be!). It could have been rectified by drastically increasing speeds to say, match ww2 fighter speeds, then hits would’ve been more of a challenge. My rose colored glasses never came with lenses for this one.
The game uses so many under the hood crutches to prop up the missions in a vanilla TIE Fighter that it’s really not fair. The order logic for squadrons in each mission expressly allows for the exclusion of the player’s ship as a valid target, which is used to limit the number of enemies targeting the player to a manageable level. Combine that with the hard limits on how many shops can be present at one time, and it becomes basically impossible to get a thematic TIE swarm going.
The reliance on shielded fighters is part of the legacy of the original X-Wing. The engine was designed around a small group of Rebel fighters going against numerically superior but individually inferior Imperials. It really does show.
yeah. Although even my above argument is really only a commentary relative to Xwing (game); you’re right in that shields that act like Trek-style bubbles were a way to even the odds in the game, whereas in the SW movies, pretty much every rebel ship disintegrates after one or two hits, just like Ties. I think in some books they talk about fighter pilot ability being the larger differentiating factor.
(Maybe Ties are actually a bigger target too? I’ve always been surprised by scale models and how much bigger Ties are than they seem onscreen in the cinema, possibly because I assumed that without the need for traditional-looking wing surfaces they’d be cutting fat, not adding it.)