The third episode of Artdink’s ongoing How-To series is now up on their official Youtube channel for those who do not mind reading localised subtitles. This video is all about resources and transporting them for some sweet, delicious profit.

According to their official Twitter profile, Artdink are already beginning work on their next patch for the A-Train: All Aboard Tourism too. Probably mainly be about fixing bugs that cropped up with the v1.1.0 update but I’ll be interested to see what else they might sneak in.
Now without further ado…
Please have your tickets ready for inspection by the conductor and prepare to board today’s train, as our railroading adventure in All Aboard Tourism continues!
Let’s Play All Aboard Tourism - There’s no scheduling quite like train scheduling…
Click to reveal...
Continuing on from where we left off, when we expanded our railway network south-west to the tourist attraction of Nagashirojo Castle. Today we will be exploring the world of trains and train operations as we discuss rolling stock, research and development, and formulating an operating schedule (timetable). Thus, concluding with the beginning of active rail services between Nagashirojo and Hasuoka, establishing our first tourist route!
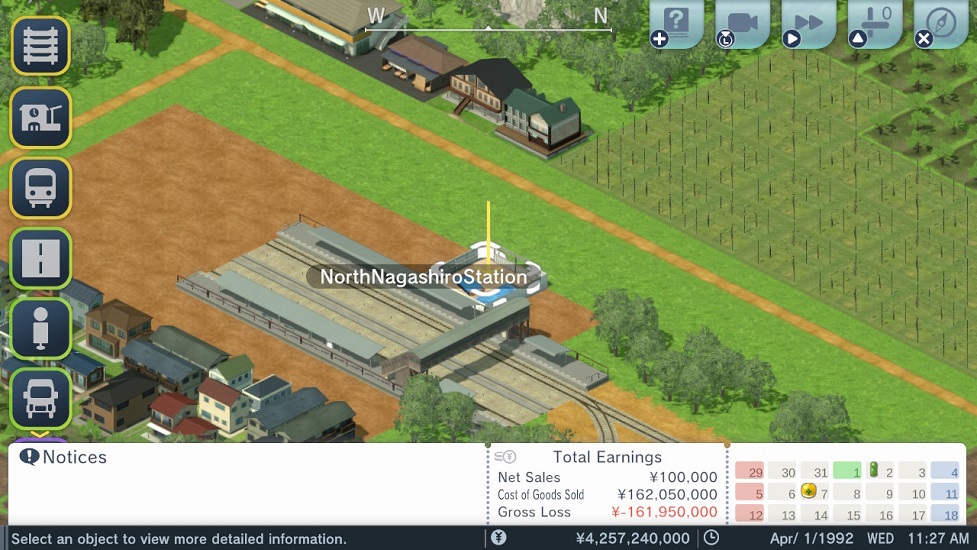
In A-Train: All Aboard Tourism construction times can be sped up by providing construction materials to construction sites. However, since we are not doing that currently our under-construction station at Nagashirojo is scheduled to be completed in six days, on April 7th. So, while we wait, let’s examine our options for rolling stock to purchase and operate on our planned service from Hasuoka to Nagashirojo.

On the purchase screen we can see the train designs (plans) we currently have available to us for purchase. Additionally, we get a summary of the year the plan was developed, the max speed rating of the train, the acceleration rating, operating costs per kilometre, fare per passenger per kilometre traveled, seated passenger capacity, max boarding capacity (112 x 150%), maximum formation size (7 cars), and the durability rating. Through research and development we can gain access to additional train plans in the future.

Before we get onto developing new train plans we’re going to go off on a related tangent first. In A-Train: All Aboard Tourism when we first begin the All Aboard Tourism scenario, as part as the first introductory tutorial to the game, ordinarily we begin with access to the Suburban Train 2 and Electric Locomotive 2 plans. However, because I developed the Suburban Train 1 plan when I initially played this scenario as part of the tutorial I have gained access to this plan from the beginning in my Normal difficulty playthrough. This is a function of the Bonus Plans parameter, which when set to Very Few gives the player access to a randomly selected handful of previously developed plans.
This parameter is set by the scenario creator and can on other settings either disable bonus plans all together or give the player access to their full arsenal of previously developed plans. It’s almost like someone went and stuck some Rogue-lite meta-progression in my train game!

Research and development of new vehicle plans – whether for train, bus or truck – can be conducted on the Plan menu. Vehicle plans developed in other saves can be acquired through the Technology Licensing option, handy for when you desire access to a specific previously developed plan. However, all licensed and bonus plans must be applicable to the scenario’s time frame, since the game will not grant access to either obsolescent or futuristic vehicle plans.
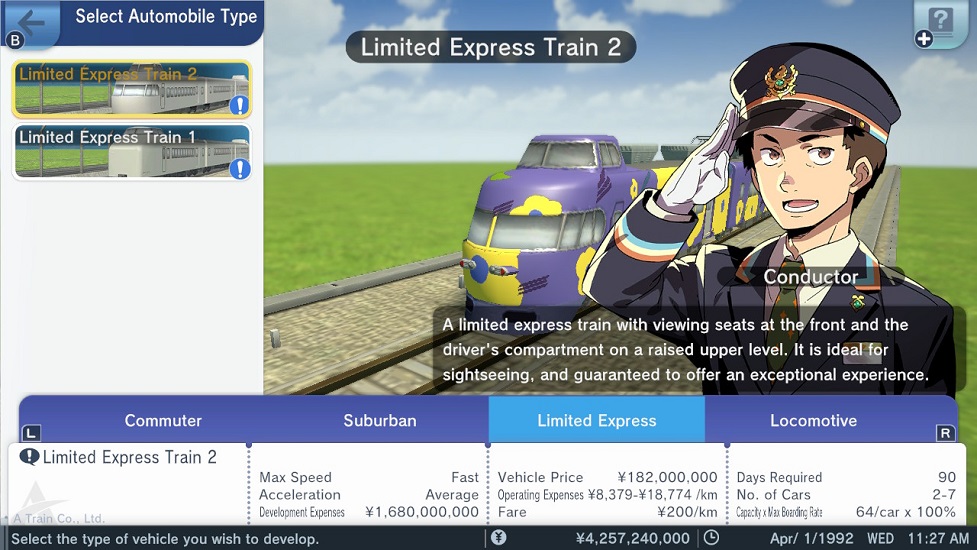
Progressing onward with vehicle development (i.e., train development) lets us select the automobile type we wish to develop. For trains we have the ability to develop Commuter, Suburban and Limited Express category EMUs *(Electric Multiple Unit) plus traditional single unit steam, diesel or electric locomotives. Each automobile category has their own strengths and weaknesses, thus it’s important to determine which potential plan is most suitable to the tasks that will be required of it.
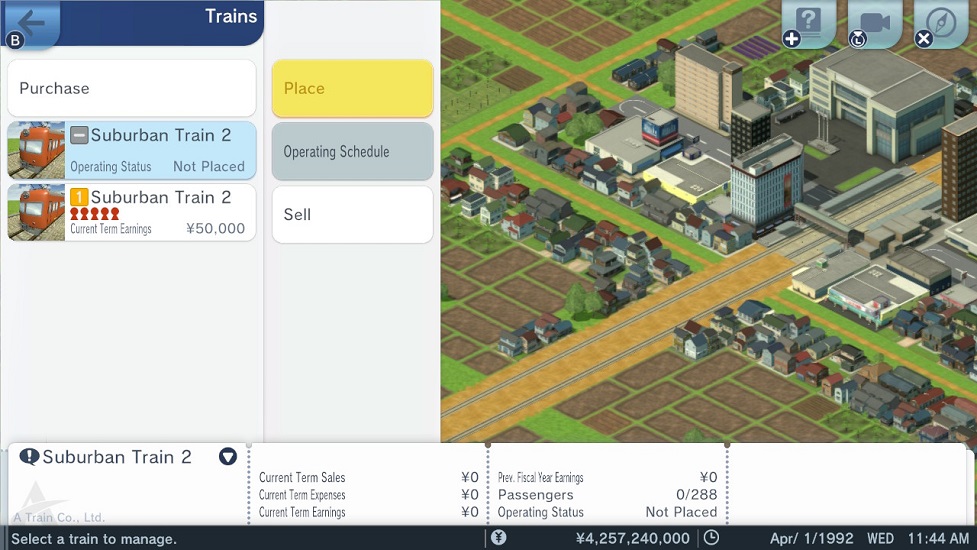
Since vehicle plans can take several weeks to develop and incur significant capital costs for a business of our current financial standing, let’s make use of the vehicle plans we currently have available to us. Therefore, we will move on to placing the 3-car, Suburban 2 type train that is currently located in storage. No sense letting a usable train go to waste when it could be helping us to turn a profit.
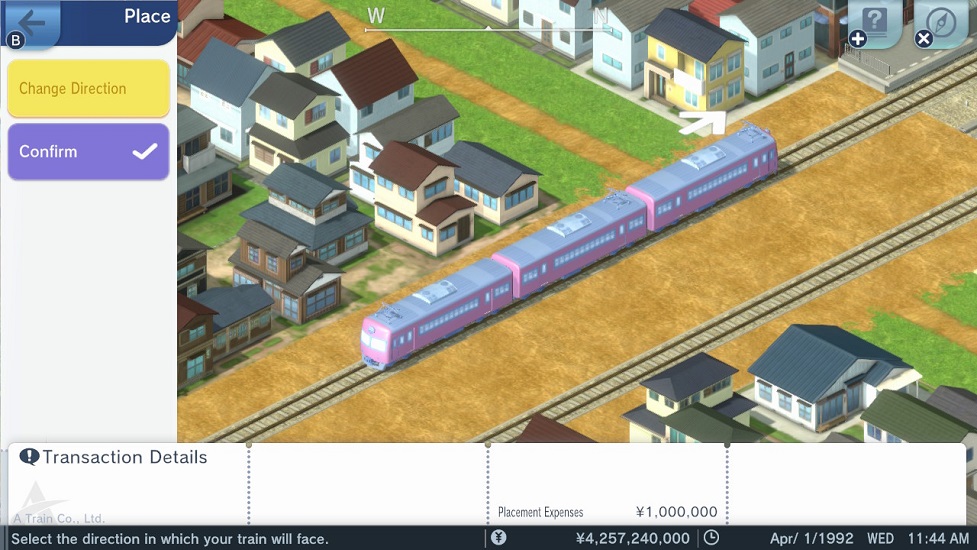
Placing a train is relatively straight forward task to do. Just select where on an available free piece of track you want to place the train and then make sure the arrow above it is pointing in the intended direction of travel before confirming.
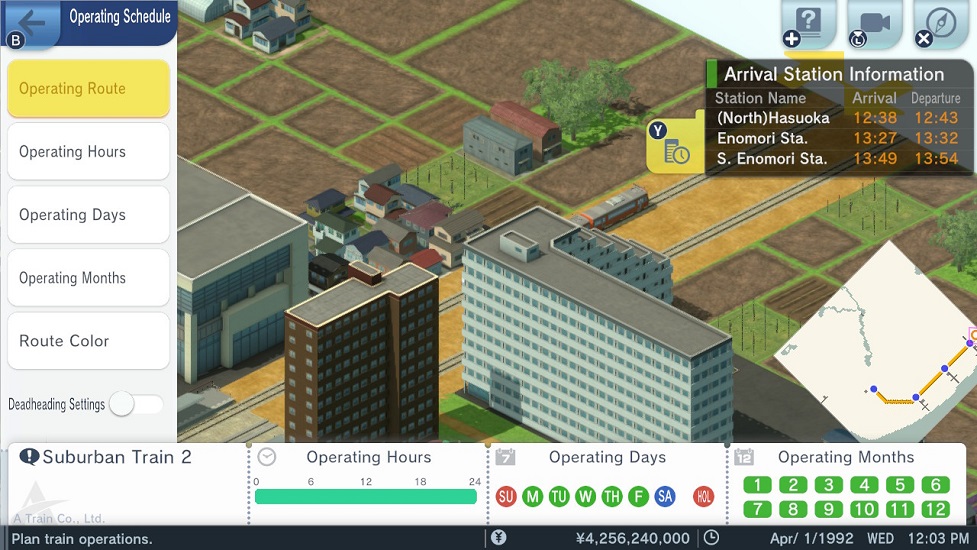
Next, we will open up the operating schedule for the train and begin configuring it for smooth operation in conjunction with the rest of our operational fleet. Depending on whether we have any advanced settings enabled in the game we may just have the operating route and operating hours options available. Operating days, operating months, route colour and deadhead settings are useful but non-critical settings which can help us further fine tune and construct complex, elaborate service timetables. We might experiment with those options some other time but for now they aren’t important to what we are seeking to achieve.
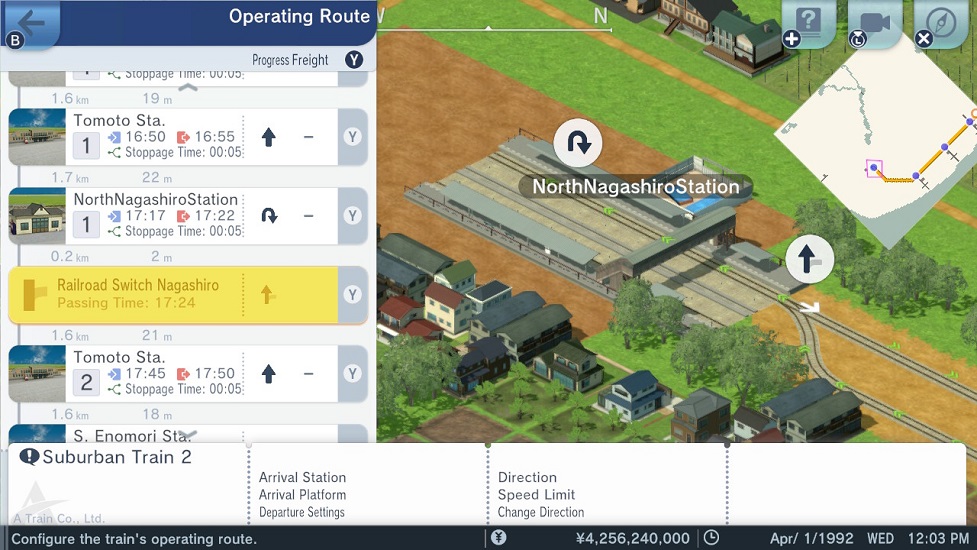
Progressing onto the Operating Route menu we get a visual indicator both on screen and the mini-map of the route our train is currently set to travel. Using the route list on the left-hand side, or the symbols above points of interest such as stations and track points, we can modify the intended path of travel for our train. Since we are currently operating a fairly basic two track system we just need to ensure our points near Nagashirojo Station are set correctly so that our trains are always running on the left-hand side. Additionally, since our railway tracks and services current terminate at Nagashirojo Station we might as well instruct our train to change direction of travel. After all, why have it waste precious seconds attempting to vainly forge on ahead before realising it needs to travel back the other way.

Now we will begin to evaluate and configure the operational orders of our train at the stations along its route. Depending on if we have any advanced settings available we may have just the Departure Settings tab available, or we may also see tabs for Direction and Speed Limit settings. Stoppage time is a straight forward setting to use, it controls how long a vehicle (i.e., train) will wait at the station before departing. Typically, five minutes is sufficient time to let passengers embark and disembark but there may be situations where you want to employ longer stoppages, such as when loading and unloading freight trains.
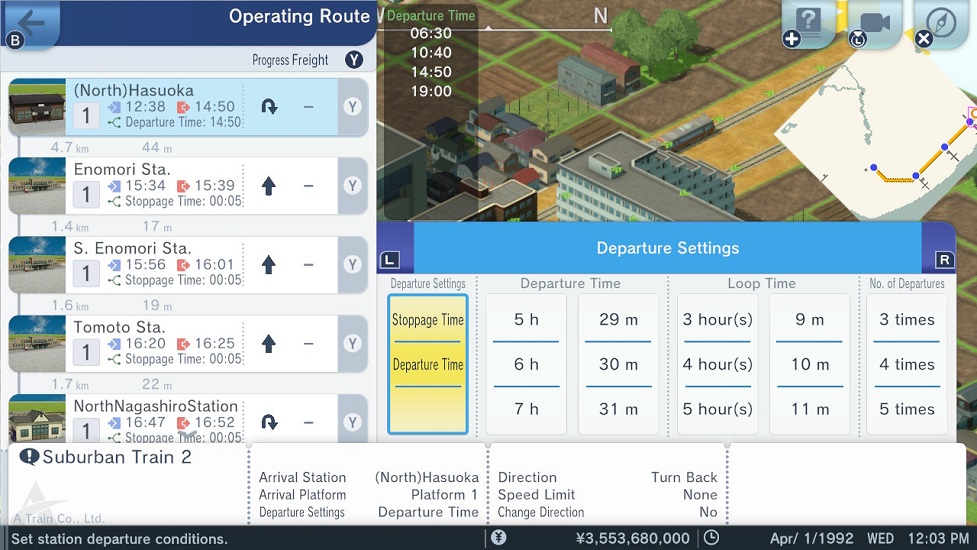
The departure time setting can be a little more complicated to wrap your head around initially but is a very useful tool when it comes to setting up timely, efficient and well-spaced transport services. Firstly, we set what time (24 hour clock) we desire our train to depart during the day. Next we calculate how long it takes our train to complete one loop from Hasuoka to Nagashirojo and back again using the travel times in the route list. From this we can calculate that one loop requires four hours and 2 minutes to complete, therefore to provide sufficient time to load and unload passengers at Hasuoka we will set the loop time to four hours and ten minutes. Then finally can set how many departures we want our train to make throughout the day, setting this to four we get a departure schedule from Hasuoka of 6:30am, 10:40am, 2:50pm and 07:00pm.
By applying the same style of scheduling to our other trains and altering the departure time setting at Hasuoka we can create a consistent, well spaced timetable for our Hasuoka-Nagashirojo train service. Depending on customer demand, we could configure our trains to have anywhere between a few minutes interval between them up to a couple of hours. For now we’ll organise our first service to depart at six in the morning and then have additional trains depart in 30-minute intervals after it.

Since we can expect passenger demand to grow rapidly with the opening of a direct route from Hasuoka to Nagashirojo we’ll buy two more Suburban 2 type EMUs, with a formation length of 3-cars, right away. As you may notice from the picture above, buying in bulk nets us a two-percent discount on the total price we must pay. This discount for buying in bulk goes up by an additional 2% for each additional train we decide to buy. Thus, it can be good business to order multiple new trains all at once, if we know that we’ll be making good use of them soon.
Following the lead of our original two trains we’ll setup similar operatiing routes for them, modifying the scheduled departure time at Hasuoka to be 30 minutes later for each new train joining active service on the route. Consequently, giving us a consistent train service from Hasuoka for Nagashirojo that first departs at 6:00am, 6:30am, 7:00am and 7:30am before arriving back and preparing for another round trip four hours and ten minutes later. With each train on the service making a total of four round trips from Hasuoka throughout the day.
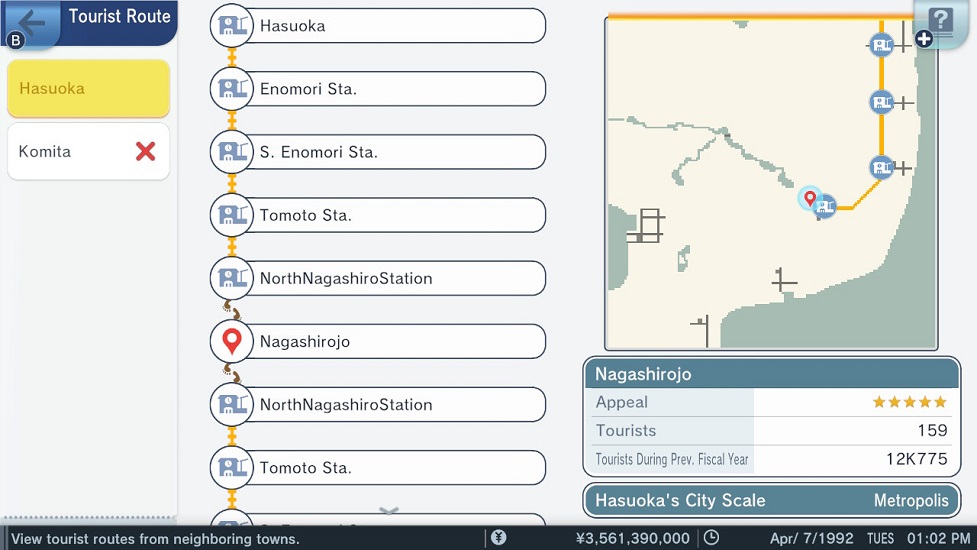
With an active train service now running between Hasuoka and Nagashirojo all we need to do now is wait for construction of Nagashirojo Station to finish up. Upon completion of the station we receive notification that a tourist route with Hasuoka has now been opened, which we can confirm by looking at the Tourist Route screen. The expected influx of tourists from Hasuoka to Nagashirojo Castle should boost the ridership on our trains very nicely and help us progress towards turning a profit.
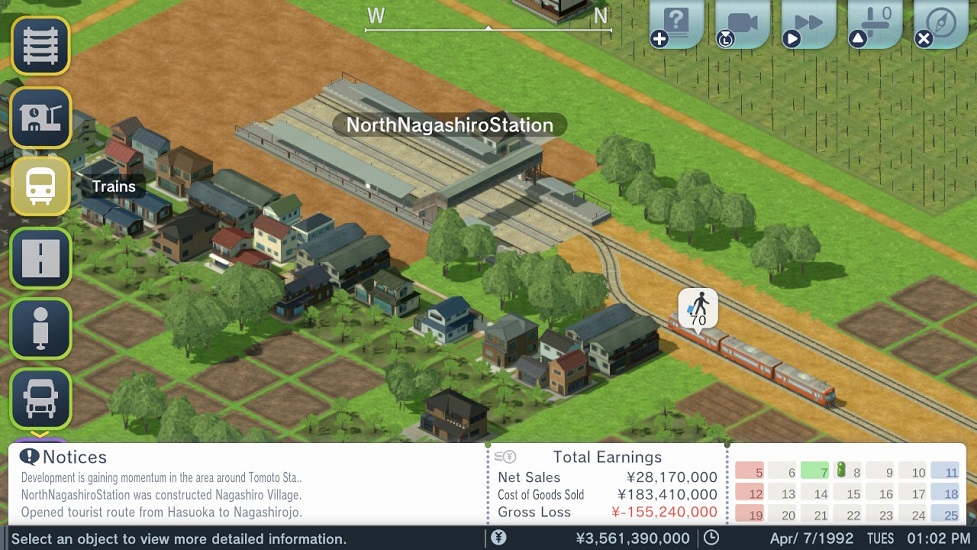
Something we can actually visually confirm in real-time as we beginning getting indicators that tourists from Hasuoka are traveling to and from Nagashirojo Castle using our growing mass transit system.
With our tourist route between Hasuoka and Nagashirojo castle established and tourists starting to trickle in using our active train services, that concludes this third entry of Let’s Play All Aboard Tourism. I hope you will join me for part four when we examine city growth and development, expanding and modifying our rolling stock to cope with the continual rise in ridership, and investigate establishing some subsidiaries near Nagashirojo Station. Until the next time we travel together, have a safe journey aboard the A-Train!