The Battle of el Arīsh (معركة العريش), January 19, 1805
Part Two- The First Day’s Action
Turkish (@Panzeh)
Key Leader and Commander Pechlivan Khan 3.4.3 B
I Janissary Corps with 14 Infantry and 2 Cavalry, all have 3.0 Morale
Imperial Cavalry Corps with 1 Cavalry, has a 3 morale
Syrian Corps with 5 Infantry and 6 Cavalry, Infantry has 1 Morale and the Cavalry has 2 Morale.
28 Factors, 9 are Cavalry, at 2.4 Morale
Egyptian (@Mark_Weston)
Corps Leader, Tahir Pasha, 1.1.1
I Egypt Corps with 15 Infantry and 5 Cavalry, Infantry has 1 Morale and Cavalry has 3 Morale
20 Factors, 5 are Cavalry, at 1.5 Morale
Leadership, Terrain, Environment, Operational Factors
Desert: +1 to Morale Level on Combat Table for both sides, -1 to Final Pursuit Level
Leadership: Attacker has +1 to Combat Rolls, Defender has -1 to Combat Rolls
Chits: Attacker Chooses Echelon, Defender Chooses Defend
Attacker Chits (Here, Echelon) are Compared against Defender Chits (Here, Defend) on this chart, with these notes.
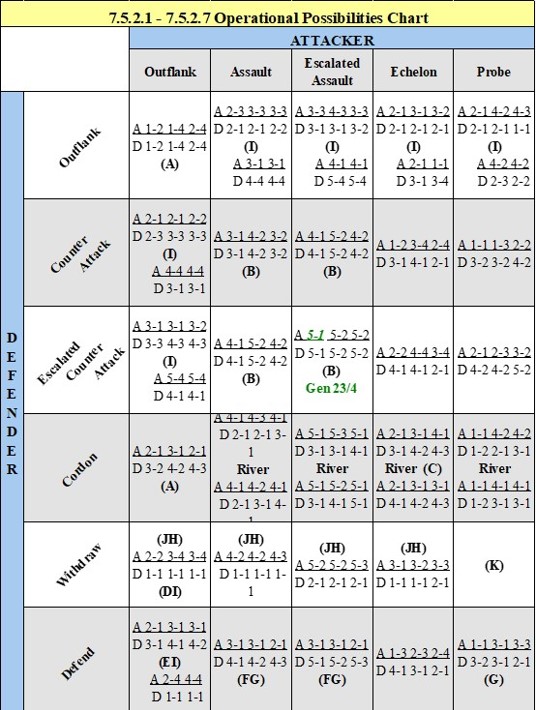
Cross-Referencing them results in Three Rounds of Combat (potentially) on this Resulting Table. Each Set of numbers for each side (A for Attacker and D for Defender) is are the columns on which each side rolls for each round. Each round is conducted simultaneously (both sides always get a roll for each round the combat lasts on a day).
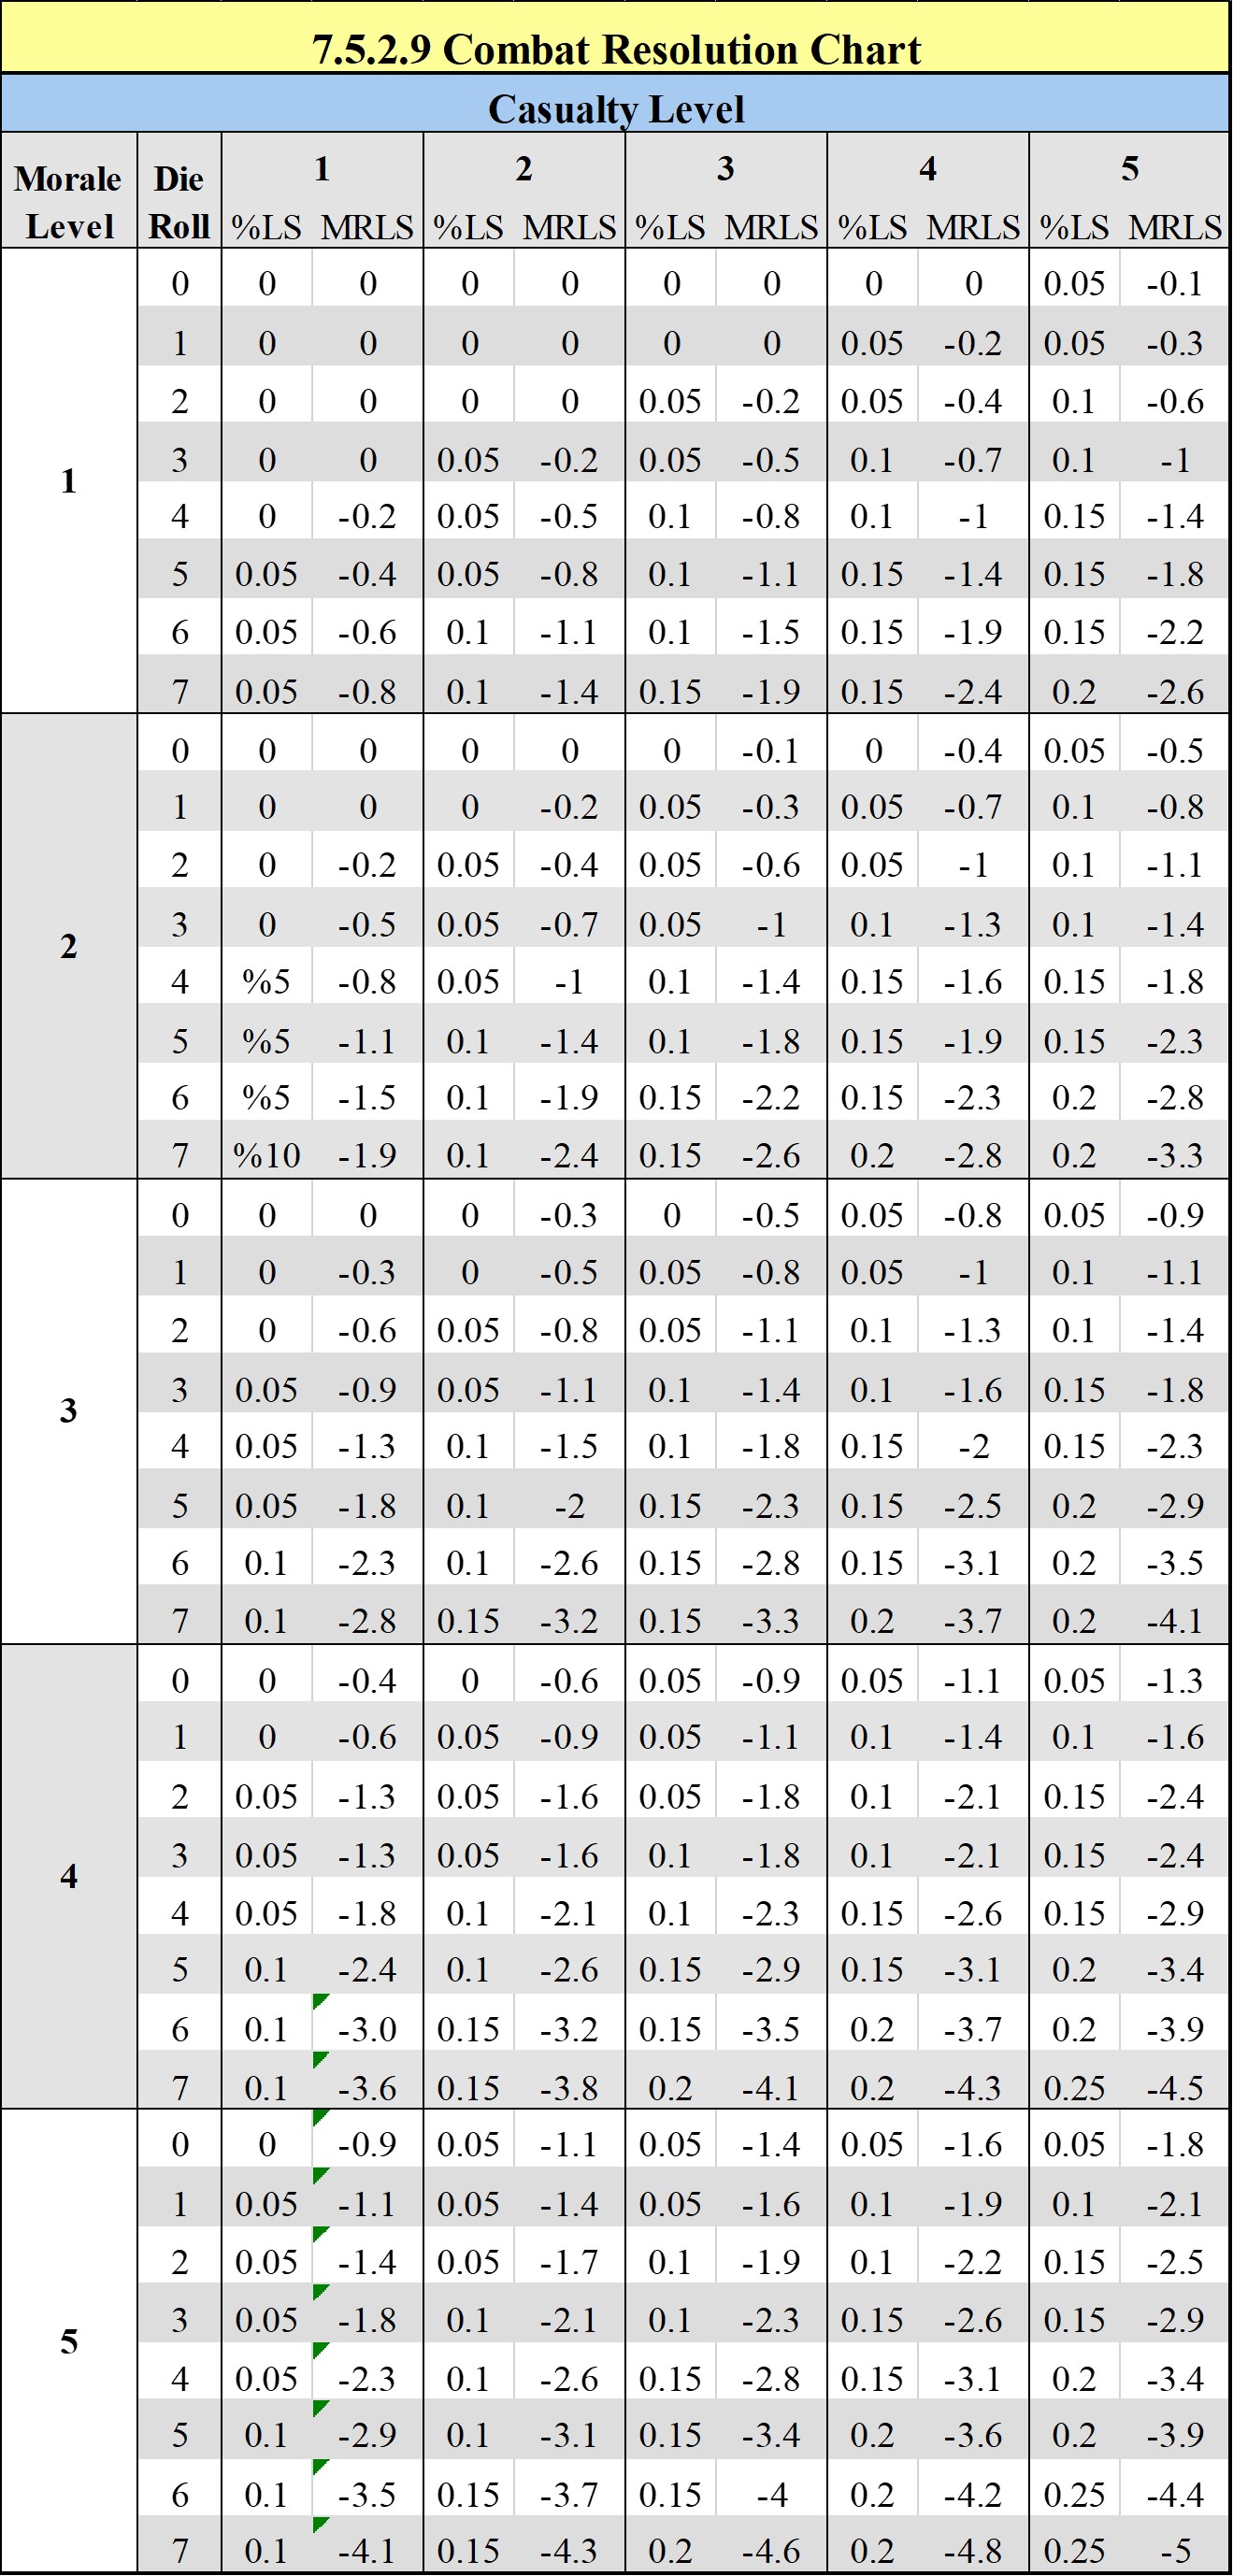
The First Number is the Casualty Level and Second the Morale Level, as indicated on the below Chart. Note that because we are in the Desert, the Morale table is increased for both sides by one (the Desert is a punishing place to fight). So we really have:
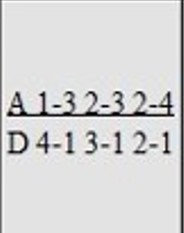
A: 1-4, 2-4, 2-5
D: 4-2, 3-2, 2-2
The Attacker (The Turks) has +1 to each round’s roll, and the Defender (The Egyptians) has -1 to each round’s roll due to the Comparison of Commander Tactical Ratings (The Second Leader Number above, 4 and 1, respectively to each side) on this Chart here:
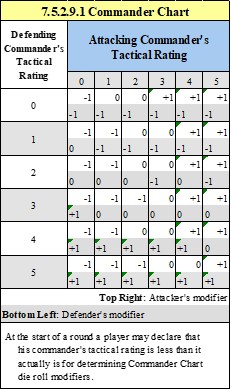
If the Turks had one more Cavalry Factor, they’d get another +1 due to Cavalry Superiority of at least 2-1. They do not, however.
So Now:
Day 1
Round One:
The Turks roll a net 3 and the Egyptians roll a net 1.
On the 1-4 and 4-2 Tables, respectively.
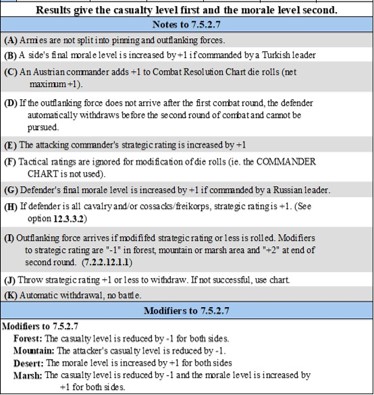
We look at the below chart:
Round One Results:
A-Inflicts 0.05 (5%) Casualties (on the below table) and inflicts -1.3 Morale.
D-Inflicts 0.05 (5%) Casualties (on the below table) and inflicts -.7 Morale.
Casualties inflicted are a percentage of that side’s overall numbers at that point.
The Turks inflict 2 Casualties and -1.3 Morale on the Egyptians.
The Egyptians inflict 1 Casualty and -.7 Morale on the Turks.
The Turks have 27 Strength and 1.7 Morale after Round One.
The Egyptians have 18 Strength and a shaky .2 Morale after Round One.
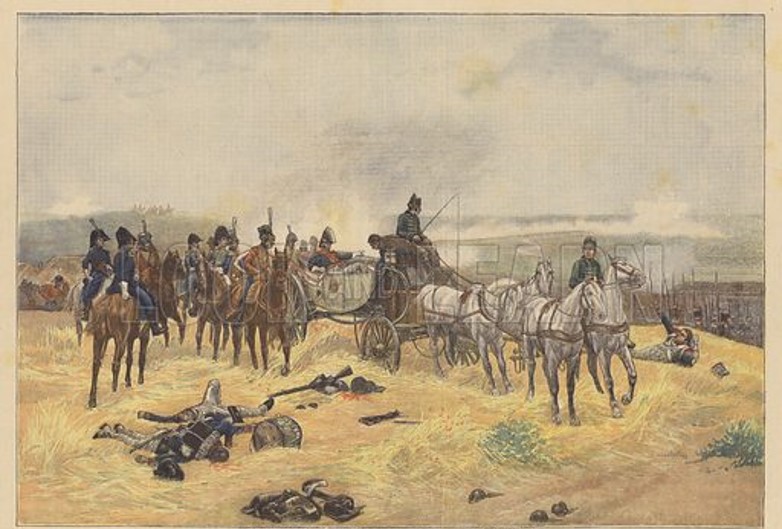
It was all but over, as the better Trained and Disciplined Ottoman Troops kept up a steady persistent fire against the Egyptian weak points, as the Syrians started to envelop the flanks of the Egyptian line. The Bashi-Bazouks began to waver, but Tahir Pasha kept his men in the action as Noon approached…
Day 1
Round Two:
Again, the Turks roll a net 3 and the Egyptians roll a net 1.
On the 2-4 and 3-2 Tables, respectively.
The Turks inflict 2 Casualties and -1.6 Morale on the Egyptians, who break, so one of those losses must be Cavalry.
The Egyptians inflict 1 Casualty and -.3 Morale on the Turks.
Now for Pursuit. The Combat went two rounds, and the Attacker lost 1.0 Morale. So we have a Pursuit Class of 4 on the below chart, shifted to 3 because of the Desert.
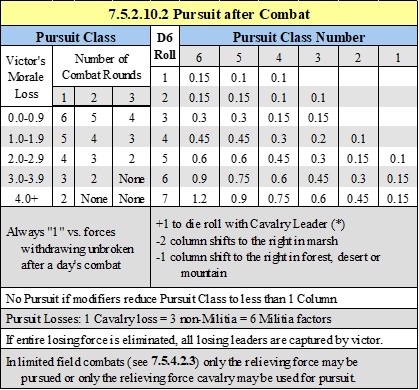
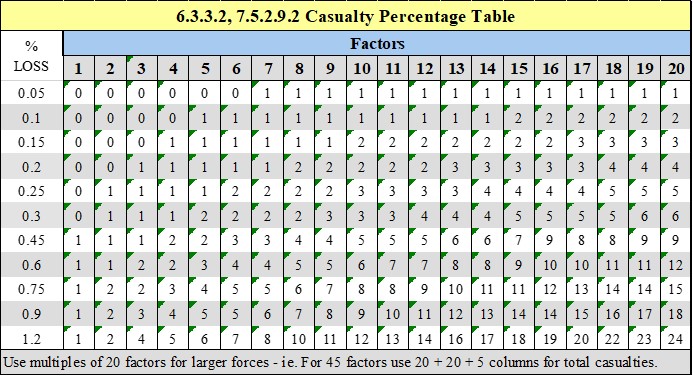
They do .15 of their 9 Cavalry on the Defending Cavalry on the Casualty Chart, which is 1 Cavalry. The Egyptians got lucky. If the turks had broken them earlier, or the Turks had lost less morale or gotten luckier in the pursuit, once the Cavalry is eliminated, other units (Infantry, Guard) lose at a 3-1 ratio. 6-1 if Militia.
Final Result:
The Turks take 2 losses and win the day. Please note your losses on your information sheet and notify me where they are taken privately.
The Egyptians take 5 losses, 2 of which are Cavalry, lose the day and must Retreat. Spanish Adviser (@Mark_Weston) please tell us here where they shall retreat to. Please also note your losses on your information sheet and notify me where they are taken privately.
+1 PP for Turkey, -1 PP for Spain.
7.5.2.10.1.3 Political Points For Winning/Losing Field Combats: The victor now gains political points and the loser loses them, recorded on the POLITICAL STATUS DISPLAY on the Status Card). Half a political point is gained or lost for each corps of the defeated side (rounding fractions up) used during any round of that combat (this includes corps in outflanking forces that never arrive, but not reinforcing corps that do not arrive) up to a maximum of +3 political points. For this purpose a single corps which begins or reinforces a battle with more than 20 factors in it is treated as 2 corps.
7.5.2.10.1.3.1: If the victor was commanded by the NAPOLEON leader, they get one extra political point.
7.5.2.10.1.3.2: If the loser was commanded by the NAPOLEON leader, they lose two extra political points.
Tahir Pasha, defeated but in good order, fell back towards Cairo. Inauspiciously, Muhammad Ali deserted his cause, and made haste to Damietta, where the Vizier now had his headquarters.
Pehlivan İbrahim Ağa (Pechlivan Khan) led the advance, and planned his next move, unscathed after the battle. cries of “Pasha! Pasha!” were heard after the battle from the troops, presaging his promotion to Mîr-i livâ, and attaining the title of Pasha 2 days after the Battle.
[ 12.7 ] LEADER CASUALTIES: After the completion of a field or limited field combat, a trivial combat, or a naval combat, each side with a leader or leaders present checks to see if any became casualties in the combat by rolling two dice. Rolling a 12 indicates a leader casualty. If a casualty is indicated, randomly choose a leader counter from among those present (if more than one is present) and roll one die for the chosen leader. If a 6 is rolled, the leader casualty is "killed" and taken permanently from the game. On any other roll, the leader casualty is "wounded" and taken from the map for a number of complete months equal to the die roll number.
12.7.1 KEY LEADER SURVIVAL: Each player will choose one “key leader”, who cannot be killed. If that “key leader” rolls a 12 then a 6, during the above process in rule 12.7, instead of killing the “key leader” change the result to a 12 month injury.
12.7.1.1 CHOOSING THE “KEY LEADER”: At the start of the game, each player will choose one leader who cannot be killed. For some countries, their key best leader enters as a reinforcement, ie. Blucher or Wellington. If the leader enters as a reinforcement, the player may instead choose another leader (if he possesses one) from the start until the time that the leader arrives. When the chosen leader arrives as a reinforcement, the secondary choice returns to being a normal leader. Similarly, if using the optional rule that removes Kutusov, and Kutusov is chosen as the Key leader, Russia may choose another leader as the “Key Leader” when Kutusov is removed.
Pechlivan Khan is Turkey’s Key Leader, however this is mooted as a 6 on 2d6 was rolled and the battle ends with him unscathed.
Turkey (@Panzeh), please send me your land file, as the retreat location is immaterial to the French (@Juan_Raigada) turn, and I will qc and send to him forthwith. Allies (@Matt_W, @Cuthbert) you are after France.
General Exposition