Modding the GH Xplorer guitar

The Guitar Hero Xplorer guitar gets no respect. It’s widely considered one of the worst guitars for the game, which is unfortunate, as it was the pack-in guitar for the very popular Xbox 360 version of GH2. It’s still available as a wired bundle guitar for GH3, and as the pack-in for the PC and Mac versions of GH3. It’s not going away any time soon, as much as we wish it would.

So… given that I got another unwanted Xplorer with my purchase of the PC version of GH3, I wondered… can I make it suck less?

There are three common-ish Xplorer mods that I tried:

1. Add cardboard behind the fret buttons so they respond quicker.

2. Put a bit of rubber behind the strum to make it a bit quieter. This also helps a bit with debouncing.
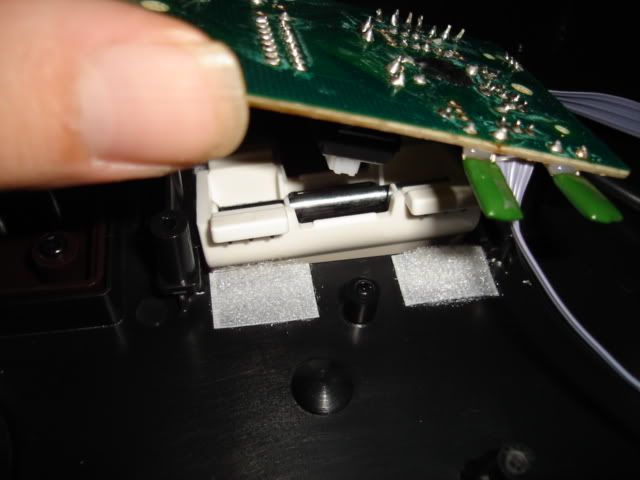
(it is possible to de-clickify the strum buttons inside the guitar, if you want it even quieter, but it’s fiddly)

3. replace the stiff whammy spring with a rubber band.


(a spring is shown here, but you get the idea. Imagine a rubber band there instead.)

All three of these are pretty easy to do-- all you need is a small torx wrench. I found it all fairly self explanatory once I opened the Xplorer up. Nothing complicated in these guitars. I also used a bit of silicone lube spray around the strum pivots.

Results?

The whammy bar is stupidly stiff on the stock Xplorer. Doing something about that gets it much closer to the nice, smooth response of the SGs (and pretty much every other good plastic guitar).

The fret button cardboard mod is surprisingly effective, much more so than I would have predicted. I used a fairly thick cardboard stock behind my buttons, so maybe that’s why. It’s still not as nice as the ultra-flat low profile Les Paul buttons (by far my favorite feature of that guitar), but the buttons respond noticeably better this way, and they’re more friendly to sliding. I’d say this is the most effective of the three mods in terms of impact on actual playing.

I initially used velcro on the strum mod, but I found that was WAYYY too thick and screwed up my playing. I replaced it with thin adhesive rubber strips, and that worked better. It’s a fairly subtle tweak, compared to the other two, but it does make the strum feel a bit smoother and generate less clack against the body.

You’re still better off, obviously, getting a newer / better designed guitar-- but, with these changes, you can transform the bad ol’ Xplorer into something at least decent to play with.

Also, you can go with skins to make the Xplorer at least LOOK like it doesn’t totally suck. Here’s the one I put on mine:

Also, in case you didn’t know, standard guitar straps fit all GH guitars. There are some nice, inexpensive guitar straps that make swell mini-customizations for your plastic axe… like this one from Guitar Center

Loosening up the whammy bar spring was the first thing I had to do to that guitar.

That’s the first thing most of do to our real guitars too… Can’t have a stiff whammy! Uh, not like that…

I’m experimenting a bit with painting. Looks like Krylon Fusion (designed to work with plastic) is the way to go for the first coat.

basic guitar painting how-to:
http://forums.gameinformer.com/gi/board/message?board.id=sony&message.id=132913

I just did the buttons to start, with a glossy black, so far so good. I’m shooting for that “black on the surface, colors on the edges” button look. This also prevents any issues with sticking on the edges, since those are masked off and remain unpainted. It came out great so far-- very professional looking.

Needs to dry for 24 hours before I can play on it and see how it changes the feel. I’m worried I should have put a clear coat on top of the buttons for durability…

ooh, this is really tempting. I’ve always wanted a metallic finish.

With the Les, it’s gonna be quite easy to snap the removable faceplate off and paint it, too.

Here’s a fairly involved Les Paul facepaint painting walkthrough

http://www.pixelatedmayhem.com/2007/10/my-gh3-les-paul.php

Too much work.

Well, that guy went a little nuts with his Les Paul faceplate. I think a single coat of plastic primer + metallic + clearcoat should be pretty straightforward.

And you can buy faceplates, of course…
http://www.jr.com/JRSectionView.process?InSearch=t&N=&Ntt=guitar+faceplate&Ntk=All_Record_Search&lastSearch=

Here’s the final “raining blood” xplorer, with all the mods.

Also, based on the two Les Paul faceplates I’ve done so far… it’s looking like you need to do metal flake spraying to get a REALLY impressive paintjob.

http://www.paintwithpearl.com/

There seem to be hobby kits that might work. They’re intended for painting models, but I think they could probably handle a Les faceplate.

I should note that the two faceplates I painted with standard hardware store “metallic” blue and silver spraypaint did end up coming out pretty nice, actually. I got compliments on them. It’s all about prep-- make sure you sand, prime, re-sand and re-prime to get the surface extra smooth, unless you’re shooting for a textured look. Priming doesn’t take very long (around 30 mins) so this is easier than it sounds. Then you spray your color, and lay down a clear coat on top of that, which takes FOREVER to dry… like 48 hours.

These hardware store spray paint finishes are quite sparkly under bright light, but it’s kinda subtle, as the metal particles are very small. The purple guitar image I linked, above, is fairly representative. If you want mongo bass-boat hot-rod flaked out finishes like I do, you gotta go with airbrushing.

I was already thinking of getting a small compressor for inflating car tires, so I took the plunge and ordered an inexpensive airbrush setup, too. Along with a number of of pearls/flakes/candy finishes from http://www.paintwithpearl.com/ .

If you’re flake-crazy like I am, but unwilling to go batshit insane for plastic guitars as I have, the only spray stuff I could find is from Testors, in a traditional spray can: [EDIT] deleted, because I got some of this crap, and it’s no better than the hardware store variety. Bah.

Now that is a !@#$load of flake.

Real Mirror chrome paint. Looks a treat, but basically $100.

http://www.alsacorp.com/products/killercans/kc/killerchrome.htm

Shimrin’s Kandys

http://www.plastikote.com/plastikote/auto/template.jsp?searchcode=RES&product=ShimrinsKandys

Shimrin’s Pearls

http://www.plastikote.com/plastikote/auto/template.jsp?searchcode=RES&product=ShimrinsPearls

Still no way to do big flakes in a spray can. I think it’s a physical limitation based on what they can fit in a standard spray nozzle. I am finding that certain colors (notably black and silver) in off-the-shelf spray metallic “flake” finishes can look pretty good. You have to pick a color that will show off the small flake size.

Red, for example, is so subtle in metallic as to be nearly indistinguishable from plain ol’ red. Unless it’s in direct sunlight or very bright lights…

Lots of good guitar info on the ScoreHero hardware forum, if you can deal with the signal-to-noise ratio, which isn’t great. I’ve seen worse, but you do have to dig a little.

http://www.scorehero.com/forum/viewforum.php?f=33

Fuck. I tried that de-clicking guide on ScoreHero on my GH1 SG, but now my downward strum doesn’t work anymore. The upward works great and is really silent now, though. But it sucks to have to play like this.

That glue that holds the strum buttons on the circuit board is just glue, right? Not something conductive for signal transfer? Because it sort of popped loose when I had to push the screwdriver down on the strum circuit board screws.

So, uh, mod at your own risk. I was thinking of getting a PS3 Kramer anyway.

Yeah, de-clicking looks pretty advanced-- I didn’t attempt that. The Kramer is awesome, IMO, and that’s as good an excuse as any.

Disassembly and reassembly, along with many other basic mods, are quite easy. I’ve done this on GH1 SG black, GH2 SG red, GH3 Kramer and GH2 Xplorer now. They are all remarkably similar inside. There are a few differences, though:

  • Xplorer and Kramer use Torx screws; SGs use Phillips
  • GH1 SG has an unsual, seperate tilt detector mechanism (ball bearing in tube) which no other guitar has. It’s integrated on all other guitars.

I’m thinking of hot gluing some pennies into the bodies of the SG to increase their weight. Very easy mod. They feel weightless compared to the wireless models, I’m guessing due to the batteries.

After talking about adding weight, I had to try it. People compliment the les as “heavier” and “more substantial” but if it’s anything like the Kramer inside, that’s solely because of the battery weight. There’s no extra weights inside or anything, and the guitars are all very similar internally as I’ve noted above. (Caveat: I have dissassembled many types, but I’ve yet to disassemble a Les, so I’m assuming.)

Pennies/nickles seemed kinda ghetto, plus coins aren’t as heavy as you might think. I had to go to the hardware store for some errands, so while there I bought a set of 20 pk 2" x 1/2" fender washers. I think that means 1/2" hole in the center and 2" diameter-- they’re the biggest, heaviest washers I could find.

The 2" diameter fits perfectly in several places in the SG guitar shell. I suppose you could do either side but I put them all on the “face” side of the guitar. I distributed them in 3 places in a 4 - 3 - 3 config in each of the two SG guitars (20 washers total, 10 per guitar). I used alcohol to wipe down the area, then copious amounts of hot glue to make a washer “sandwich”.

I weighed them on my scale-- 10 of these washers is about 8 oz. It gives the “weightless” SG quite a bit of heft!

I think I’ve posted this here before – this is my main Xplorer:

Since this pic was taken, I’ve continued to modify the guitar, with the following:

  • replaced the whammy with an SG whammy, which is longer and more comfy for me to reach for
  • replaced the whammy spring with one from an old SG; whammy feels much looser and easier to use.
  • replaced the entire padding section behind the buttons with the padding from an SG. The action feels a lot better.
  • replaced all the buttons with orange and red buttons from other Xplorers.

All that said, I’ll never use it again unless there isn’t a Les Paul around. The basic shape is still uncomfy to me, and I like everything about my Les Paul a little better as well.

I am playing around with using the plasti-dip on the Xplorer buttons to make them black. Works quite well, with a little minor cloth dremeling to get the edges smooth. Nice and professional looking and solidly black. Very tough, clearly designed to be handled extensively; it’s the same stuff you’d find on the handles of tools, more or less. However, it does produce a rubbery surface which isn’t as amenable to fast sliding as the smooth plastic.

Coloring plastic buttons designed to be handled extensively is… tough. I suppose if I was really hardcore, I’d mold my own damn plastic buttons. Not quite there. Yet.