Can’t use a movement tile on a netted unit.
My head is spinning. I think I need a simpler game. Like chess.
Then you are in trouble. : )
Put the module in the lower right of his HQ instead. Now he can’t block your ranged unit (newbies: you can shoot over your own pieces). He also can’t kill you with a 3 initiative melee unit in the other two spots before you get your shots off in the same round.
Oh no, this game is great! I only meant that we probably didn’t have to keep posting screenshots, because the peanut gallery had gone radio silent. But they are back! And I am about to make my play.
Apologies for the delay; family is visiting.
I blended Tim’s suggestion with Lantz’s.
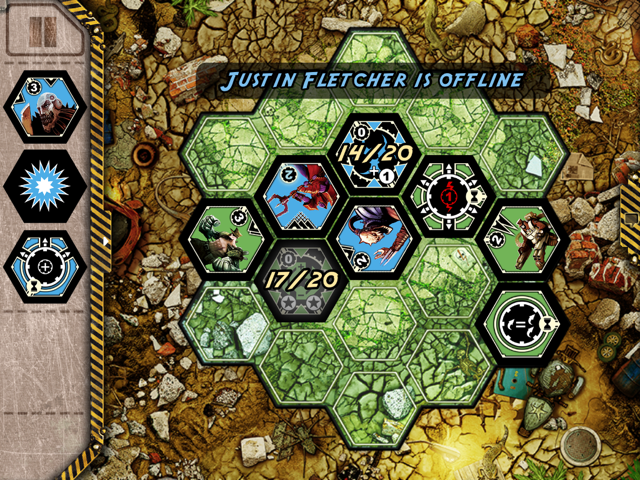
With my module that reduces initiative by 1 placed in front of my ranged unit on the far right, Justin can’t simply block his attack with another piece. And it will take some effort on his part to knock out that ranged unit before it gets two more shots on his HQ.
I placed my melee unit to face his net tile. That thing has GOT to go!
Remind me: if you’ve got a health module protecting you, can you absorb unlimited hits from one enemy in one round? In other words, can Justin place the health module to the upper left of his net guy in order to survive the two melee attacks from Dave’s unit in round 3?
The draw: Another Butcher, a Battle tile, and a Medic module.

This is pretty straightforward. The Medic module, which absorbs all damage from the units connected to it and is then destroyed, will save my Net Fighter from Dave’s Brawler in Initiative Round 3.
The Brawler won’t be able to attack again in Initiative Round 2 since netted HQs don’t give bonuses*; therefore, I could place the Butcher to take out Dave’s Annihilator and Saboteur module and hope to get another unit in place to take out the Brawler before the next battle.
But I don’t want to take that chance. I want the Brawler dead, so I place my Butcher appropriately.

This placement also protects the Net Fighter from any other melee attackers. For the moment.
*Remember? Dave’s HQ bonus is to allow any adjacent unit to attack again in the next Initiative Round. Forget your enemy’s HQ bonus at your peril.
Yes, because even though it appears there’s an order to attacks within Initiative Rounds, they’re really all happening at the same time.
I would’ve placed your melee unit to the lower left of the HQ to do some damage and take out Dave’s unit. But I like your conservative approach to surround the net fighter. He can change the game so it’s worth trying to keep him alive as much as possible.
If you need peanut gallery commentary, here’s some:
This is amazing. I’m really learning a lot by reading your thoughts, others’ advice, and seeing how it works out. I will pick up NH next time it’s on sale if you keep going ;)
Dave seriously needs another 3 initiative guy to knock out the medic module in round 3.
Wouldn’t the medic module still take effect in round 3? Don’t you need an init 4 unit to negate the medic in round 3?
I’m surprised, Justin, that you didn’t trigger a battle! But that’s the joy of NH.
Ephraim, thanks for the encouragement!
No, the medic does not provide healing/damage absorption during the round that it is destroyed in.
A very interesting draw!

The module with the red arrow in my draw pile will convert an enemy module to my own. Thus, I could “steal” the effect of Justin’s medic module. Unfortunately, my module would appear right next to Justin’s HQ, so it would only last one round.
I also have a medic module of my own to play, as well as a high-initiative ranged unit!
I have ideas. But what are yours?
I would honestly discard the medic module, steal his medic module, and place the range unit to target his mutant. That way you manage to destroy his offenses when the battle phase happens, and you still have your dual-attack ranger ready to strike his base.
I’m thinking along the same lines as Mini-Cyn - use the Scoper to disable the Medic, which should almost ensure the death of the Net Fighter. Then, use the ranged unit to attack the Mutant, and combat is looking very favorable for you in the near future as you still have that double barrel aimed at Justin’s HQ.
True, the Scoper will die instantly, but it won’t be in vain as you get rid of that net. Nowhere else to play it where it’s sure to have an effect. Don’t play it, and it’s possible that Justin can defend the medic, which in turn defends the Net Fighter, which means at least 3 hits on your HQ.
The only useful place right now for your medic module is to keep the double-barreled range unit alive. Tempting, but it has a good chance to get it’s 2 shots off at least once more before dying sans medic, so I’m thinking the medic is the thing to discard.
The ranged unit allows you to take out the only other attack on your HQ, which puts the pressure back on Justin. Place it on the SE corner of your HQ, you take out the Mutant and you’re aimed at his HQ, which will be 2 shots due to your extra turn bonus once your HQ is freed. On the SW corner, you also take out the Mutant, and while you don’t aim at his HQ, you protect your melee guy from being attacked before he kills the Net Fighter. It would be difficult for Justin to pull off, but I can see a few ways he could do so with the right draw.
Placing that Saboteur module where you did is looking damn brilliant, as I’m trying to figure out what I’d do in Justin’s shoes the next turn. That initiative bonus from his HQ could have opened up a few things, but that module slammed that door shut.
This is what I love about this game, there’s all kinds of punch-counterpunch. Dave sets up to take out the Net Fighter, Justin protects it with the Medic, Dave now has an option to negate the Medic. Still, Justin might be able to counteract that move with the right cards played properly.
Holy WALL OF ADVICE
+1
To add onto my suggestion…if I recall correctly green base adds a second attack on the next initiative. So I would place the new range unit right beside it, so that it has a clear chance of attacking both the mutant, and his base. That way you’ll be getting three strikes next battle round. Plus your range attacker is initiative 3 while the mutant is initiative two. So you’d still be saving yourself two damage on your base.