Star Ruler 2 - A Beginner's Attempt to Conquer the Galaxy!

Introduction

Star Ruler 2 is an amazing game with many complex subsystems with a lot of depth hiding behind an RTS.

I feel that there is much fun to be had but the structure of the game may discourage some players. Therefore I’ll write a simple play-through and see if it helps others come to appreciate this gem.

Pre game information

I’m playing the expansion/DLC. I’ve just bought DLC after playing the vanilla and think I may as well play it for this since I’m a beginner anyway.

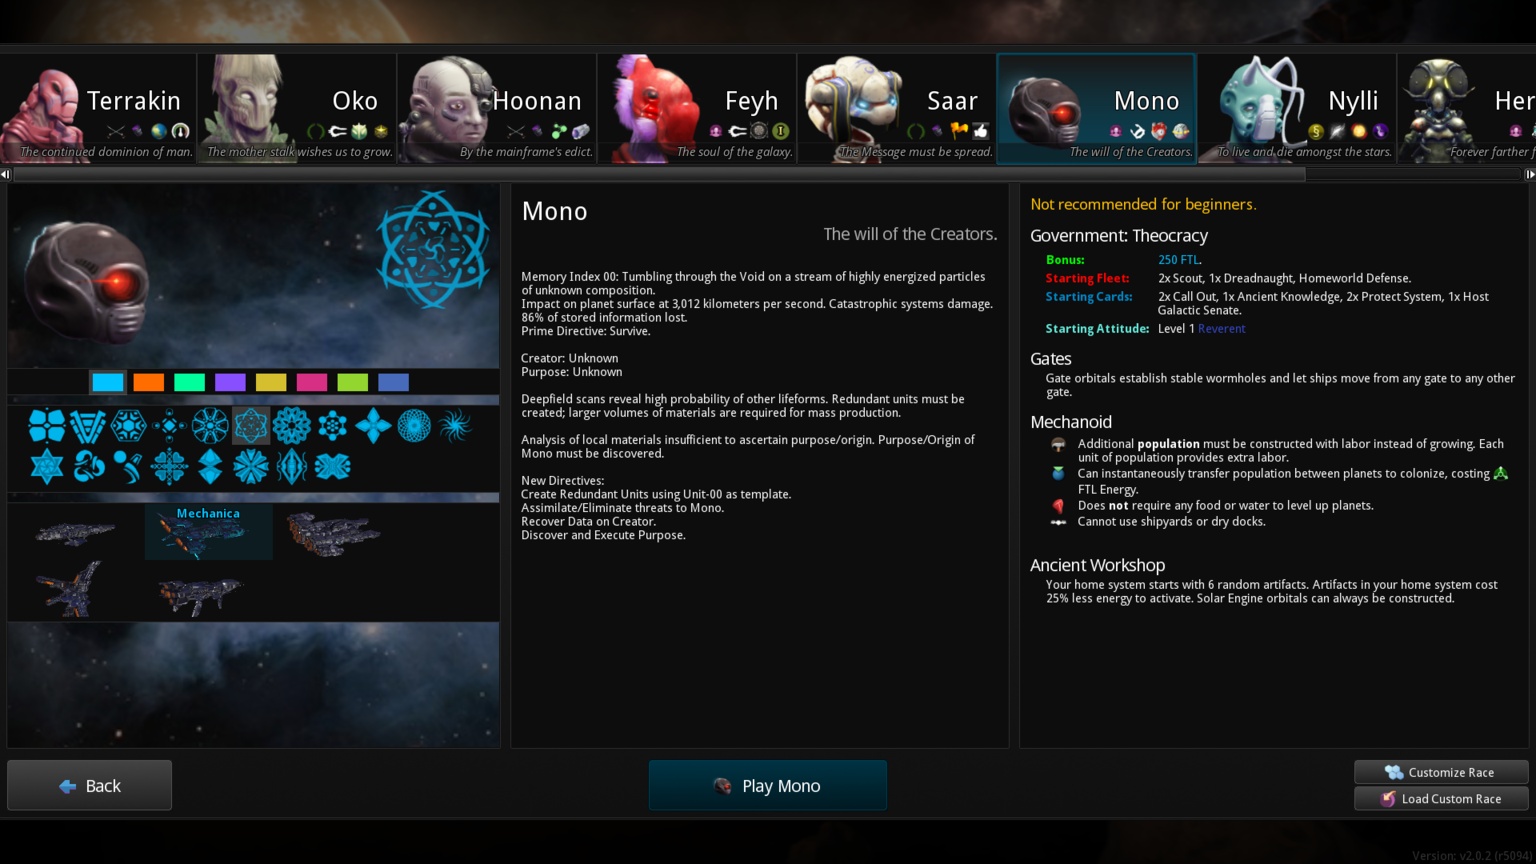
I’ll be playing Mono. The reason for this is that I’m a beginner. Mono as a race has some special features that encourage learning for beginners, even though the game warns beginners not to pick it as their first games!

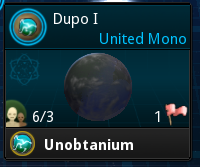
  1. The Mono does not need food and water. They are a robotic race and thus does not consume food like normal race. Without need for water and food, complexity in managing the economic requirements is reduced. This is a gigantic advantage. But it’s balanced by…

  2. The Mono’s population does not grow naturally and must be manufactured. This is a disadvantage and tends to slow down the Mono in their expansion in the very beginning phase as they must devote a large part of their labour to manufacturing population. As beginners, I see this as a strength for learning because it teaches us a very important lesson in managing populations on planets and how that affects labour.

The Mono is a “turtle” race with huge potential after the initial weak period. I’ll explain why as we play. They are kind of like the Industrial Klackons of MOO but behave and play like the Psilons of MOO. Expand a bit, hunker down, develop then unleash destruction on the opponents. This play style allow us to learn quite a bit about the various subsystems due to the turtling nature.

Setup

In the setup screen I have picked the Mono. Upon choosing, the game randomly picks 2 opposing races for me.

Oops, a new expansion race is in there and since I would prefer a more familiar play through now, let’s change the races.

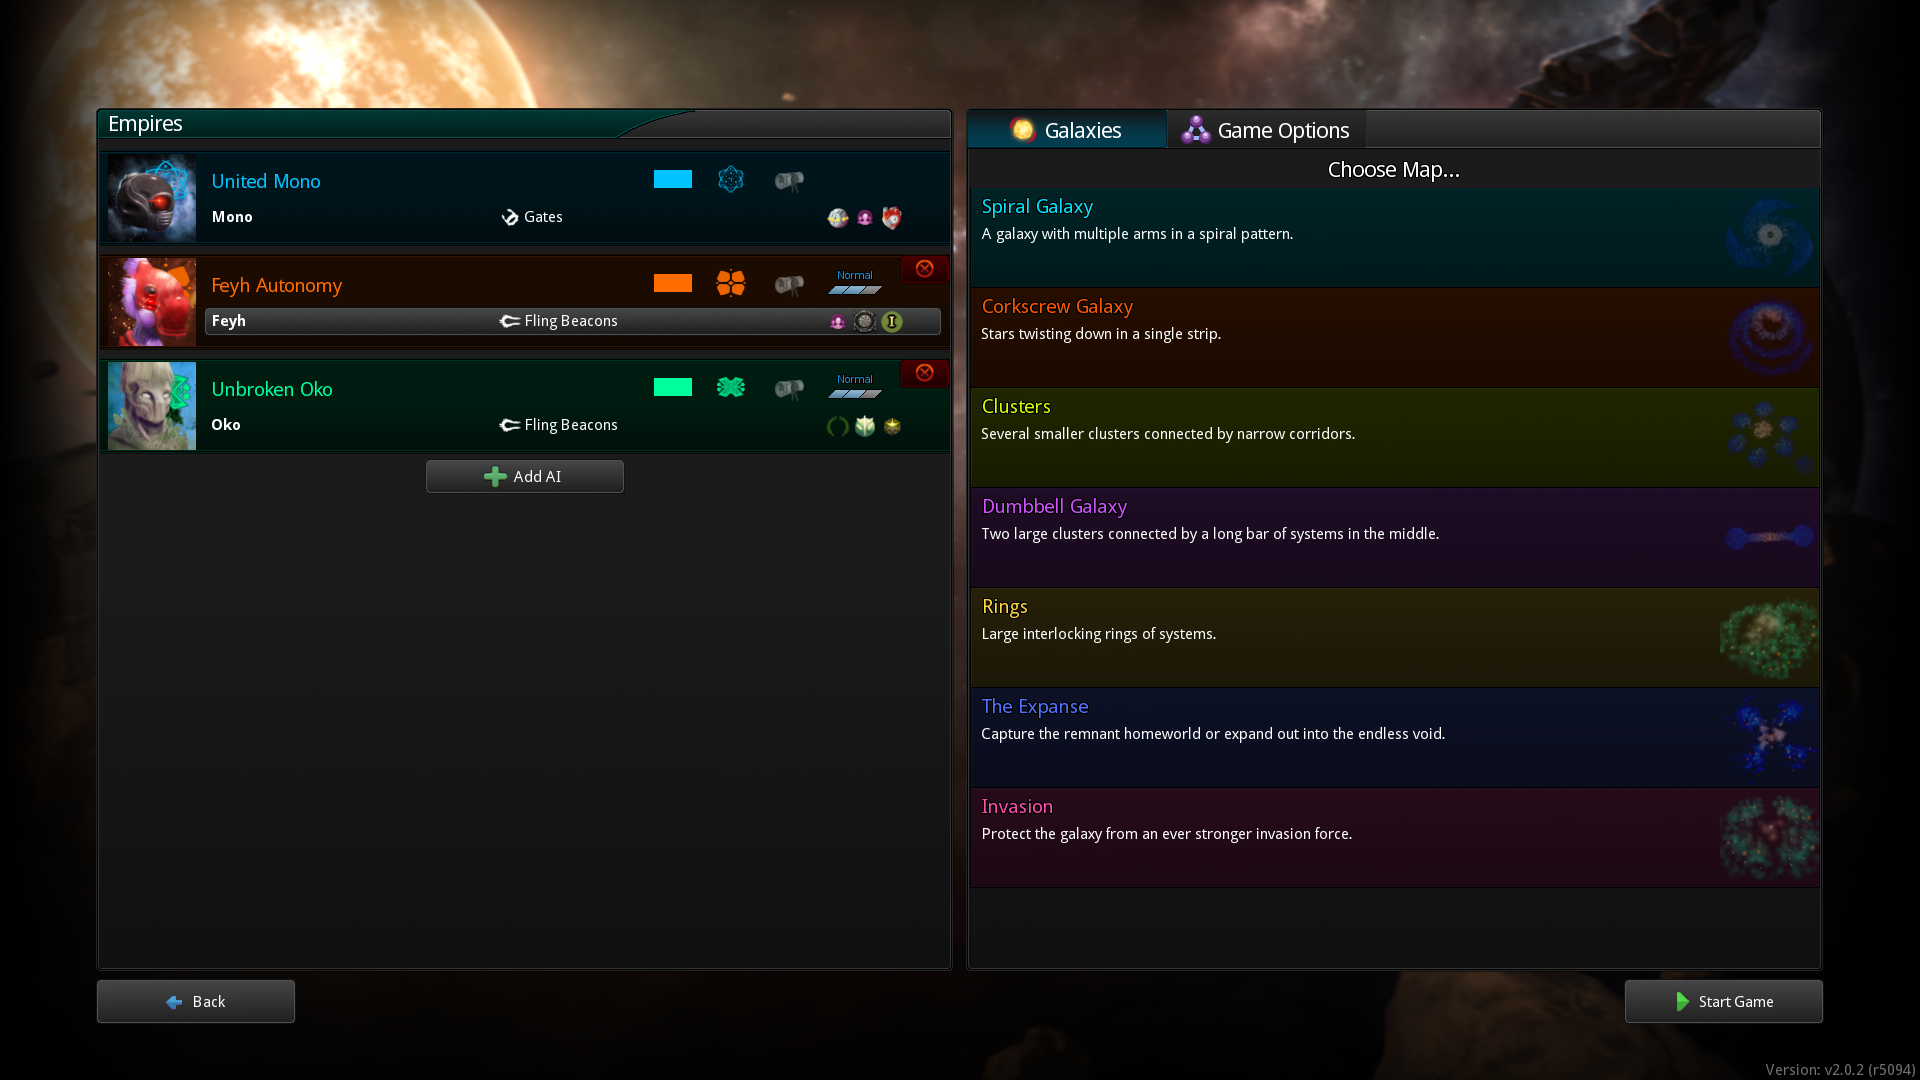
Interface Tip: To change the race of your opponent, click on the race name just below the name of the faction. You will see a race selection screen similiar to what you had at startup.

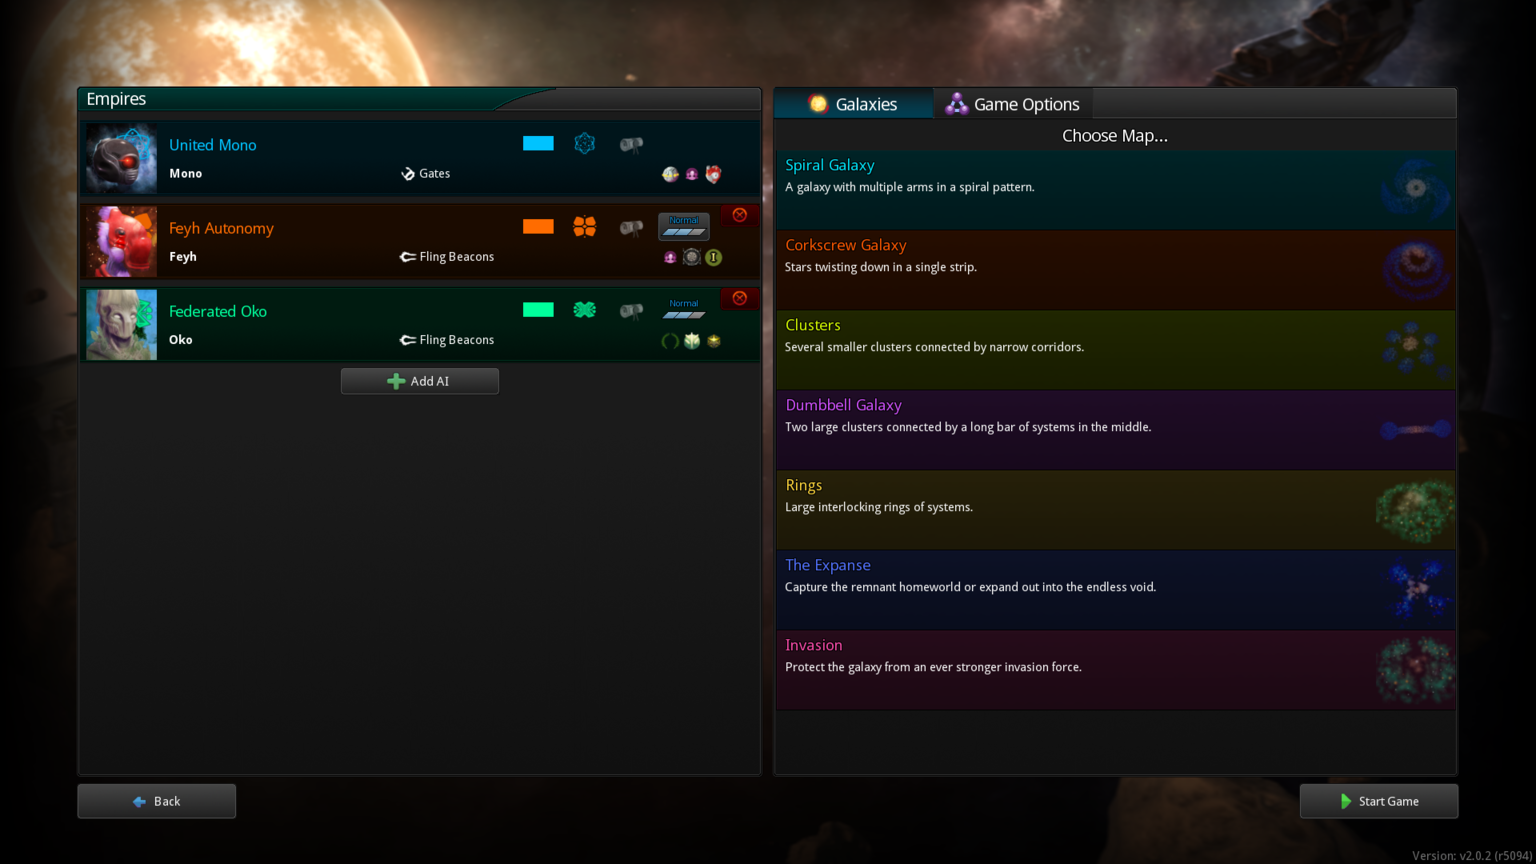
I’ve change the unfamiliar races with some more familiar ones, I’m going to select the Terrakin and the Oko.

Now I’ll select the difficullty of the game.

Interface Tip: To select a difficulty, click on the difficulty and select the level that you want. You can also choose the various subtraits. “Passive” means the AI will not attack you unless you initiate war on them.

I’m picking Easy + Passive for both AI since I’m only a beginner learning the ropes.

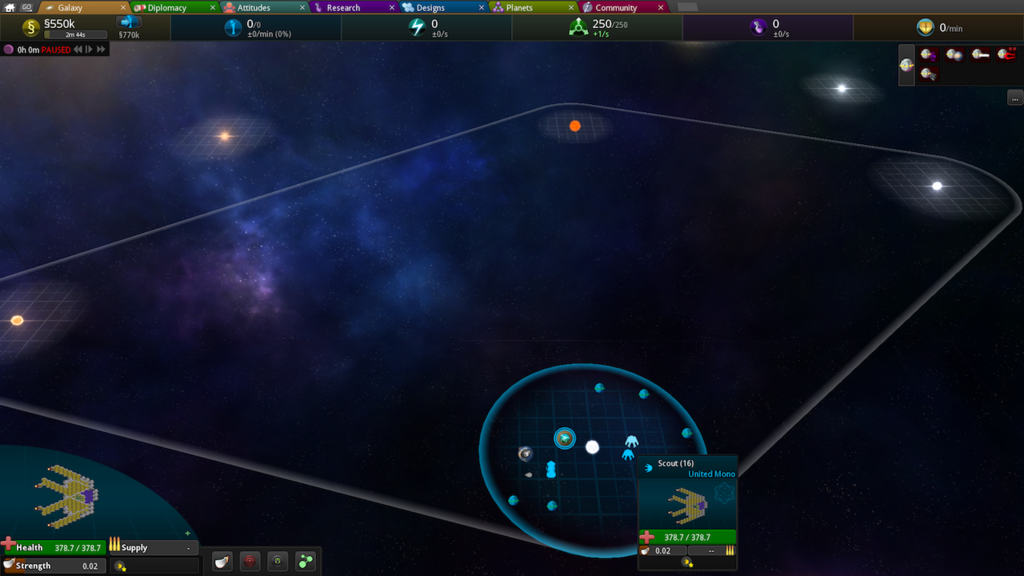
Next I’ll select the Spiral Galaxy for our start.

The spiral has a simple structure with the start systems within the arm that is typically only connected through the entrance through the center of the galaxy. I am hypothesising that this makes the AI value your inner arm planets less valuable as there are no direct connection to the star systems from their borders.

The spiral is also straight forward without too many connectors between stars. This allows us to have less distraction and have a clear idea of how to expand towards the center of the galaxy.

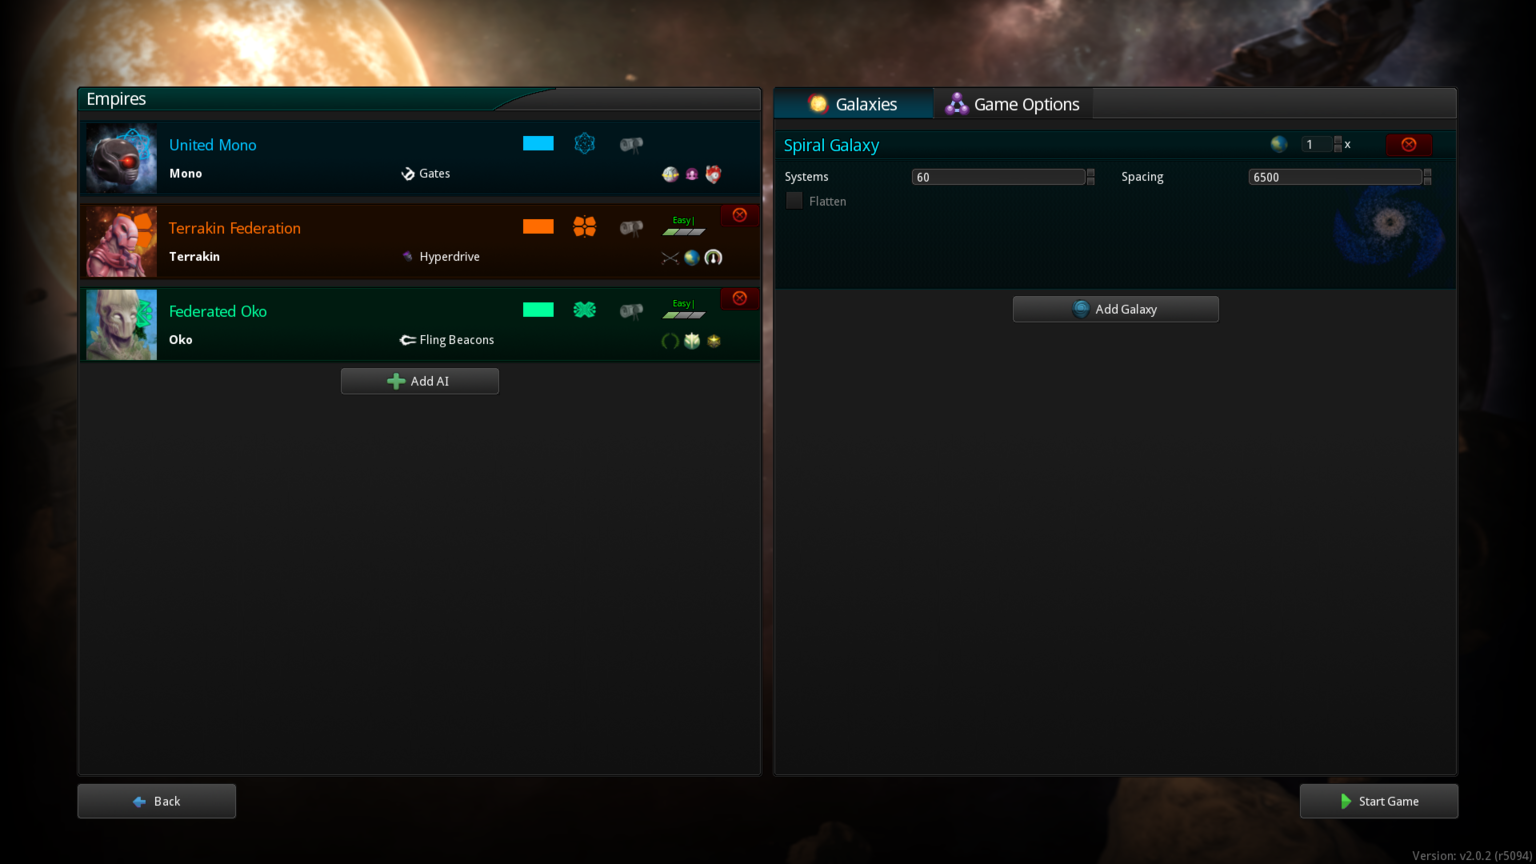
I am using the defaults so we’l just accept that and start the game.


Summary:

  1. We have picked the race Mono for it’s turtling ability.
  2. Mono also simplify the system for us because they do not need food and water.
  3. We’ll be playing to their strengths and use their weakness regarding their population growth as a learning feature.
  4. We have chosen 2 easy opponents with the passive trait to allows us harrasement free game since we are pure beginners learning the ropes.
  5. We pick the spiral galaxy as a default learning ground.

A New Beginning


We wake up from our electronic slumber. The central AI have download the instructions to us. Directive is to expand and colonize this galaxy so that we can harness it’s energies. We are to find the reason for our existence. The Calculators need vast energies for their calculations. We must fulfill the directive!


Ok let’s take stock of where we are.

You always start with an unhelpful view… Let’s fix it. While we are at it, let’s pause the game while we look around and take stock of the situation.

This is an RTS game. It is important to use the pause. We can leisurely play and explore but the game AI opponents will proceed at a fixed pace and we may find ourselves falling farther and farther behind.

Interface Tip: I bind my “spacebar” key to the “pause” function. You can do that by hitting escape -> options -> keybinds. And manage your bindings there. Don’t worry about the huge list there, we’ll just bind those that we use so that we don’t get overwhelmed. Right now we’ll just bind “pause” to “spacebar”.

(Hmmm, it seems that Discourse stopped accepting my image uploads. So I’ll need to resort to TinyPic. Anyway, let’s move forward.)

Situation Awareness and Planning

Now let’s zoom out and get a situation awareness of our immediate surroundings and form a long term plan.

Interface Tip: Zoom out using your mouse wheel.

What we want is to take a look at our star system. You should get a view like this. Let’s see what we have here…

Interface Tip: Hovering over graphics gives tooltip information that is critical to give us situational awareness. But be careful, the scale you are viewing the universe sometimes causes the objects to stack. SR2 cleverly rearranges the items when you scale out. So the icon representation may not be the actual position of the described object. Keep that in mind as you get used to this cool UI feature.

As we mouse over the items in the UI we get some pop-ups that may be confusing at first but they show some very crucial information.

In all default games, the Mono starts with 2 planets. Here we have Dupo IV and Dupo I.

As you can see, Dupo I is where our starting world is. Dupo IV is uncolonized.

We also have 2 starting scout ships. You do not have to worry about what the numbers really mean now. But as a quick guide, 373.7 is the hitpoints or health of your ship. And 0.02 is the attack strength. Needless to say they are flimsy =).

But wait! We also start with a dreadnaught. Which don’t look so bad. We’ll use this later if need be. Note that it seems strange that this dreadnaught is represented by some dots as well that is different from the scouts.

Game Mechanics: Fleets In SR2. An individual ship/spacestation/planet can have group of “support” ships attached to them. Zoom into the dreadnaught you have and you can see individual ships surrounding the main flagship. Support ships cost money to build and attach to flagships. And they contribute to the firepower of the fleet. They consume supplies also. We’ll come back to this later when we explore the combat aspect of SR2. So let’s move on.

Looking forward to this, good intro to the monos

Thank you for this.

I bought SR2 at release and boot it up every so often, go through the tutorial, start a game, scratch my head for a few minutes, and then go on to something else. For whatever reason it just doesn’t click with me, but your AAR might be a huge help.

Also looking forward to this… though I already suspect [quote=“cicobuff”]
This is an RTS game. It is important to use the pause. We can leisurely play and explore but the game AI opponents will proceed at a fixed pace and we may find ourselves falling farther and farther behind.
[/quote]
is the key to what I’ve been missing here. I’ve played more like CK2 where I rarely really need to pause…

Bookmarked!

Thanks for the encouragement guys.

Situational Awareness and Planning (Continued)

In the systems you visit, you may occasionally find orbs like the above. Think of them as chests or loot that you may encounter. They will require “energy” to activate to make use of their special bonuses. We’ll talk about these later. The Mono starts with 5 of these special orbs in their home planet but you will not get to use them until your economy is built up.

Let’s take a look at the galaxy. Use your mouse wheel to zoom out.

You can now hover over stars and see how they are connected. Basically the connections show how planets within each star system can participate in the supply chain that constitute the economy in SR2.

Game Mechanics: Economic Supply The lines connecting the stars simulate how SR2 design supply lines. It’s an artificial construct as real space does not work this way but it’s a design decision and will present us with some strategic choices and decisions. What it means is that only planets in systems connected by these lines can transport resources to be used in other planets connected by the lines.

Now, the game generates a blackhole in the center of the galaxy. One of our objective is to build towards the center as it’s where the probability for special resource and higher tiers planets exist. It’s a clever way to encourage expansion towards conflict zones by the designers. Good design here.

You can take some time now to see how the stars are connected to get a sense of how you should be expanding. As noted earlier, in a Spiral galaxy. The arms are “sealed off” and not connected to the center. It offers a “safe” expansion zone. But this is balanced by the potential lack of higher quality planets.

Like button needed!

Situational Awareness and Planning (Continued 2)

Let’s zoom back in and take a look at our surrounding stars.

Interface Tip: You will find yourself using a zoom that your are most comfortable with as you play the game. Normally. for me, it’s a view that covers a few star systems. This view offers the best combination of information and awareness. The great thing is that as your empire expands, the information is still quite easily accessible from even the galaxy view. Once you get used to the screen. Things will become second nature.

Let’s hover over the star Dupo. Here we see the UI updates to show us the star connections. This is important as it shows us that we’ll need to get to those stars and see if we can expand there while building the economic network.

If you click on the Dupo I planet. You will notice that the lower left corner updates itself with the most important information about the planet.

Interface Tip: This information panel apply to anything that you can click on in the Galaxy Map. It shows the most critical information regarding the selected object. Here we have the name of the planet Dupo I, the “level” of the planet, and the requirement to reach the next level. We also have the special resource called the “Unobtainium” and a population counter that reads 6/3.

Game Mechanics: Planet Level Planets range from level 0 to 5.
Each level determines how much income it generates, how many people can work there which affects labour and how much “pressure” it holds. We’ll talk about the basics first.

Take a look at your top left corner, you will see your Income. Hover the mouse over it and you will see a break down.

As you can see, you “budget” is 550K. The planet itself generates 770K but due to some expenditures, you have only 550K remaining. Home planets are special. They typically generate a lot more income compared to normal ones. Your level 1 Dupo I generates 770K but a typical level 1 planet much less.

A level 0 planet produces NEGATIVE income. Meaning it’ll take away from your treasury every “cycle” which occurs every 3 minutes in real-time.

A level 1 planet produces POSITIVE income and hold more people. And the higher level you go, the more base income it generates. This is excluding the special planets and resources you may use in your supply chains.

A level 5 planet produces most income and hold the most people.

Needless to say, crazy expansion without regards to the levels of the planets in your empire will quickly bankrupt your economy.

As the Mono race, our requirements for building planet levels is different from the other races. We don’t require food and water. Instead we need just non-food resources to level up. We’ll touch on this later.

Game Mechanics: Budget Cycle Every 3 minutes, the game calculates the budget available to you. Your income fills the budget and expenses of maintaining things that you have built (buildings/fleets/orbitals/level 0 planets) deduct from your budget. You can spend up to double your current budget. Meaning if your starting budget is 550K, you can spend up to 1.1M and go into a negative of -550K. Going into negative will reduce efficiencies. But every 3 minutes, the budget is reset and the treasury replenished. If you had a deficit of 550K (-ve), it would probably recover to near to 0 because your income offset the deficit, taking into account reduced efficiencies as you operate in the negative. For us, we’ll try to stay in the positive budget.

Under the 550K you will see a timer bar that reads 2m 45s, this means that in 2mins 45secs, the budget will be replenished with income from your planets. Unspent amount will contribute towards one of the following areas: “Influence, Power, Research, Labour, Defence”

We’ll touch on these later. Now click on the budget leftover button to the right of the budget.

You can see that it’s defaulted to give leftover budget to influence. Here we have a choice to make. Do we keep it at the default so that we can play diplomacy cards sooner or put it into “Power” to activate our 5 special orbs? Or shall we start our research now?

As beginners, we have no idea what is the best. In my play throughs, I never realised that this can have a huge impact in how the game progress because every 3 minutes passes very quickly and it can rapidly boost an area which we want to grow in. For now, let’s keep it at Influence because I’ll like to show my fellow beginners a nice implementation of diplomacy by SR2. So we’ll keep it at influence generation and leave the default there. Energy production and research can wait a bit.

Let’s take a look at our planet again. Hover over Dupo I in the galaxy screen.

Game Mechanics: Planets Population and Resources Each planet have a population, minimally they will have 1. If you hit 0, the planet is abandoned. Here we see 6/3. This means that the population on the planet is 6. But only 3 contribute to labour. The reason is that a level 1 planet can only allow 3 population to work. A level 2 allows up to 8, level 3 16 etc etc…

Our planet hold 3 excess population. Basically you can imagine that they are robots in storage awaiting orders.

Below that, you see the resource the planet holds. It is Unobtainium. The other planet in our system Dupo IV holds Iron, which is a tier 0 resource.

Special Tip: Unobtainium Unobtainum is VERY a special resource that can magically transform into another resource of your choice. As long as you have colonized the planet it was on. It is tempting to use Unobtainum to duplicate a good resource and grow better. But for Mono, it is crucial that you use it to duplicate the FTL resource. The reason is that Mono is dependent on “teleporting” their colonist for colonization work. That’s right! Mono do not ship their colonists on ships to other planets but teleport there instantaneously. This is a double edged sword because it’s extremely powerful. But it requires FTL which currently only accumulates at 1/s.

As the Mono, your Unobtainum can be used to duplicate a FTL resource and make your FTL resource issues go away in a blink! Additionally, the FTL resource at higher levels allows you to obtain a galaxy wide view of ALL FTL travel if your Dupo I becomes a level 4 planet. A level 5 planet will make your FTL usage in-system for free. We will be building up Dupo I and therefore, the duplication of FTL is the best choice in using the Unobtainum in my opinion.

The flag of the right shows the loyalty of the planet which will increase as the level of the planet and the population gets larger.


Summary

  1. We have examined our surroundings and have an idea of where we would like to expand.
  2. We studied the galaxy map and see the key things that are of immediate concern in the UI. The treasury displaying the budget. The planet tooltip. The information panel.
  3. We saw the star connections that decide how the economic resources can be routed.
  4. We explained how the budget cycle works in 3 minutes chunk and saw how the excess budget can be redirected.
  5. We saw how the planets display the levels and briefly explained how the level 0-5 planets mean.

Next! Let’s get into some action!

This is amazing, and will help me get back into the game. Thank you!

This would be me. I’ve been playing strategy games since the original Master of Orion and I so want to figure this one out. I like innovation and trying new game systems, but like some others I’ve bounced off SR 2 a few times and gave up. And videos don’t work for me as well as an old school text and pictures AAR.

So thanks for this and perhaps I’ll finally see past the trees of SR 2’s economy mechanics and see the forest of a great game so many others on the forum are enjoying. I’ve done some AAR’s in another forum and know how much effort these are and am appreciating your work.

thanks for doing this. looking forward to following your journey

First baby steps, colonizing and gaining our first planet level


What we are going to do?

  1. Explore the nearby star systems by sending out the scout ships
  2. Prepare to colonize our first planets
  3. Produce more colonists

Some Rational
In all 4X games, industrial capacity basically decides how fast your can build those giant pew-pew death dealers that you can use to crush your enemies with.

And it’s no exception in SR2. As a general rule, having more high level planets will mean having more industrial capacity. So our immediate objective is to build up our economy.

As beginners, there are many things to consider:

  1. At it’s most basic level, a high level planet will have more workers which mean it will have more industrial capacity
  2. Planets can specialize by having specific resources shipped to them, as long as there is enough excess pressure (which is what the game calls capacity), the resource will be able to generate a resource value
  3. Planets can build special buildings to take advantage of resources shipped there and utilize multipliers.

Needless to say, it can get quite complicated and interesting in how you combine resource and specialization.

For now in our immediate future, we’ll expand our industrial capacity by focusing on point 1. Expanding our population. Which means upgrading our planet.

Let’s click on our planet Dupo I and examine our information panel. Hover over the “I” circle and see that it tells you that a level 1 resource is needed at Dupo I to upgrade it to level 2.

So how do we find a Tier 1 resource? Iron, which is found on Dupo IV. is not in this list so colonizing this will not help us level up Dupo I.

So what do we do? We find what is available at the other star systems! Send out the scouts!

Zoom the galaxy map where you can view the neighbouring systems comfortably. Now click on a scout.

Let’s send the scout to the system on the left as we’ll prefer to expand towards the center of the galaxy. Right click near the open space near the star system. You will see a green line plotting out the path the scout will take. A right click is used. So it’ll take the path to travel there. We are still paused.

So now, let’s issue another explore command to the other scout, this time, we’ll make it go to the star at the top. Right click onto the star.

We note here that due to scale of the UI, the designers made a very good approach to ambiguous commands. If the UI can figure that you are clicking on an open space, it will plot a route. Else a context menu will pop up. Go ahead, left click on the menu item to select move to star and a plot will be shown.

Now, before we un-pause, and proceed. I’ll need to remind ourselves that we are the Mono.

Race Mechanics: Mono We are robots. And robots do not procreate by natural means. This means that our “colonists” which are currently in a box in a warehouse must be manufactured when they are used up.

In a RTS, every second counts. So instead of wasting time, let’s put our industry to use. Let’s build some additional colonists. Some may argue for building some buildings to boost productivity. But I typically find myself wishing for more colonists in this phase of the game. So lets do that.

Double click on the planet Dupo I

This is the planetary screen which you have probably encountered in the tutorial. I’ll highlight the interesting stuff that concerns us at this stage in the picture below.

We note that even though the planet only produce 220K, we somehow get 770K planetary income from just owning this. I think the game has a boost for the home planet to signify that it’s a starting planet or it has a hidden absolute value added to the planetary budget portion to assist the starting position.

Click on the production tab. And produce 3 population to be used as colonists for us.

Click on construct 1B Population 3 times. You will see that as we produce more colonists, the incremental costs increase. Also the build times increases. This reflect the reduced efficiency when we have an overpopulation of stored robots. Don’t worry too much at this stage. We can nitpick and just produce 1 now and produce more as we send out the colonists. But we’ll try to not micro too much at this stage and just play more naturally. After we improve ourselves, we can tackle this like a true competitive RTS and max–min every action.

Right click outside the Planetary screen and get back to the galaxy screen. Now un-pause the game (spacebar if you had previously keybind or the default “p” or click on the timer control at the top left corner) and lets see the scouts travel to new unknown worlds!


Summary

We have:

  1. Sent out our scouts
  2. Built more colonists in preparation for colony building
  3. Unpaused our game

Now we await the results for the scout’s exploration

Thanks for the encouragement guys. I’ll update this again after waking up tomorrow, near midnight now over here. Hope it helps the gamers who wanted to pick this up but bounced off it.

IN4 Later.

Bought this when it was on sale and when I was on the throne I was going to pull up the manual via the Steam app but they ripped a page out of Paradox’s playbook and did not write one for the game. I went hunting for the wiki next and it turns out to be pretty scant.

At least with Paradox you can count on packed to the gills wikis and Steam guides but there’s hardly anything for SR2.

Cool stuff, cicobuff. I really hope this helps more people get into the game, because it’s the most innovative 4X game I’ve played in a long time!

YEA I LOVE THIS THREAD!

getting a message “Body is invalid; try to be a little more descriptive”. why? Is all caps a nono?

I DON’T KNOW, IS IT??

It appears it is, because Dictator Discourse yells at me too!

I am so glad you’re doing this. Can’t wait to dive in.

Thanks guys.

First baby steps, colonizing and gaining our first planet level (Continued)

The scouts we have sent out are travelling in non-FTL speeds. Although they are not in FTL travel, they do not take long to reach the target systems.

Interface Tip: Game Speed You can speed up by pressing the >> button next near the pause/play controls if you are really impatient. The default keybinding F7 increases the speed. and F5 decreases the speed. F6 resets the speed to realtime. Normally during the initial stages, I tend to go slow, later when the economy is humming along or when we’re waiting for really long build times, then we’ll increase the speed.

Now let us see what the scouts have found! Take a look at my Galaxy screen below. You will note that information is presented in a clean iconic way. As long as you understand what it means =).

Let’s see what we have. Pause and take a look.

We have the following:

  1. 2x water planets
  2. 1x food planet
  3. 4x Debris fields
  4. 2x Remnant fleets

Game Mechanic: Water and Food Unlike the Mono, other races require water and food to establish and grow a planet. So in addition to Tier 1 and Tier 2 resources, a planet will need food and water to be imported for it to grow in levels. As the Mono, being robots. Food and Water is not required. Which is why you see on you planet details that only 1x Tier 1 resource is required to grow to level 2 for our planet Dupo I. This also means that we have hit a system that we cannot immediate put to use in our growing economy. Not to worry. We will not write off these planets because a bit later, we will be making use of these seeming useless planets to make our economy much more powerful! More on terraforming later!

Game Mechanic: Debris Fields Debris fields are like treasure chests similar to the orbs we have in our Mono starting system. To see what they contain, we need to scan them with a ship equipped with a scanner. Which our scouts naturally have.

Before we send the scout to scan the debris, there is something we also note in the system. Space Monsters!

Ok the Remnants are supposed to be relics of an ancient space faring empire. The game Lore hints at a possible relation to the First (the DLC expansion race). It’s very vague and leaves it to our imagination to work out the possibilities.

For our purposes, and as beginners, the Remnants fleets look scary. They are like the Guardian in the MOO, we would like to fight them for the treasure they are guarding but will most probably be obliterated!

Look at the size of that thing!

Ok comparing our starting dreadnaught to the 2 fleets shows us that it’s a no contest. We’ll stay away from these baddies for now. We will not be making use of the system anyway in our immediate future.

We do note that the space monsters are guarding some cool research data and a HP boost that we can use on our flagships. So we make a note and we’ll come back.

Does this mean that we are done with the system? No. Because we have 4 debris fields to scan. The presence of the fleets is annoying. This means that we’ll need to keep the scout out of the range of the fleets while we are scanning.

How do we scan?

A quick analysis of the situation shows us that we’ll probably be out of range of the Remnants if we scan the 2 lower debris fields. The other 2 upper field may come into range. At this stage, the scout have no chance against the fleets. So we’ll be careful and take some precautions.

In an RTS, I like to prepare for setbacks. Since we’ll be taking a risk here, I’ll like to make a backup scout from the home planet Dupo I.

Interface Tip: Quick Planet Access The SR2 design allows us to very quickly jump to any planets that we are interested in. Let me introduce the Planets tab.

The Planets tab display a summary and very big overview of all your planets. This is an invaluable screen as our empire expand. It allows us to keep tabs on things and gives a very good picture of what is happening in the empire in terms of the economy and industry.

Do you notice that we are at 7/3 population in our Dupo I. Yup, we had built our first 1B colonists, which will be put to use shortly.

Left Clicking on the planet will being us to the planetary screen.

We issue a build command to build a scout ship.

And move it up in priority so that the scout will be immediately build when we unpause later.

Interface Tip: The production queue holds all the stuff you have queued up. The only limitation seems to be your budget. Meaning as long as you have budget, you can add stuff to the production queue. To reorder priorities of the build, left click and drag items in the queue to reorder them.

Game Mechanics: Production and Budget When you add things into queue, you will notice that the budget gets reduced. You can obtain a refund by dismissing/cancelling a build item in the queue IF AND ONLY IF the current budget cycle is not completed. Meaning, if you ordered a 200K build item and you are at 2m 59s into the budget cycle, if you cancel the order, you’ll get a full 200K refund. But if your order is keyed in. And the budget cycle starts at 1 sec again, cancelling the 200K item you ordered in the last cycle gives you back nothing.

Now that our scout is ordered. Let’s head back to the star system and instruct the scout to perform a debris scan.

Ok, let’s right click and exit the planetary screen. You will notice that you’re back at the galaxy screen with no easy way to get back to the scouts.

Let’s fix that.

Interface Tip: Side Panel Quick Access and Notification Take a look at the right side of the Galaxy Screen. You will see some icons that do not make sense to us beginners. It’s actually a quick access/notification/interesting panel. Go ahead and hover over the items to get a read. You can add other interesting things so that we can more easily track our stuff. Let’s add the scouts here.

Add Civilian Flagship to the panel and you will see the scouts appear.
A double click to the scout brings us to the scout on the Galaxy screen.

Game Mechanics: Flagship vs Support ship Terminology In SR2, a flagship is an independent unit that can be issued individual orders like move, attack, FTL etc. A support ship is something you attach to a flagship. They cannot be independently controlled apart from being attached to something else. So a scout ship is a flagship and a miner is also a flagship as much as a space cruiser bristling with weapons and defences. Flagship just mean it’s an independent unit in SR2 jargon.

*

We issue a “Scan Anomaly” command to the scout.

Interface Tip: LEFT - RIGHT - LEFT Clicking SR2 UI requires us to have something selected before orders can be performed in the Galaxy screen. It works uniformly on all objects. Here we want our Scout to do something. So it MUST first be selected with a LEFT CLICK. We want the scout to target a debris field for scan. so the target must be RIGHT CLICK’ed. SR2’s UI will then know that we want the scout (left click) to ACT on the debris field (right click). This will bring up a list of all actions that the scout can perform on the debris field, so you LEFT CLICK on the action in the menu. Once you understand that Left Click (agent) Right Click (target) Left Click menu (action), you will be able to figure a whole ton of things you can perform on anything on the Galaxy screen.

Ok, we’ve issued the command to the scout. Let’s take a look at the other star system we scouted!