Fallout 3 Modding Edition 2015

'WARNING! You are about edit a module file…'etc

Scary looking message (with a typo! mi kind of program ;) ) but really we have no doubts about what we are doing, so when it is available (at the beginning it has a time period before you can carry on) we want to click the bottom right most choice of ‘Yes I’m absolutely sure’, which will have a nice friendly green arrow icon.

Another pop-up dialogue box will appear called ‘Which files do you want to add this r…’ (or some-such) and it will show all you currently loaded Fallout 3 files from your mod list. We don’t want to select any of them as we need to create our own new Patch file, so choose ‘<new file>’ and ‘ok’ as shown in the pic below:

Another pop-up this time asking for the name of the file we wish to create. By now you will know i use ‘Patch Plugin Load Last’ (you don’t need the .esp bit, it will do that for you, just give your file a name).

It can be anything, but i like mine as it is very specific and no way in hell can i confuse what it is or where i should place it. But ‘Unicorns Mount Me Last’ might be just as good? It’s up-to you. You can be as frighteningly creative or logical as you like, it is a free world (kind off). Click ‘Ok’ once you are happy with the name. See pic below:

We now get another confirmation pop-up as shown below, so just check the pic and what i’ve written on it and we can move on to the next part:

Now just follow the guide closely (like really concentrate, as my memory of the exact process is a little hazy so you need the guide!), page 41, and you should end up back in your starting screen view before you decided to make your own Patch Plugin, this time on the right most section you will see a duplicated entry of all the details of that ‘MetalScrapDoor01’ we want to add a lock too. See pic below for details:

The right most column will be titled as the name of your Patch you created, so in my case i will have the top right most part of the screen show on the left ‘MaintenanceShed.esp’ with all the original mods details below for the section we are in, and just to the right of that i have a ‘Patch Plugin Load Last.esp’ with all the same details.

Whatever is furthest to the right in this screen in FO3Edit will ‘win’ any conflict, so my ‘Patch Plugin Load Last.esp’ is going to overwrite the original mods details with whatever i put in my file. So lets do that now, as they are currently exactly the same.

Look about half-way down the screen in that right section until you see ‘XLOC - Lock Data’

Once you see that, right-click on your Plugin Patch files section where is says ‘Level’ over on the left of this right part of the screen and click the ‘Add’ prompt as shown above.

You might get that warning about editing stuff pop-up again (these eventually reduce as you use FO3Edit more often), if so click ‘yes etc’ to carry on. Now we will be able to edit the field in our Plugin Patch as shown below:

What to put? well it needs to be a number and this will set the ‘level’ of the lock that will need to be picked to gain access to the Maintenance Shed. If you put 100 you probably won’t be able to access it until late in the game, if you put 5 you might as well not bother as your minimum starting lock-pick skill is going to be higher.

I put 25 in my game. The reason is that i normally will have about 20 points in lock-pick at game start, and i always bring a tonne of stuff with me from vault 101 which includes my own Vault 101 Utility Suit that gives me a bonus of 5 to my lock-pick and repair skills when i wear it. So yeah, that sort of works for early/instant access.

If i want to make it a bit harder for game start i could use a value of 35, which would require me to do as above but also create my own ‘Toolbox’ at a workbench somewhere (part of the CRAFT mod), or prioritise my Lock-pick skill at my next level up.

I like to get access to this player home early on, as it is not over powerful, it feels like it fits right into the game, and it is local to Megaton. But i don’t want it to be seemingly ‘free’ to access. It also avoids me get annoyed at the general sexism in Fallout 3 (yeah right on sisters). So for your own game you can balance out all these issues and put the value you want. Lower for early access, higher for later access.

Once you have put this value in it will fill out the rest of that section for you. You should end up with ‘Key’ as ‘NULL - Null Reference [000000000]’, ‘Flags’ as blank and ‘Unknown’ as a bunch of zeros ‘00 00 00 00 00 00 00’.

And all this ONLY under your Patch Plugin column, not in the MaintenanceShed.esp column. If so we can close FO3Edit (click the red x button on the top right of the screen).

As shown above, you will get anther dialogue box asking you to save the changes and it will list all the files data will be saved to if you click ‘ok’. Just make sure only your Patch Plugin is mentioned here, and it’s box is ticked (normal default behaviour, but good to double check). Now if you see maybe ‘MaintenanceShed.esp’ is also ticked for saving data too, this means you might have miss-clicked something, or edited a field in the wrong column. Now as long as your Patch Plugin is listed and ticked for the save of changes just untick the original MaintenanceShed.esp and it should be fine.

And below is what the final change should look like. Our Patch Plugin Load Last.esp always loads last so it’s changes to the MaintenanceShed.esp will take precedence.

Sometimes when doing lots of edits in FO3Edit, over multiple files, it can get a bit confusing and you can enter things in the wrong place. It is always better to keep the original mod files intact (so untick them in this final ‘save changes’ dialogue) and loose some data entries. You can simply go back and check over your Patch Plugin to reference what was missed and re-enter it, in the right place.

Anyway now we have saved that change to the Lock on the Maintenance Shed Door in our Patch Plugin, so congrats you’ve made your first mod (of a mod). A nice simple example.

Next we are going to remove the MaintenanceShed.esp via our Mod Manager (FOMM), as we only wanted to load it in so we could create our Patch Plugin (that will forever load last, once we have set it to do so).

So load up FOMM, untick the MaintenanceShed.esp from your main load order, then click the ‘Package Manager’ button and in the pop-up screen for that select the MaintenanceShed file and click ‘Deactivate’. It will remove the tick next to the mod and tell you it is uninstalled from your mod list. You can ‘remove’ a mod completely (by right-clicking on it after deactivation), but as we plan to re-install this mod later we don’t need to. As for now it is as if it is not in our Mod List Load Order anyway.

And that is the basic process we are going to cover for the other mods i mentioned. They won’t all have the screen-shots for each step, and the changes are going to be different, but the process is basically how we create and ultimately add to our Patch Plugin to make mod changes to help them fit better in our overall modded game.

Oh and well done if your sticking with this, have some candy :)

@Zak: Please excuse my snark, because I definitely appreciate your efforts to demystify this crazy complexity for our benefit, but:

This thread just changed my mind about paying for mods on Steam.
I would definitely pay* for an installer .exe that saves me the hassle of a mod installation that requires >16 detailed posts with annotated pictures. I really do hope to replay FO3 with mods someday, but gee willikers this looks complicated.

*(Some utterly trivial amount of money because I’m cheap.)
[Edit: Also, does everyone find that unmodded FO3 CTDs a lot? Zak asserts this in his intro post, but I don’t remember many CTDs when I played the vanilla version (pre DLC) around release time. I’m just wondering because I have relatively little patience for CTDs, so if they’re not inherent in the vanilla FO3+DLC, I might forego any mods rumored to increase their occurrence.]

Well in truth this is only looking complicated because i’m making it that way, for a reason, a good one. But if you want simple (as simple as modding a Bethesda game gets) no fuss guides, i really do recommend Dan’s youtube tutorial (over Gophers in truth, but user of NMM may prefer Gophers?) . The build is pretty much the same, without getting into the customization we are going to be doing in this guide at Qt3.

Please keep in mind we have not actually started to add mods to our game yet (well not to play them at any rate), and so far we have only added, then taken out, one mod to show how to use FO3Edit, which i feel is important for anyone wanting to get the most out of their modded Fallout 3 game. It can’t be made any ‘easier’ sadly, and you really should read through the ‘guide’ for FO3Edit to see what a nice (i think) job i’ve done on simplifying things. I’m no rocket scientist, so i like to make things as simple as they can be, even if complicated.

In my defence, i got my report on this from the Bethseda Fallout forums. Things like the Updated Unofficial Patch fix lots of CTD’s that were left in the unmodded game (according to it’s details) but also has it’s own issues (and errors). As i’m new to Fallout 3 i can’t speak with authority on it’s stability, but i do know every other Bethesda game i’ve owned had a higher than normal tendancy to crash (and that includes Morrowind on Xbox and Pirates of the Caribbean, so i’m not just talking PC games here). I’m sure others can confirm or deny the CTDness of ‘GOTY’ edition Fallout 3 sans mods. I’d be happy to change that sentence if it is indeed incorrect :)

Using FOMM and FO3Edit to mod the mod ‘LeatherBackpack-eng.esp’

This mod you have seen in a couple of those screenshots, it is a rather nice backpack and the in-game effect is to give you +50 to your carrying capacity, which is about perfect for it’s size (more or less). What is not perfect is the mod author also gives it an armour rating of 25!! That makes it better armour than most of the actual armour in game, which imho is way overpowering and not logical, for a backpack. But it is the mod author’s choice so that was his call.

Sure you can use your pack as a makeshift firing point, and if you packed it with Kevlar and ceramic plates it might offer some protection, but hardly ideal, and the main purpose of using your pack in this way is really to provide a stable firing platform. So my call is to remove that 25 armour rating and replace it with a 2 in my game.

Now before we do this we need to check our newly created Plugin Patch that we created last time is active in our Mod Load List. So to do this we need to quickly open up FOMM and our modlist load order should look like this:

Fallout 3.esm
Anchorage.esm
ThePitt.esm
BrokenSteel.esm
PointLookout.esm
Zeta.esm
Patch Plugin Load Last.esp (or whatever you called it)

Remember we uninstalled that MaintenanceShed.esp after we have created our Patch Plugin, so it should not be in our mod list just now. Just make sure all are ticked (made active). We will from now on, be using our Patch Plugin quite a bit in our mod preparation stage of this whole process.

While we are here in FOMM’s mod load order list, we can also set two key priorities for our game files. So right-click now on your Patch Plugin.esp and from the dialogue menu that pops up we want to select ‘Load last’. Then go to Fallout 3.esm and do the same but choose ‘Load first’. This just ensures that both these mods will now retain their correct load order for the duration of the rest of our modding of Fallout 3.

Ok so we can now close FOMM, our Patch Plugin is now our first permanent .esp file to our mod build and we can carry on ‘adding’ to it to improve our final game. Back to the LeatherBackpack mod.

So let’s repeat the some of the steps we did when we created our Patch Plugin to change the Maintenance shed mod. This time we don’t need to create our Patch, but the process for changing the armour value on the Leather Backpack is more or less the same.

Open up FOMM, use the ‘Package Manager’ tab to ‘Create from Folder’ and browse to your unzipped and organised well folder for the ‘Leather backpack’ mod. Then click ‘ok’ and let it all install, activate it in your mod list as we did up above. Close FOMM when it is all as it should be.

Now open up FO3Edit, at that first prompt screen do the ‘select none’ thing, then select (tick) just the ‘Leather backpack’ mod and click ok. It will load up that mod and it’s Master files (Fallout 3 as usual).

We want to expand the tree and open up the ‘Armor’ entry. Here we see four items and we are going to ‘copy as override into…’ for all four. We don’t edit anything until it is in our Patch Plugin

Don’t forget that warning pop-up and clicking ‘yes’ to carry on. Then we make sure all four armour entries are copied into our Patch Plugin, you should see that listed now in the pop-up box, so make sure you tick the box next to it’s name.

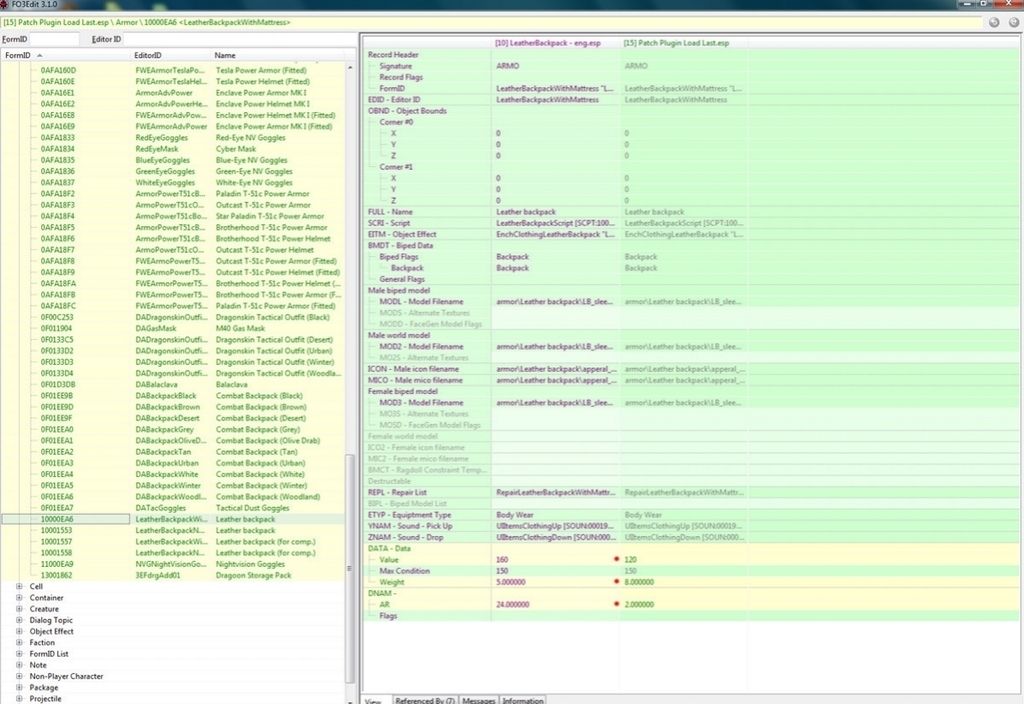
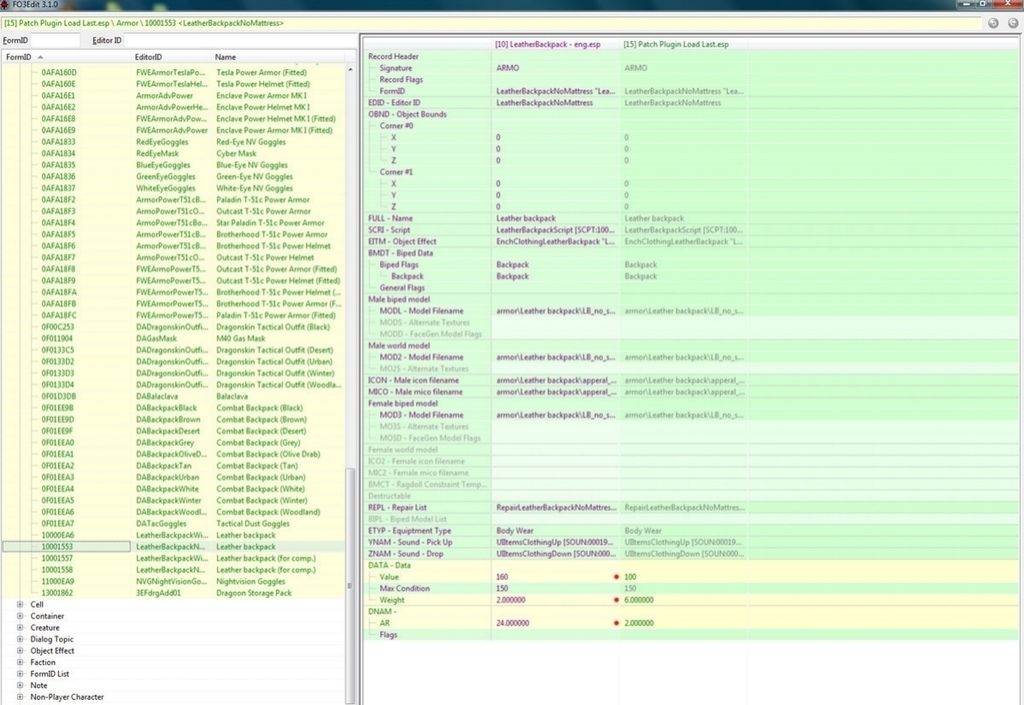
Once you have done that for the first one, you will see your Patch Plugin take up its correct position in the right-most part of your screen, and once you have all four entries entered into your Patch Plugin, just navigate to the very bottom of each Armor entry and where it says DNAM - AR change the default value to something less uber, I choose 2 for this particular backpack (as we have some actual military issue ones we will edit later, and I give them a little bit more AR), but you can give it what you wish. 80 even if you want to create a cheat item! But you don’t want to really, that makes the game boring ultimately.

The four different entries for this item are for a player item that has no sleeping mat (that is the lighter ‘2’ weight version) and one with a sleeping mat (that weighs 5). And the same two options are available for ‘companions’ if you use/want a companion at some point. Now I believe the sleeping mat might have some stability issues, the author mentions something about them being a bit tricky to use, and as we use sleeping mods in FWE in general I don’t bother using the sleeping mat versions in game.

So once you are happy all those four entries have had their armour values reduced in your Patch Plugin file, you can close down FO3Edit, and allow the changes to be saved to your Patch Plugin. The two main changes for the Leatherbackpack with a Matress and without a Matress should look like this in FO3Edit:

With Matress:

Without Matress:

Now open up FOMM and unistall the Leather backpack -eng.esp mod. We have the improved realism changes for this mod in our Patch Plugin and as we are still not installing mods yet, we don’t need this mod active currently. Just as we did with the MaintenanceShed.esp.

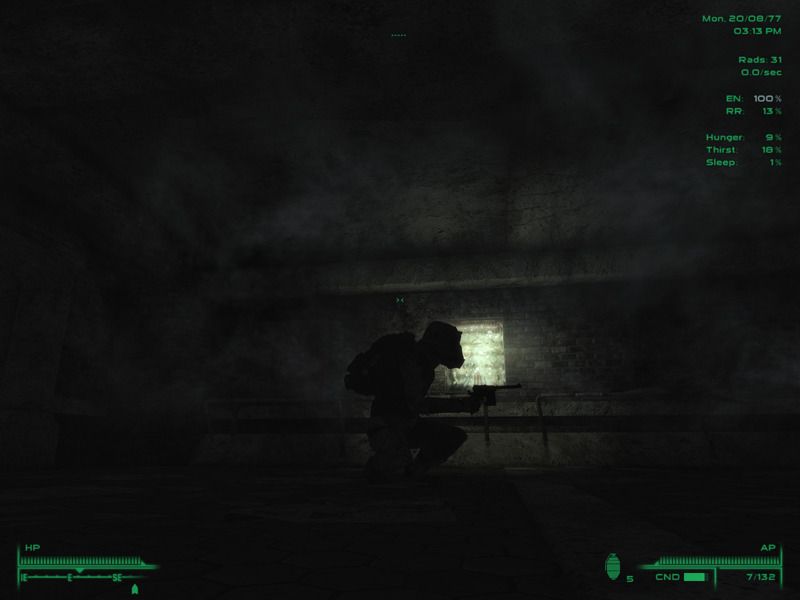
Do I have another nice picture of this mod in use?..ah yeah here it is:

Small change to Nightvision Goggles mod

The basic problem here is in the default mod they are too expensive, considering you can easily pick up a Power Armour Helmet fairly close to game start (just a few stages into the main quest to go to GNR). So even with a -1 to your Perception, you effectively get Nightvision goggles (plus decent head armour) for free. And not much beats free.

So really the tiny small tweak i make to this mod is really best used in conjunction with a Power Armour Overhaul type mod that decreases the benefit of using Power Armour without any training, and i couldn’t find one that didn’t mess up all FWE’s work, so had to do all that myself in my Patch Plugin (which we will get into later). But one small thing i could do right away is reduce the value of the (Powered) Nightvision Goggles, as it is pretty quick and easy to do, and you are much more likely to want to buy them earlier before you get Power Armour.

So we go through the process of installing the NightvisionGoggles(Powered) mod with FOMM. You know ‘Package Manager’>‘Create from folder’(navigate to the mods prepared folder), and after FOMM has installed it, tick the box and ‘Activate’, close FOMM etc.

Then we run FO3Edit, select ‘none’ on that first dialogue, tick just the ‘NightvisionGoggles(Powered).esp’ and ‘Ok’.

Once that is loaded in (along with it’s Master files) navigate to the ‘Armor’ section of the mod and expand that tree until you find the ‘NVGNightVisionGoggles’ entry under the EditorIDcolumn, and just ‘Nightvision Goggles’ under Name column.

Then right-click on somewhere on that line and select ‘Copy as override into…’

If you get that warning again, we know by know just to click ‘Yes’ to carry on, as we do know what we are doing (probably). Select your Patch Plugin folder in the pop-up box and you will see the two entries now side by side, as with the other mod changes we have been making so far.

Under your Patch Plugin column, we are going to make 4 quick changes:

  1. on the EITM - Object Effect row, in your Patch Plugin column, right click and ‘Add’. This will give a NULL reference entry. Now slow double click and it should give you a pull down menu arrow and you will be able to scroll through lots of different data entries. We are looking for this one, ‘EnchClothingHeadSunGuard “Head Gear” [ENCH:00071B88]’ - this gives that bit of clothing/armor a +1 Perception when wearing it. The aim is to make the Nightvision Goggles a more desirable buy, and this is part of that.

  2. on the BMDT - Biped Data row, go to the ‘Mask’ entry (under eye glasses) and right-click>Remove. This will enable you to wear this item with more types of headgear, like the motocycle helmet that also has a ‘mask’ attribute, and these goggles are only eye-covering items. They may ‘clip’ more with certain helmets, but in TES games i’ve found you can often use this to good graphical effect, and the items become more useful overall.

  3. On the DATA - Date row, change the value to 150 (from 300). A Power Armor Helmet is worth about 200 upwards, so this default value feels a bit high in comparison.

  4. On the DNAM - AR row, we are going to half the Armour value to a 1. More to keep them in line with other ‘google’ type items that usually have this minimal armour value.

Once all those edits have been made to your Patch Plugin, we can close out of FO3Edit (hit the red ‘close’ cross on the top right), save the changes to our Patch Plugin (make sure it is ticked in the dialogue box, and click ‘ok’).

Then we just need to fire up FOMM again and unistall the mod, as this is just what we do at this stage of the game. We still only want the main Fallout.esm and DLC esm’s AND our Patch Plugin.esp in the load order, as we are is the process of preparing that Patch Plugin for it’s roll in the final build of our Fallout 3 game.

So this is what the entry for those Nightvision Goggles should look like in you Patch Plugin:

And in game they look like this with a standard issue open face combat helmet:

Editing the Dragonskin Tactical Outfit mod in FO3Edit

This is a great mod. Not only does it have a really good and believable set of ‘best in class’ armour, but it also has an excellent Gas Mask ,eye goggle set and various cam’d Backpacks. And we really need to edit them all a little. Mostly because the default prices for these items is a little high compared to Power Armour (suits and helmets), but also some things (like the Gas Mask) are a little under-powered for their cost and potential use in our modded game.

But first…we got to install the mod via FOMM. We know how to do that now right? Run FOMM, ‘Package Manger’>‘Create from Folder’ then tick and ‘activate’ once it has told you it is installed etc.

So now it is all ready to be added and edited in our Patch Plugin lets talk a little about Basic Power Armour.

In FWE (which we will be using) it has a base AR value of 65 (it was 40 in default Fallout 3), and part of my tweaks to Power Armour has been to also increase it’s value a bit, so the base T-45d body costs 1000 (instead of 740 from default Fallout 3), and increase it’s weight to 120 (from 45 in base Fallout 3 and 100 in FWE). I’ve also made it so you get none of the benefits (+Str, extra carry weight etc) without at least Basic Power Armour training, they really are a hindrance to use without that now.

Now what this has to do with the Dragonskin Tactical Armour mod is that based on those new values for Power Armour (from FWE and my tweaks to that) I felt it needed some small tweaks to better fit as the ultimate body armour before Power Armour.

So we have a few things to change in FO3Edit. Firstly we change the AR value for the Dragonskin Tactical Outfit and there are 5 versions to do this for (Black,Desert,Urban,Winter and Woodland), so we need to find those in the Dragonskin Tactical Outfit.esp under ‘Armor’ and ‘copy as override into…’ our Patch Plugin, for all 5 versions.

Then we are going to change the ‘DNAM - AR’ value to 40 (from 34) in our Patch Plugin entries for all 5 versions. It should look like this when done:

At a weight of 25 this makes it easily the best non Power Armour choice in the game, which is one of the original mods aims, and the price at 1000 (default mod value) per body makes it as expensive as the basic T-45d Power Armour (but you don’t need special training to use it!).

And now we also make another change, but this time to the Object Effect data, so scroll up and find the entry ‘EITM - Object Effect’ and make a note of the ‘DAEnchClothingDragonskin “Dragonskin Tactical Outfit” [ENCH:0F00C257]’ details.

We are now going to find that in the ‘Object Effect’ section in the Dragonskin Tactical Outfit.esp and look for that entry to edit after doing the ‘Copy as override into…’ our Patch Plugin off course.

The original file had a sneak bonus, which I prefer to keep on stealth-specific items (if at all), so I removed that. It also had a carry-weight boost of 20 (which is just under half our LeatherBackpack mods carry-weight boost effect), which I reduced to 15 (but could go down to 10 in truth). Sure you do have pockets all over combat clothing in general, but compared to a backpack they are limited. It also had a ‘small guns’ skill increase of 5, which I kept even if I’m not a fan of clothing having skill boost effects like this, it is a game mechanic and aids somewhat in adding to the high cost value of the armour.

And because I’ve removed the stealth boost and reduced the carry-weight boost, I decided to add both an ‘energy weapons’ skill increase of 5 and a ‘Big Gun’ skill increase of 5. Again I don’t really like this stuff on clothing/armour BUT this is the best in-game armour before Power Armour, so it sort of needs something. It should look like this when we are done:

On another day I may be tempted to go through ALL the games armour and clothing and remove these kind of skill increase boosts, I much prefer keeping that stuff to the ‘skill books’ (or if they existed, in-game trainer NPC’s - maybe a mod I’ll have to make one day?).

Once we have made those changes to the 5 sets of Dragonskin Armour we can move on the next item in this great mod that needs a ‘balance’ tweek.

The M40 Gas Mask is a cool item, but in a game with Power Armour helmets that are cheaper(!) it needed a price adjustment downwards.
So as we have already installed the whole Dragonskin Tactical Outift.esp mod already, we can just look in the ‘Armor’ entry for the mod until we find the Gas Mask, to ‘copy as override into…’ our Patch Plugin before editing.

In my modded game it now has a base value of 110 instead of 250, as shown in the screen below:

Also to make it a more desirable purchase, and extend it’s longterm game use a little i’ve buffed it’s Object Effect entries as shown below:

You will need to ‘copy as override into…’ your Patch Plugin first from the Gas Mask’s Object Effect entry in the mod files. You get an increased Radiation Resistence of 15 (default was 10) and an additional Posion Resistence of 15 (it’s a Gas Mask?) but you also loose 1 point of Perception when wearing it (that is from my general first hand experience on using them, in reality it may be closer to a -2, but we want people to want to use it!).

Again these are small simple changes, aiming to fit certain items more smoothly into the overall mod build we are aiming for.

Next up in this series of edits to the Dragonskin Tactical Outfit.esp mod we have two simple items, the ‘Balaclava’ and the ‘Tactical Goggles’. The changes i want to make are short simple ones.

For the Balaclava i wanted to reduce it price (‘value’ in FO3Edit) from 50 to 10, and reduce it’s ‘toughness’ (‘Max condition’ in FO3Edit) from 150 to 20, and reduce it’s armour value (‘AR’ in FO3Edit) to zero. It’s a balaclava and last time i tested one out it didn’t protect me at all from much and being made of light fabric didn’t really seem like it would take a lot to damage it. Anyway it looks like this after the ‘copy as override into…’ your Patch Plugin to make the edits:

The Tactical Goggles confused me at first, as for the asking price (in our modded game) i thought maybe they did something fancy like Nightvision (which they don’t) even if they would then be a bit cheap? Anyway as per the descriptions in the screenshot below i made these edits to it:

The effect i added in the ‘EITM - Object Effect’ row was: ‘EnchClothingHeadSunGuard “Head Gear” [ENCH:00071B88]’ and that gives them a +1 Perception boost when worn. ‘Value’ is reduced from 50 to 30 and ‘Max Condition’ is reduced from 100 to 30.

The last entires we are looking to make in this mod is for the awesome combat backpacks and there are 10 of them to change. Get ready with the ‘copy as override into…’ your Patch Plugin 10x!

Value is 200 (from 250), weight is 6 (from 4) and AR is 4 (from 1) - we are using the stats from the Leatherbackpack to balance vs here.

With that in mind i wanted to increase the carry weight of these larger combat backpacks to 80 (default value was just 60). Now if these numbers are in pounds (and Fallout 3 being an american game this is probably the case) i felt that not only was 60lbs a bit light for a fully packed ‘long back’ combat pack (in real life) but in comparison to our leather backpack that can carry 50lbs, it also could do with an increase. I did, but rather prefered not to, carry around 80lbs in my pack often, so 80 seems like a good number for these top of the range largest backpacks in the game. It would be great to have slightly bigger model versions also to get an OTT 100lbs into the game for all those ex-arty guys and their base plates! Anyway it looks like this, and you need to do this for the 10 versions the mod names (but only once for the Object Effect edit - hurray!):

Phew, time for a little break and some candy:

Hand-to-hand weapons are very handy in FWE, ammo is expensive and finite, so get out your fist full of steel:

A sunflare as we look under a bridge into the forrests:

Fellout doing ‘Miami Vice’ (quite well):

How odd this thread isn’t stickied

Request for blog feature?

Or something. We get the occasional epic do-it-yourself thread on Qt3 and they have a tendency to fade away into the Pandemonium. And they’re invariably asked about again when Qt3izens rediscover the game/are doing a backlog sweep/are in one of gaming’s lulls.

It’s all cool from my end. I did my ‘Massively Modded Morrowind’ thread on a very small site i used to visit, and just like this it was a regular forum thread full of stuff, and it seems to find ‘itself’ quite easily with a quick search for that term. This threads title might not be so good, but i’m sure folks can ‘subscribe’ or whatever the fancy technological term is for it, and not ‘lose’ this thread in the years to come, if they so wish. Assuming my information and tutition is not being badly put out there (that is possible, ‘buyer beware’ etc) and it all does work as well as the modded Fallout 3 i’m currently playing and having a good time with.

Oh and don’t let that last screenshot’s reference to Miami Vice sway you, we are going to be seeing a lot of FO3Edit text screens!