Gemcraft: grandiose TD at its finest

It’s time for a Gemcraft thread as it is one of the finest Tower Defense games out there. You can sink hundreds of hours into its 160+ levels, its talismans for strengthening your towers (gems), its three difficulty levels, the battle trait modifiers that give extra difficulty & XP, it’s 25 skills and its 460 achievements.

Gemcraft has it all and it does it very well. Instead of different towers, you get gems that socket into one of three different tower types. There are 9 different gems and you can keep them pure, or you can combine them with other gems to weave whatever power you need on the map. Slowing, Chain Hit, Poison, Critical Hit are just a few.

A person new to tower defense will make the mistake of trying to find strategies to use on Gemcraft, and I would recommend that you ignore these for the time being, focus on a beginner strategy guide such as this one, and just enjoy it on its own merits.

Because there are two Gemcraft games. One for the first playthrough and one for those who want to go crazy. What I mean by that is you’ll find guides for “Wizard Level (WL) 1,000 and above” or “Endgame strategies” which talk about WL 10,000 or even higher. For example, it’s quite doable to finish the main campaign at around WL 200 or 300 if you’re not doing a lot of the advanced gemcrafting and endless runs. And when you see guides that mention WL 10,000 you’re really starting to see the significance of the two levels of play within this game.

Introduction to Gemcraft

Gemcraft does a wonderful job in introducing the player, if you pay attention to the pop-ups for the levels where the game is introducing a new mechanic. The problem with most people (I include myself in this btw) is that we are familiar with the TD genre, and we don’t need any stinkin’ tutorial. Let me just play the game, I’ll figure it out. I did that on the first playthrough and only after starting my 2nd playthrough, did I read these tutorials, and expand my knowledge of how to play the game.

Read the tutorials. They are short, and the contain very pertinent information. You can pull them up at any time on the field map menu by pressing the Tuturial button.

When you first start Gemcraft, you’ll get your first field, and you should easily crush the creeps. This is easy you say. And you’re presented with something of a map implying more things to come:

This is called a field. There are 23 fields on the map, and each field has between 6-8 levels. There are different types of levels:

Normal: nothing special
Tome Chamber: unlocks a gem or tower type.
Wizard Tower: unlocks a special skill or battle trait
Vision: Very difficult level. Skills / Talismans / Traits don’t work here. These are super tough. Better to avoid until you’ve been through a third of the levels (roughly 50).
Border: Completing this will open up one or two adjacent fields

As you progress, the map will start to expand. It’s kind of like a treasure hunt. completing one level opens up several more options, and you’re always hunting for those tome chambers and wizard tower levels to get more toys!

Read this steam guide. It does a very good job at introducing a lot of things to the new player to Gemcraft.

Now I’ll add to it some things that they didn’t cover in that guide.

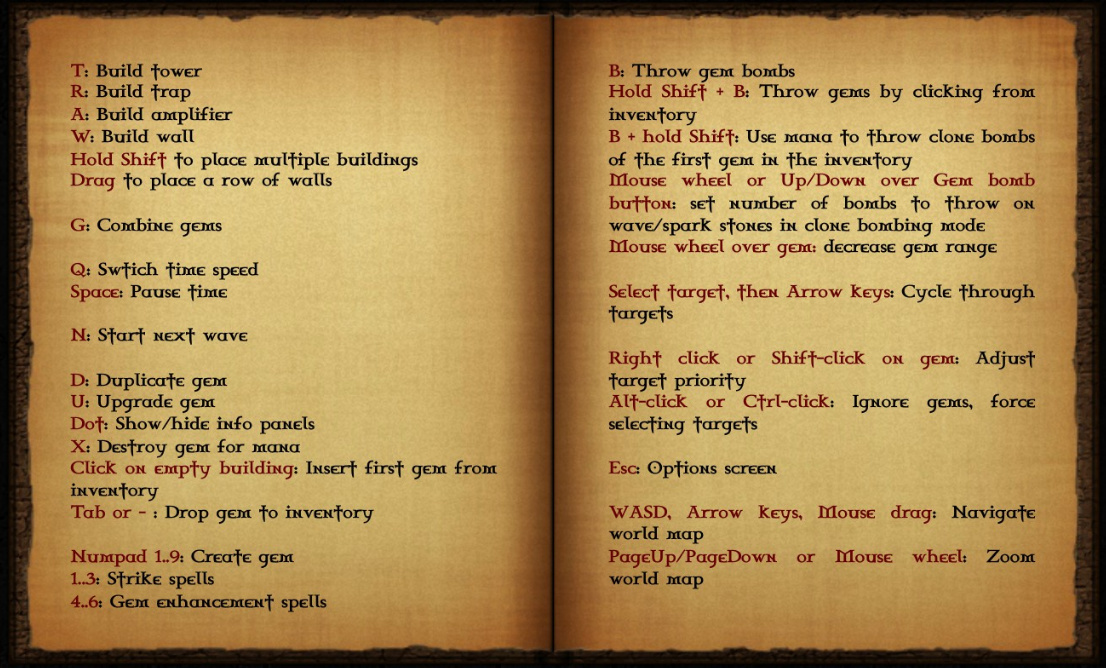
Hot keys. This post alone will probably get Tom to bite if he hasn’t already played this.

See that hotkey for mouse wheel? This is VERY IMPORTANT. You can alter the range of a given tower by hovering over a gem and using the mouse wheel to increase / decrease the range which it will fire (up to the maximum for the gem level). This is critical to get some of the tome chambers opened up as they always have some "kill 400 creeps in this tiny circle) and your towers will invariably be targeting and killing them outside of this circle.

Enraging waves:

Ok, this is a somewhat non-beginner strategy that will open up the game for you in so many ways, it needs to be covered:

Note: Enraging can make it so easy to open up tome locations (kill XXX creep within this circle) as you can gem-bomb an upcoming weaver wave for example 3 or 4 times to generate a lot more creeps to coincide with some other timer like the freeze or curse.

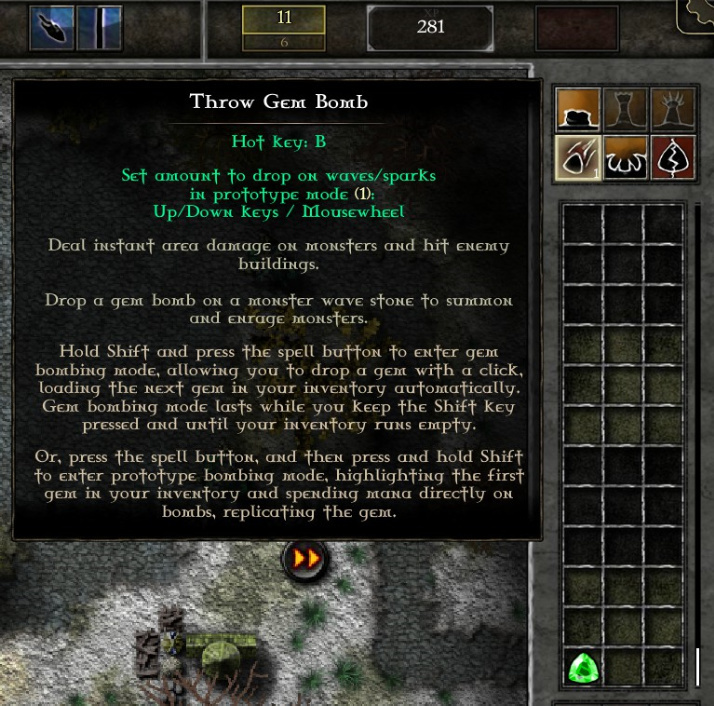
Enraging waves give you both more creeps and tougher creeps. This equates into more mana (mana is generated per kill) and more XP, so you level up faster. Enraging waves is the process of gem-bombing the upcoming waves (the rectangles on the left hand side). To enrage waves the easy way you create a level 1 gem, and you click B or click on the gem-bomb icon. When you click on the gem-bomb icon it shows you this text:

I hate this text, because you only need to read the last sentence. Do it only this way and your life will be so much easier. So, you have your level 1 gem in your inventory, you press B to start bombing, then you press and hold the SHIFT key. This will take that gem you have in your inventory and make a copy of it, and bomb the ground whenever you click. No need to create a bunch of inventory - just have that single gem. This is so important and makes this so easy!

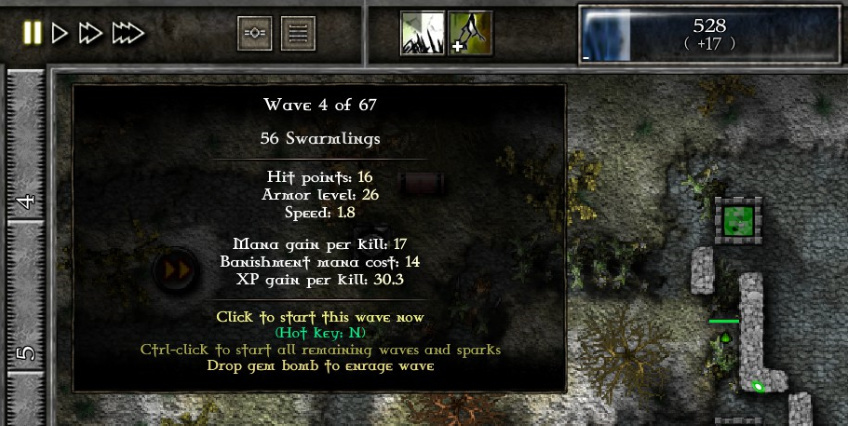
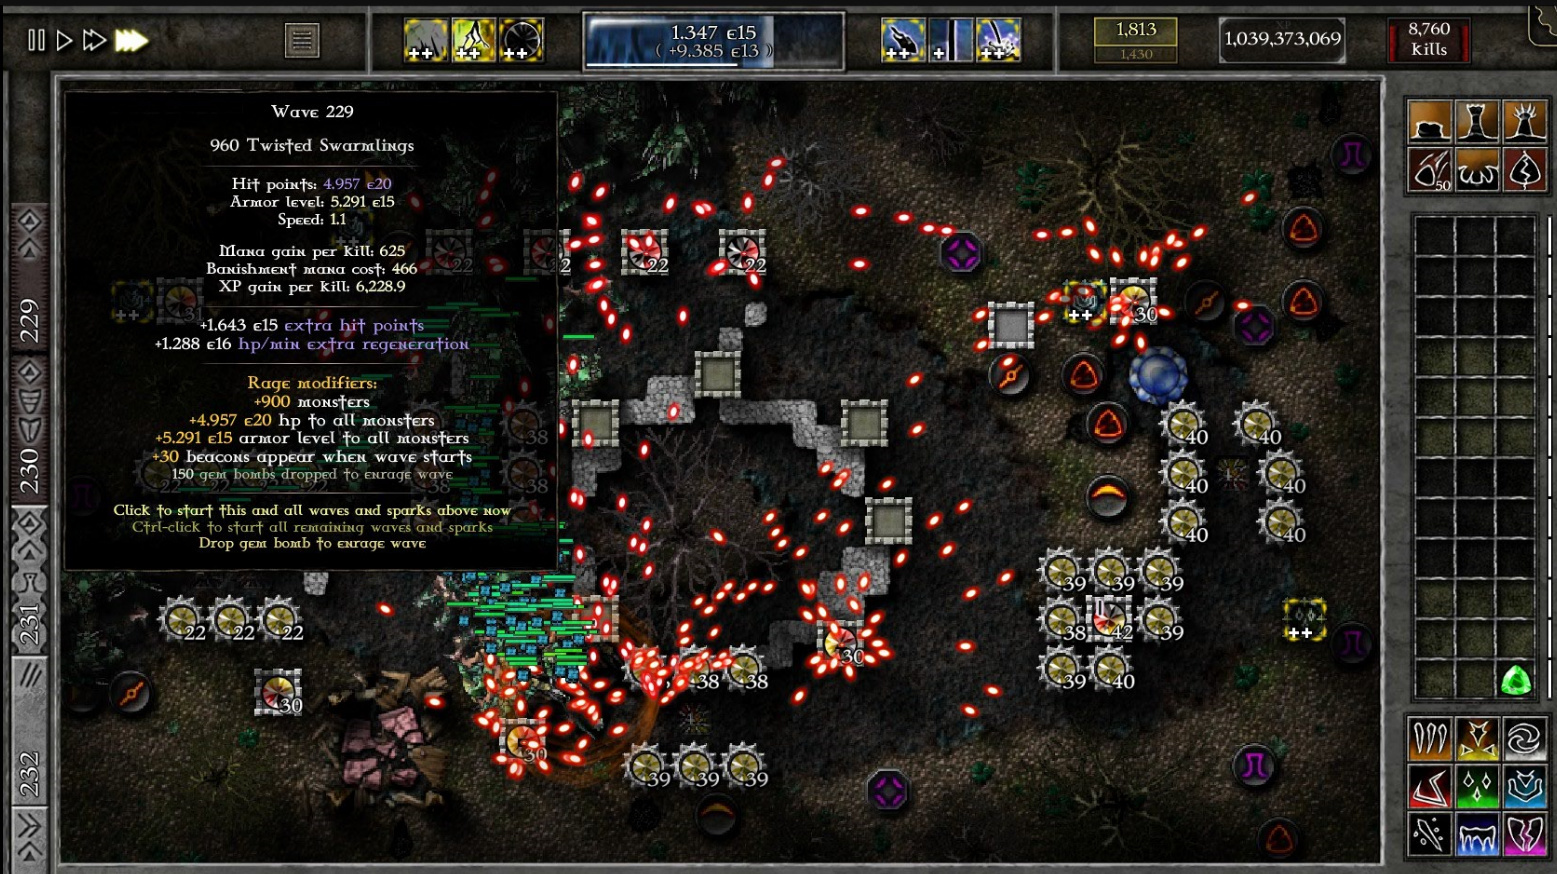
Now, on the upcoming wave diagrams on the left hand side of the screen. Notice when you mouse over them:

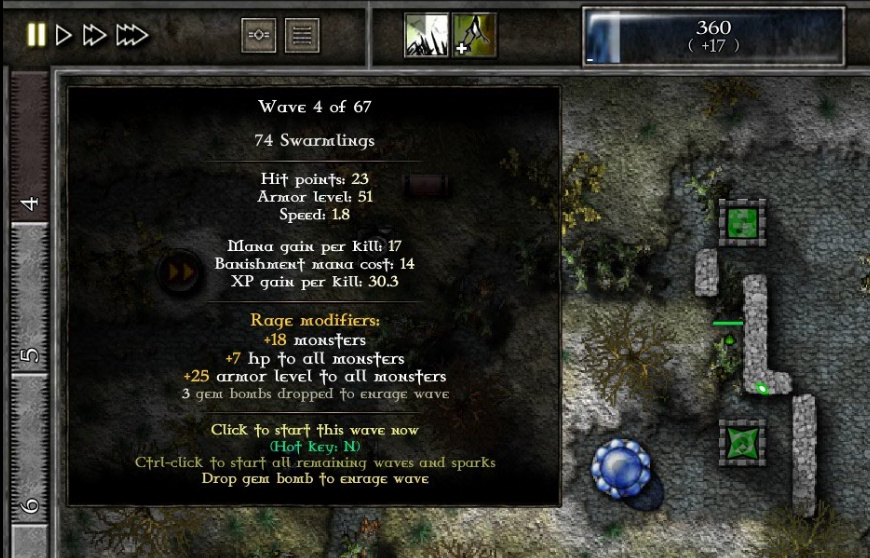
When you mouse over, it shows you how many creeps are going to come, how tough they are. When you gem bomb that rectangle, it will turn dark and when you mouse over it, it now shows:

Notice the rage modifiers! By dropping that single gem on the wave, we now have 18 more monsters! Yes they are tougher, but you can earn so much more mana this way.

While there is an science to enraging waves, particularly in WL 1,000 and above, I’m going to ignore that and give you a simple formula:

Enrage waves 3-9 with one gem
Enrage waves 10-19 with two gems
Enrage waves 20-29 with three gems
Enrage waves 30-99 with 4 gems

With these notable exceptions:
+1 for swarmlings
-2 for giants (or fuck giants and never enrage them, seriously they’re hard enough).

With this enraging, you will gain 2x-3x the normal XP you would earn on the field. This will really accelerate your wizard level!

Now, of course, your mileage may vary. As you get above WL 100, you will find that you can enrage more than this. You can also use bigger gems to enrage. But to keep it simple for now, just use this formula and it will help you so much!

You may have to reduce enraging depending upon your battle traits - so YMMV.

I would love to say I am shooting for WL 10,000! It boggles the mind!

Thanks for making the thread!

I will start with the beginner’s guide.

You did a far better job than I would have @Tman!

You get to a point where you are powerful enough that you can start maxing out the 9 difficulty areas so you can start earning a lot of xp. Then from what I understood, people just let endless mode run for a few hours to gain a ton of xp. Same people probably also use outside gem making apps to ensure every gem is perfect. I could never put that much work into the game. :-)

It’s kind of a rough video and long, but this is the video that taught me how to make a mana farm. Once you get to the point you can make one, pretty much every mission revolves around making a farm in whatever space you can. This was always extremely satisfying to me. Even though I would make one every map, making the perfect one was my zen. :-)

@LeeAbe that is a great video. The problem is that you don’t get the mana gem reliably until you get to field B5 and the amplifiers on J4 and bolt on Field I3 . Watching that video as a beginning, when you are below WL 100, and haven’t got those is frustrating because you’re left wondering how you get all those gems & towers to use it.

But once you do get it, look out because it opens up an entirely new part of the game with so much mana.

Full list of fields

Please do not show me that at this point in time.

j/k! This looks really cool. I’m chucking it on the top of the backlog pile!

-Tom

Let’s talk Mana pool

Your mana pool is everything. It is the amount of life you have and it is also your bank for which to purchase gems, or build towers or combine gems.

When creeps reach your mana pool, two things occur:

  1. You lose mana for the amount the creep is worth.
  2. The creep restarts the level at the beginning.

So, it’s very important to keep enough mana in your pool to withstand a few creeps leaking by. It is very frustrating to be gem-bombing on wave 50, and see that you’re out of mana (there is a battle trait called Mana-Lock which only releases the mana you’ve accumulated every XX seconds - depending upon the level you set it at. I routinely set this at 7 to gain more XP multiplier). And then one stupid creep leaks by and game over.

There is another thing about the mana pool which is not intuitive. The mana pool itself has a “level” and as the level increases, the rate at which mana is replenished is increased. This mana level will impact a gem called “poolbound” later on - the larger your mana pool, the more powerful this gem becomes.

So, you want to try & get your mana pool up to the next level before you go spending - the more you can let it grow, the faster it will continue to grow, helping you in more levels. Notice my starting mana pool is level 4 (I have a lot of left over fragments for upgrading talismans):

The bar shows you how close you are to the next level - it’s pretty intuitive. Notice the replenish & XP gain multipliers. Now look at the mana pool later in the game:

So delay spending until you get to the next level, and for heavens sake don’t get too carried away in spending & leave yourself very little mana left to withstand a few leaks!

Talisman

Talisman properties have a wide range which can help you either directly within a game (like damage increase or more starting mana) or indirectly with higher XP gains (either directly or indirectly due to e.g. a longer kill chain cooldown).

These drop during play and during endurance, randomly.

These can be upgraded by shadow cores, the reward for killing shadows, spires, spectres and apparitions. Basically these are the toughest things on the map, that wonder at will, and float above the map. So it’s good to prioritize killing these to accumulate shadow cores because you’re going to need them.

At the beginning, when you finally click on that Talisman button, you’re like, “wow, look at all these cool bonuses!”. You get several types and it’s like a child’s toy - matching the shape to the socket. You only get so many, so every 10 levels or so, you’ll be revisiting these & swapping out better ones for the weaker ones.

You will be tempted to upgrade these. After all, you have all these shadow cores right? And these fragments have upgrade slots, so why not?

Because when you start out, it looks something like this:

But then later, when you’re wizard level 1,000 or above, it takes on an entirely different look:

So you can see those pitiful talismans you get in the early game that have 2 or 3 upgrade levels? they get a lot better and upgrades cost a lot more. My rule of thumb is to don’t start upgrading till you get a level 20 or above and then only upgrade them when you feel you need them to progress.

Or, upgrade them if some level is giving you fits and you need more damage against giants (for example), then load up damage to giants and upgrade them. That 3-5% damage may be all you need.

My advice is to be aware of these talismans to the extent that you make collecting shadow cores a priority because later in the game, you will want as many of those shadow cores as possible!

Difficulty

Believe it or not the biggest complaint I see from people is that GemCraft is not difficult enough. “It’s too easy!”

And it is if you leave everything at the defaults. As you progress through the various fields, you will find new battle traits. Battle traits are the games way of giving you an option of increasing your difficulty along with XP.

Most people will find that increasing these is a great way to accelerate your wizard level, while giving you exquisite detail on adjusting your difficulty level.

All the battle traits are listed there, but your map will look significantly different depending where you are in the game.

Several of these not only increase difficulty but they also change gameplay in a minor way. For example, the orblet option gives you orblets around your mana pool which greatly increase your mana gain provided they continue to be orbiting the mana pool. If monsters take them, you get a slight reduction - provided you get them back. But if they escape the field entirely, they can really hit you hard and it’s game over man.

So crank up the Battle traits till you feel challenged and then keep adjusting them. If you find a level difficult, just dial them back down.

Another way to increase difficulty is to gem-bomb as discussed previously. This makes monsters far more difficult and more of them - with representative rewards.

Glaring and Haunting Difficulty

Yet another way is to unlock Glaring and Haunting difficulty. Glaring is unlocked at field K4. Haunting is unlocked at T4, but only if you complete Q6 on Looming.

Vision Fields

The hardest fields are Vision fields. I had to resort to a few guides on about 3 or 4 of these. They are extremely difficult. If you want a challenge, go for the Vision fields.

And that concludes my tutorial section. Hopefully this will help a few people get interested in this wonderful TD game. I’ll leave you a picture to show you what wizard level 2,000 looks like. This is about where I lost interest and this really isn’t even the endgame:

So, for those of you wanting to really sink your teeth into statistics and gemweaving the perfect gem (for which there are utilities that people have created), there is so much to offer from GemCraft.

Now hopefully others will post ;-)

(I was reluctant to break your streak but… psst… thanks…)

… I had zero idea you could boost a wave by throwing a gem at it Oo

Nice, @Tman! Added to my wishlist!

Okay, after ducking into Gemcraft to “take a quick look real quick”, I just want to say I officially hate @Tman for this thread. I can’t believe this has been around for over a year and no one told me about it.

-Tom

Not sure you want to hear this but Gemcraft has been out since 2008. It only recently came to steam a year and a half ago. That’s why there are so many guides for crazy Wizard levels. People have had years to pick this game apart!

I’m glad you’re enjoying it. It’s a pretty deep game and the story is kind of interesting the further along you get. Have you encountered a shadow yet? They’re the black blobs that dart about & can attack your core directly, and sometimes dump a bunch of demons.

Also, I’d be curious if you tried gem bombing to enrage levels?

I played, like, six levels and then muttered to myself, “Goddammit, Tman” and shut it down because I had to do something else and I knew if I didn’t stop playing immediately, I wouldn’t get that something else done. So now it’s sitting in my Steam account taunting me while I plink away at the something else.

2008, huh? That’s crazy. I guess that’s why the title screen cryptically refers to the games as “Chapter 2”, but there doesn’t seem to be any Chapter 1 on Steam.

How did you find it?

-Tom

I wish there were leaderboards! How am I supposed to know if I’m doing well, because just beating the levels doesn’t seem to be that difficult. I know it doesn’t make sense, but I’m not nearly as motivated to play as other tower defense games without the leaderboards.

I think leaderboard would be problematic unless they offered a “classic” version where everyone got the same gems. With the way you uncover fields & find things, what you have in your starting inventory can vary quite a bit. The further along you go, you get so many bonuses from skills and talismans, so little equivalence in the scores.

While Vision fields are “a natural”, they are so damn hard to complete, that just finishing them is an accomplishment in their own right. I’m not sure I’d be gem bombing a vision field to try & eek out more score.

If it isn’t difficult enough, start increasing the difficulty levels. You only start out with a few, but try to max those out and see if you can do the levels. Also try the puzzle levels (the ones that you have a set amount of resources, regardless of your level), I found those to be extremely difficult, but very rewarding once you figure them out.

For me the motivation was unlocking everything (I really wanted black and white gems), and getting more powerful. Plus, all those achievements. Even if you don’t care about the whole achievement thing, a lot of them are challenges to try to figure out or where you have to be powerful enough to do them.

This thread is really making me want to play again, but I really don’t have time for it. I did nothing but play this game for a month last year.