I have 3 knives, a Global, a Shun, and a Kan and have been doing a bit of research. Global says only hone on their diamond or ceramic rod. Shun says use their honing steel, which I own and use. Kan says you can hone, but probably shouldn’t use one.
I have always figured my knives were sharp enough, they seem fine, but I have never sharpened them. My main knife is 11 years old. My others are closer to 18 years old. I got a new knife today and I now realize how dull my old knives are.
Now I am researching what stones to buy, but I am kind of dreading this.
I use a wirecutter recommended manual sharpener, which, like, maybe it will ruin my knives in the long run, but my kitchen knives aren’t heirlooms or anything, and it seems like it will be years before I take off enough metal to start taking off a noticeable amount of metal from my periodic sharpening.
From a knives-but-not-hobby perspective, it seems to work pretty well.
Thanks, but if I am going to do this, I am going to learn to do it right. For me, if I was using $40 kitchen knives, that would be fine, but if I am going to spend this kind of money on knives, I should at least try to make them like new. it’s going to take some practice though.
I’ve got a slightly cheaper one of those for Asian knives specifically. I’m no expert, but it also seems to do the job. Certainly better than the little gadgets I was using previously. And it’s nice not to have to worry about messing things up angle wise.
Yeah, the one I posted was an older Wirecutter rec, very similar, but I think manual instead of powered. As with most things, it’s probably going to do a better job than doing it by hand for 90+% of people.
I am a noob, it is much easier to find the angle than I expected. About half the thumbs length up, for a small knife. You will feel it and hear it.
I saw this review the other day, tl;dw the $15 sharpener is competitive with the $900 one. Apparently they got some sort of fancy expensive machine to measure sharpness (lower = sharper)
I watched one video and the guy said it’s pretty easy to find the angle. He paints the edge with a magic marker, and then you can see if your angle is correct by where the marker has been worn off. One website has pictures to help you compare it to and narrow it down.
I figure I will buy a guide, they are cheap, and even if they don’t work very well, it will give me a good idea of how to hold it to get the correct angle.
Keep in mind that if you use a marker and an aggressive stone, you can put it on a wider angle and grind through the marker quickly, giving a false positive. For my chisels I use a jig but still use marker to confirm the first pass is touching the entire surface.
I have one of those (maybe older model) and it works great. I was total garbage with Japanese whet stone sharpening, and any dummy (me) can use the electric.
ok I got a random question since you’re doing woodworking.
I have a wooden cane, made out of some hard dark wood. I need to taper the point to a pencil-like shape so I can attach a cane spike. (it’s conical) I do not have a lathe.
I bought gloves and a carving knife, do you think it’s possible to do by hand or do I just end up ruining the cane?
Short answer is epoxy cures all ills. Get the good stuff, 30 minute set or longer, and rough up the inside of the spike assuming it’s a metal. If you had a lathe that could perfectly match the conical interior of the tip, that would be worse, I would think, because you have a consistent shear surface. The more features you leave in the tapering, the better the grip. Leave it too tight, and then hit it with a hammer.
Without seeing it, other options could be to whittle it down and as much as possible pressure fit it (i.e. make it a hair big and whack the shit out of it while driving the cane into the tip) and use epoxy AND drill a screw or a rivet through as well. Canes obviously get enormous amounts of incremental force on the tips that will eventually compress or wear away the wood. Epoxy should help stabilize the wood and provide a plastic/elastic barrier for the forces, but it needs surface to grip. I’d score the cane tip with a file and put as many dings inside the tip as possible to give the epoxy surfaces to flow into and then harden. Depending on your tolerance for appearance, wouldn’t hurt to buy a pointed punch and after driving the cane into the tip, whack some dimples from outside to give it more grip.
Look at this BASTARD file! Just kidding, it’s called that normally. See how the shank tapers somewhat? Without any special tools you get three or four drillbits and your drill the smallest the length of the shank, then the next biggest a bit shorter, etc. Then you get a hammer and drive it into the wood, could be a simple saw-off of an old broom handle. Because the shank is rectangular you get a mechanical wedge that can last forever. Canes are different though, and a cone going into another cone loses a lot of the mechanical torque grip.
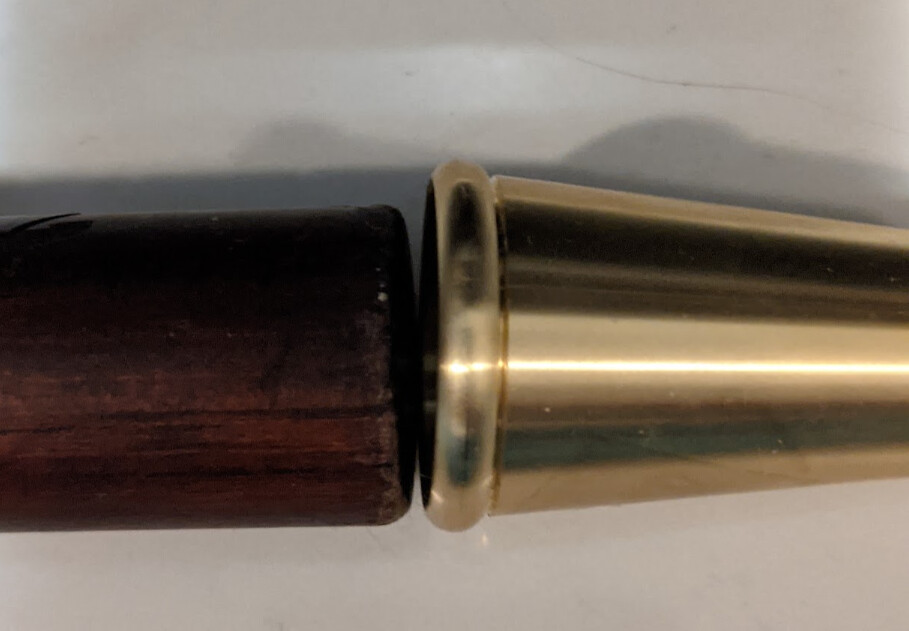
Ok you made me confident I can whittle the wood. The cane is wider than this brass attachment. And I need to get lots of epoxy then. Maybe I have to use solid epoxy (like marine epoxy) instead of liquid one or it will run off the sides as it dries. Unless I use ugly tape to seal off the gaps. But then the tape will be permanent.
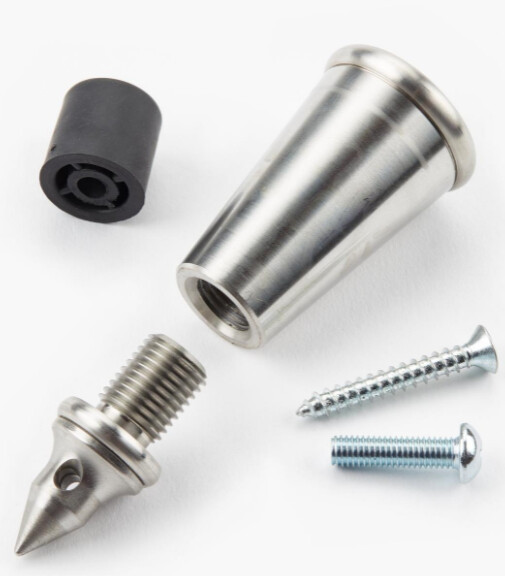
Hmm, I’m not getting why a lot of that hardware is there. Throw out the dimpling or screw angle, looks like you would want to preserve the fancy look of it. Can you link that tip? Might have some instructions that let me understand better what they’re going for here. Can’t figure out why the tip-tip is threaded.
Thinking a bit more, I believe that is meant to have a nut planted in the end of the cane, which the secondary tip then screws onto, tightening the whole thing.
Thinking a bit bit more, I see threads in the main body, so maybe just made so the actual tip is replaceable.
Oh, and you won’t need much epoxy at all. Once you whittle it there will be maybe a square centimeter of space to fill in all the nooks and crannies. I like BSI 30 minute myself. Also, don’t use putty/solid epoxy, you want it to flow into the roughing and cracks before it sets.
Did some googling, the screws are there to affix the rubber tip if that’s you choice, I’m assuming it isn’t. Screw in the metal tip, gauge the depth, gauge the interior diameters at 4 points, then start whittling. Stop well short, test fit, whack it with a hammer (a good thing, as it will pre-compress the wood before final fit, and when you have it right file some ridges into the wood and as much as possible into the interior of the tip, apply epoxy (maybe tape the end of the cane to prevent overflow from sticking) and drive that sucker in. Leave the tip in or the epoxy will gunk the threads.
In other news, I finally broke down and bought a slack-belt sharpening system. On my non-woodworking edges (where I only use stones or angled crock sticks) I had to admit after so many years that I had rounded or ground the edges to the point where I could only put a shaving edge back on for a few days or uses. Sometimes you have to drop back and punt and reset the edge.
I bought this:
And am resetting my kitchen knives and pocket knives to 20 degrees a side. So far so good, it did a great job on my main chef’s knife (thankfully a cheap Victorinox so I wouldn’t feel too bad if I boogered it up) and the cutting performance is much, much better, even vs. when I’ve immediately gotten it back to shaving sharp on a stone, which to me indicates I was putting a fine edge on a worn out, oversharpened bevel. With the new bevel it glides through tough skinned things like limes. We’ll see how long the edge lasts, I could see this being a twice-yearly thing and my usual touch-ups in between.
I didn’t do the cane but I got pretty good at the sharpening knife thing! I ended up with 4 stones, 800, 1000, 4000.
Things that were not obvious:
I needed to use more force than I thought. Watching videos they move so fast and they say go light. Well, I ended up going 20 mins and having relatively poor results. I think the knives were just so dull I needed the extra strength.
I wear gloves now because I managed to cut myself quite a few times. I am not sure whether it’s from “feeling” the burr, or because I was abrading my skin against the metal bits that fell off
I learned to clean the stone. If it’s super dirty yeah that’s metal bits and the stone is not going to grind as well. I was wasting my time. I tried to clean it by brushing it but it just doesn’t work. Flatten the stone to clean it, by abrading it against pavement or another stone. I waste some stone but my lifespan is also limited by this point.
Re: flattening, that’s absolutely a thing you need to do, but the better method is to get something that is a constant flat reference surface. I went big and bought a slab of granite guaranteed to .001, but a sheet of thick glass or a granite/marble countertop offcut works just as well. Get some 600 grit wet/dry sandpaper, wet the stone/glass, put on the sandpaper, and rub the stone’s face against it. You can use the sharpie trick here as well. Just rinse off the swarf with water, and get good 3M paper that can hold up to multiple wettings. Rubbing two non-true stones against each other just gives you two slightly smaller non-true stones.