Zaks Morrowind+MGE XE experience

Edit+3: To add to the general modding Morrowind+MGE XE awesome there is also this very nice step-by-step guide that we have seen in these forums before, but i had forgotten about it and it adds some nice stuff to the mix:

http://www.somethingfornobody.com/blog/morrowind-modding-guide/

Edit+2: Like the game of Morrowind itself this thread will require the effort of having to read. Quite a bit (so get a coffee/tea). Sorry about that but the complexity of what is involved, and the difficulty to change it as it grows means a fully voiced option was just not practical, nor desirable (imagine my voice in your head, over and over as i speak each line the same each visit!).

Edit: A quick note on performance. Morrowind was never a ‘fast’ fps performer, and to be honest it didn’t need to be, not being a ‘shooter’. Where a typical shooter fps needs about +50-60 fps to be playable, Morrowind needed about 25-35 fps. All the screens you will see in this guide are running in the range of 30-60fps (i cap Morrowind at 60) with an average of 40-55fps. My specs are:

i5 running at 3.1Ghz GTX 750 Ti GPU

Nothing overclocked. Also each post will be reviewed and i will try to iron out any errors or make additions to improve clarity and information, so if you are in the mood for building a large modded Morrowind, with fancy new looks (better than Oblivion imho, and Skyrim in some specific area’s) and a much deeper crpg system (better than both newer TES games) then check back over the thread as i will keep updating it.

The aim of this thread and Modded Morrowind build

The aim of this thread is to provide a comprehensive, but not too technical (no really), thread that pretty much anyone can use to help them understand and run a large modded Morrowind. It will cover all aspects of this, from where to go to get mods, what websites to use to get the most out of Morrowind, to loading mods into the TES construction set to edit and merge mods (also called plugins) and how to adjust texture files for use in the game.

The aim of the specific build you will see me using is what i call ‘Massively Modded Morrowind’ and it is a balance between increased difficulty (to exploit the game), realism (you will need to eat/drink and sleep, the days last longer, creatures will be unleveled etc), general gameplay improvements (related to patches and fixes and ‘game balance’), overhauled graphics and sound (MGE XE a large part of this, texture packs and sound mods) and huge added content (from items in the game (nothing Uber/unrealistic though) to quests and landmass additions).

By showing you the details on doing this you will then be able to go and build your own specific version, to suit your own tastes. This an important part of this thread, to pass on that info in an easy, not so technical, way. Everyone should build their own ‘Massively Modded Morrowind’, as it is lots of fun and the reward is a most excellent game, one that will keep you busy for years to come.


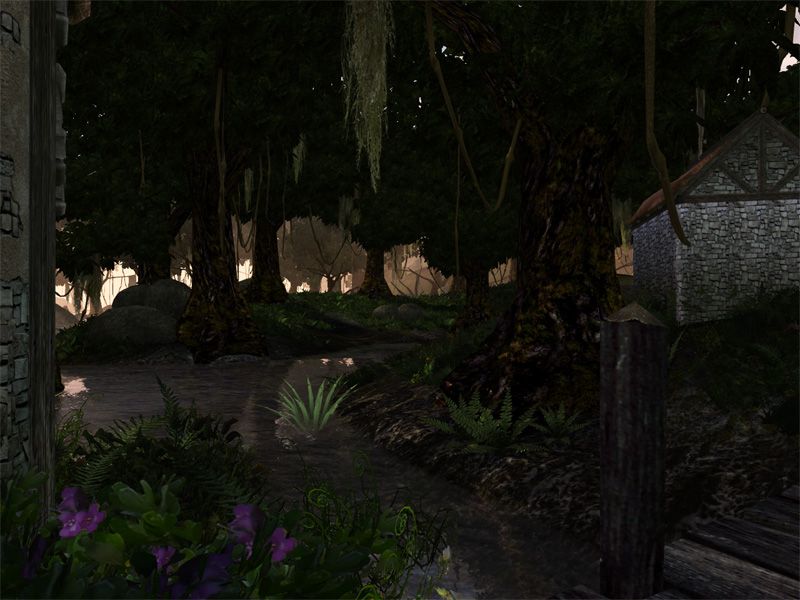
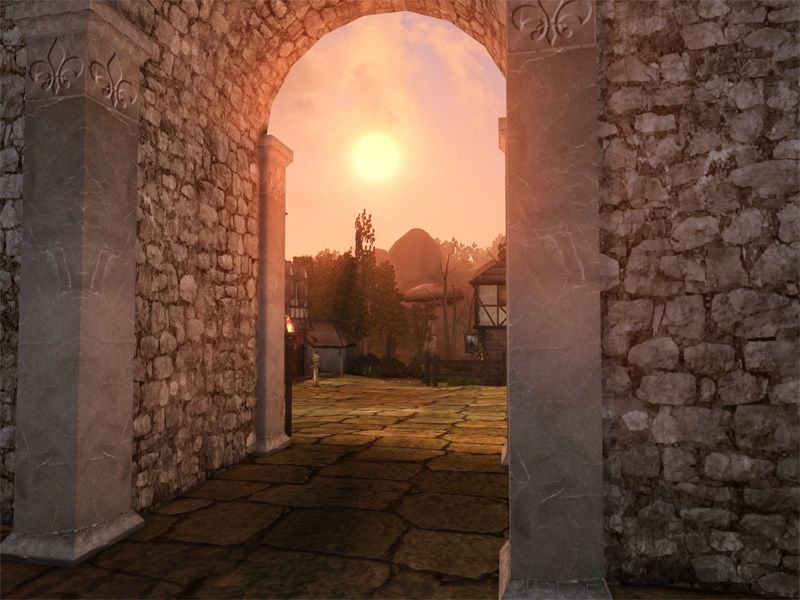
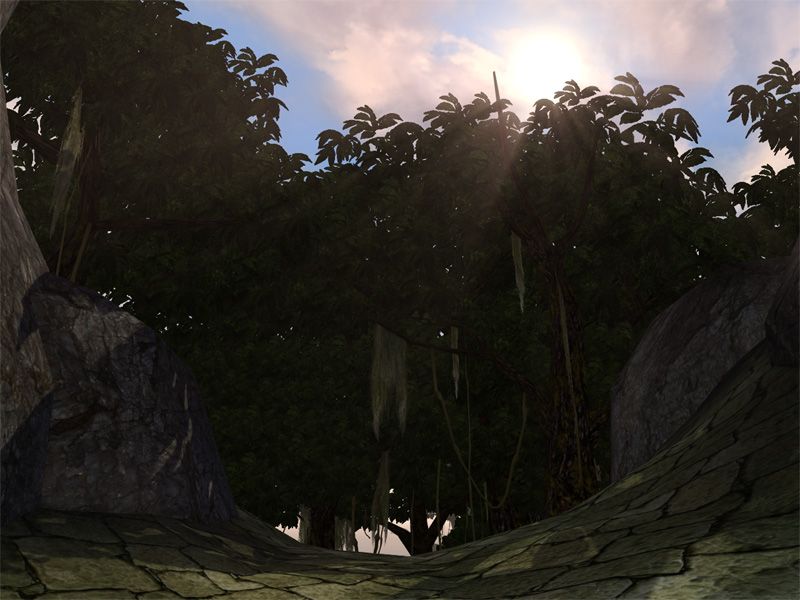
So, yeah…it feels like it needs it’s own thread. I’ve been busy over the last few days doing something i have always loved doing, building the best Morrowind experience i can. Anyway i posted a couple of screenshots in the thread for the MGSO reboot, and they looked something like this:

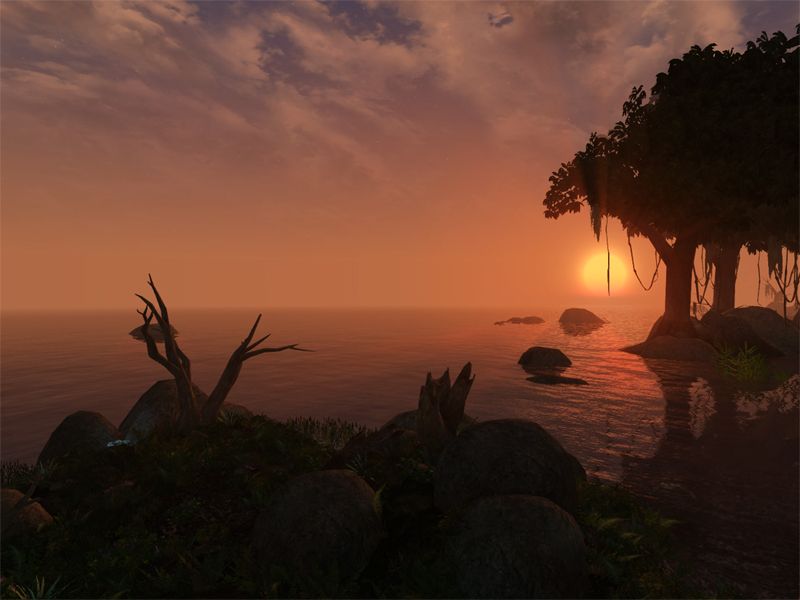
Which is pretty nice, and just on the base MGE XE program (plus a few texture packs i like). However we can do better than that, as anyone familiar with the MGE family of mods knows, so i’ve been trying stuff out, remodding old mods, adjusting textures and that kind of stuff. So here is where it is at looks wise:
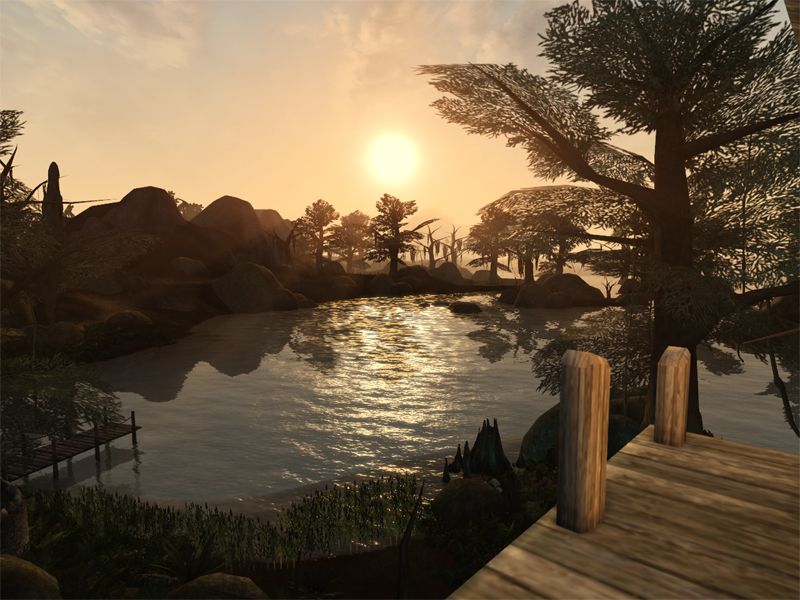
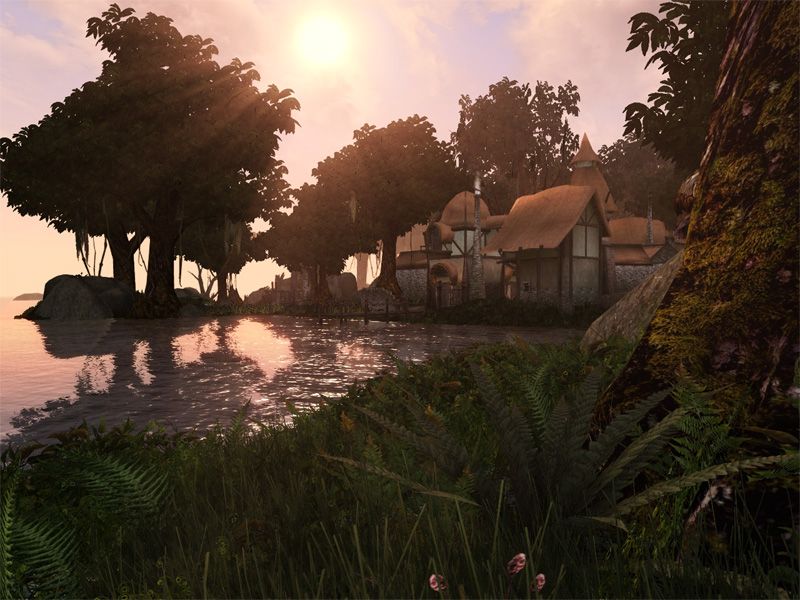
So things are definitely moving in the right direction. Why not just use the MGSO build? Well in part it does do incredible things visually (if a little ‘too Oblivion like’ imho) but it also has some drawbacks, slightly ‘hacky’ install method, gives you little choice on what textures you end up with (and that is a big issue in my book), and well building a Massively Modded Morrowind is all kinds of fun.

Why Morrowind? Why not Oblivion or Skyrim? Why not Daggerfall (ahh…Daggerfall…umm um). Morrowind is kind of special in the TES series, atleast that is how it feels to me. After Morrowind TES moved pretty ‘main stream’, stream lining and dumbing-down lots of things it didn’t really need to (like the RPG (in a crpg)!!). You can mod a whole lot of stuff back into Oblivion (i know i’ve done that too), but it probably is the least stable of the TES after serious modding. Skyrim, well for someone that does not use Steam it is a non-starter, and besides i’ve filled my boots with Lets Plays so i know the short comings of Skyrim well enough in relation to what i like in my crpg’s (i also know it can be great, especially with mods that fix many of the ‘dumbing-down’ issues, and if not Steam required i would be playing and modding it too).

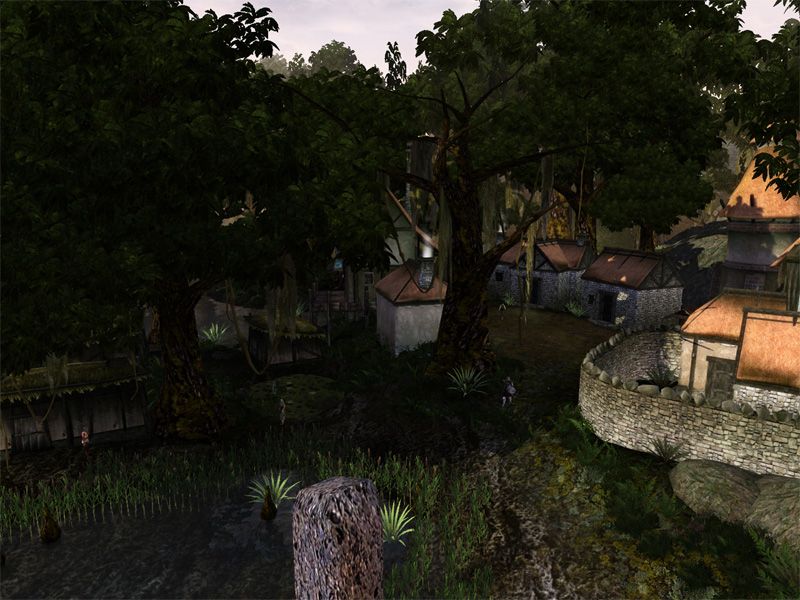
But Morrowind, deep, complex Morrowind (bugs/flaws and all) is THE crpg game that fuels my imagination maybe more than any other (except for Daggerfall off course…but seriously you try modding Daggerfall beyond AndyFall/CompUSA and get back to me). So what this thread will be is my highs and lows as i build a new Massively Modded Morrowind based on MGE XE. I might get very detailed, showing how i merged a bunch of mods together to use less mod slots, or took DDS files and converted them into PSD files to change their colour balance etc then converted them back into DDS files to use as textures in the game etc. Or i may keep it simple. Not sure yet, depends on how much time i have and all that. Anyway have two more shots of where it is at currently:

Um…Ummm…very tasty even at this early stage.

One of the few games that I’m not sure will ever leave my hard drive. It’s kind of amusing that I’ve actually upgraded my computer twice primarily for this game; once way back when it was released, and then again so I could play it with the MGE mod at a reasonable framerate. I’m hoping eventually Open Morrowind will lead to a fully modded version like this with multicore support.

Looks amazing. The best TES game without a doubt.

Still i consider Gothic 1 superior to Morrowind, in lots of ways, and Gothic 2 really is unmatched.

However as you said Morrowind has its strengths.

@ Penny Dreadful, my first experience of Morrowind was on the Xbox! But it was one of the games that made me move from console to PC (as in a modern PC, i think i was sporting a P120(?) at the time, for playing classic DOS games like Daggerfall and Xcom on), due to all the amazing mods i was reading about. MGE XE is my first experience of the MGE program, i had looked at MGE many years ago, but it was still pretty difficult to get running so decided to pass on it and stick with the Fps Optimizer 1.96 program. MGE XE blows that away and is incredibly stable (as in no crashes so far) for me, very easy to set up and use as well.

@deaderinred, I just got Gothic 2 and 3 from GOG (as they were removing them!) so have yet to try them out. I’ve heard good things off course (nice and hardcore etc).


First Step: Install Morrowind and Expansions on your PC. I put it in my E: drive (to avoid any UAC issues etc). Now this is important as i have found out recently, IF you are using Windows 7 the game will not fully install the game files properly, see this link for details on what to do to make sure you have no problems in using a modern OS (probably applies to Windows 8 as well):

Basically after you ‘think’ you’ve installed all the GOTY (MW/TR/BM) from the disks, it involves then manually copy pasting the contents of the ‘\Data Files’ folders on both the Tribunal and Bloodmoon disks into your Morrowind installation’s \Date Files directory. This wasn’t an issue under XP, but i checked my new windows 7 install and sure enough none of the content from Data Files on the two expansion disks was where it should be. This will lead to lots of graphical errors in your game, so follow this advice well.

Second Step: Go and install MGE XE, read the readme files before doing so:

http://www.nexusmods.com/morrowind/mods/41102/?

I was surprised at how easy using MGE XE is. Once it is installed you will see MGEXEgui in your main \Morrowind directory. All of it is pretty easy to understand from the instructions that come with it. I may later run a little section covering MGEXE in more detail.

Tools

Things i regard as essential for your Morrowind modding efforts, some more than others, depending on how hands on you want to be.

1. Wrye Mash

My most essential Morrowind Tool, without it you can forget running any large size mod list without a lot of issues. And it is actually very easy to setup and use. You need:

Python 2.5 wxPython 2.8.0.1 ANSI (for python 2.5) Wrye Mash (i think 84 is the last ‘good’ version, i use 79 still with no issues) here is the link for the latest version (as it can be hard to track down):

And Wrye Mash’s page with info is here:

http://wryemusings.com/Wrye%20Mash.html

And while we are there grab the GMST Vaccine download, we will be using that later, the working link is here:

http://wryemusings.com/#NotesandUtils

That contains both a very handy GMST Vaccine.esp we can use when working in the TES construction kit to avoid GMST contamination, and also a GMST Fix.esp you can have running in your mod list to stop ‘dirty’ mods doing bad things, but to be honest i don’t use that last .esp file anymore. I prefer to make sure all my mods are clean prior to starting a game or adding new ones to my game.

That is all pretty complex, so here is the shortened version. Once you have the three main components (Python 2.5, the wxPython stuff and Wrye Mash), install Python 2.5 first, then wxPython, and finally Wrye Mash. I have other versions of Python also, so having an old version also is not a problem.

I choose to install Morrowind and everything related to it NOT in the system drive, so everything goes in E: drive, Python for Wrye Mash as well. This means i have to manually edit the Wrye Mash icon(right click on it and select properties) to find the correct location of the files, like this:

If Morrowind is in a non-standard directory, then edit the Start In field to be

[Morrowind Directory Path]\Mopy (e.g. E:\Games\Morrowind\Mopy )

If Python is in a non-standard place. then edit the Target field to be:

“[PythonPath]” mash.py (e.g. “E:\Python24\pythonw.exe” mash.py )

Now look inside the unzipped Wrye Mash folder, go into ‘Mopy/Extras’ and look for ‘Mashed Lists.esp’, copy/paste that over into your main Morrowind/Data Files directory (where you will be copying all your mods later on). This .esp file provides one of the great features of Wrye Mash and we will go into it a bit more later. For now just make sure it is in the right place.

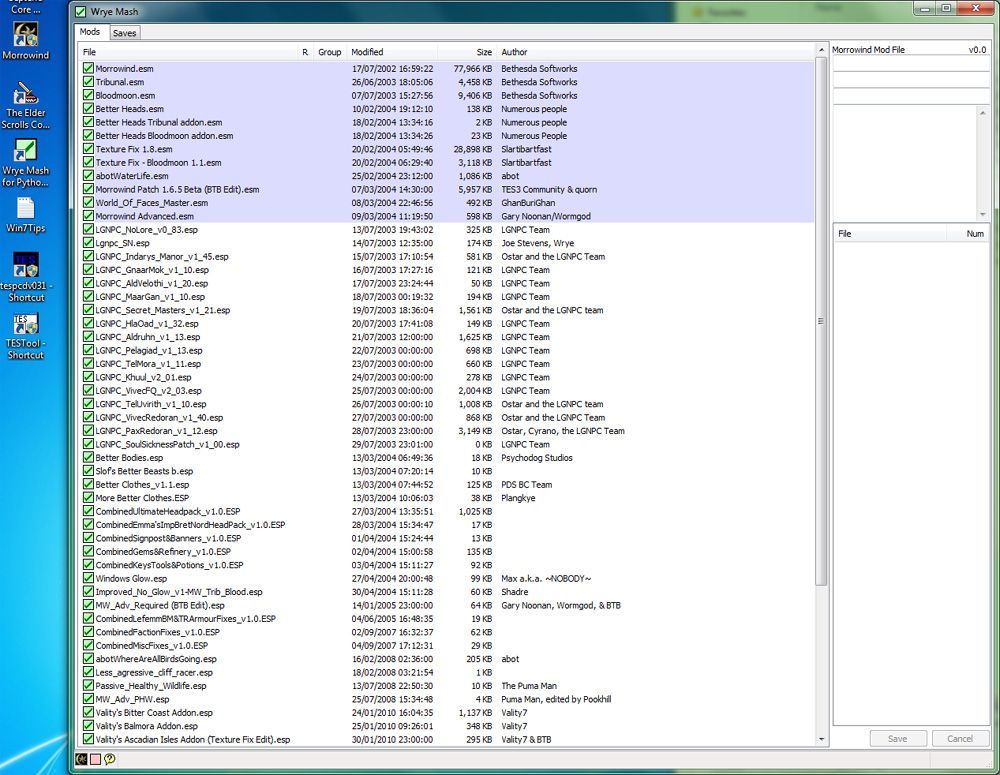
Once Morrowind is installed and you have Wrye mash installed you will know it is working fine when you first run the Wrye Mash utility as it will look like this:

Don’t worry about the details of that mod list for now, on first run you will just have Morrowind, Tribunal and Bloodmoon.esm files and that Mashed Lists.esp in your list! With MGE XE installed you will also see a bunch of ‘Vurt’s xxxxx.esp’ mods that will (and should be) unticked, like in the last screenshot of Wrye Mash below. But if you see this kind of screen you know Wrye Mash is all set up perfect.

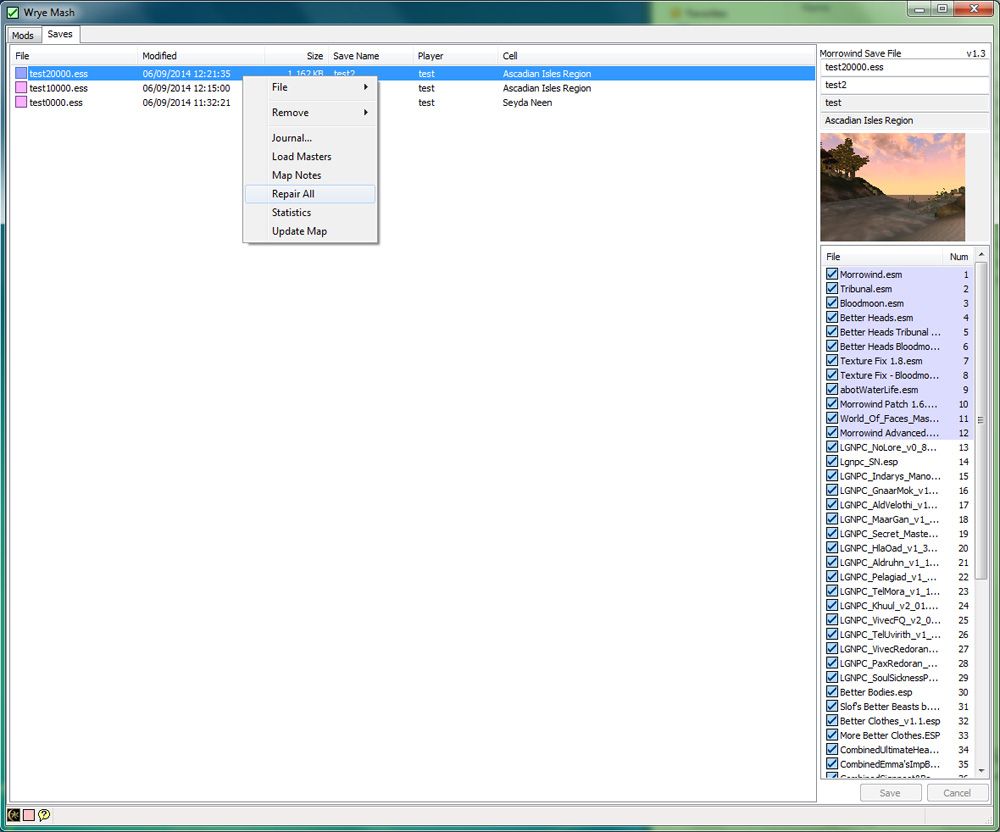
One of the very handy functions of Wrye Mash is to clean your saved games, you can see how to do that in this next pic, just click on the ‘Saves’ tab at the top and follow the details in this pic, right click on the save you want, then click on ‘Repair All’ to clean your save:

You don’t need to do this often, but if you start to notice your game getting a little ‘weird’ or your save games seem to take ages to load up, then that is a good sign it is time to clean your save. I give my saves a clean every 10 levels of char development or so at the beginning of the game, then every 10 hours of game time at later stages of the game.

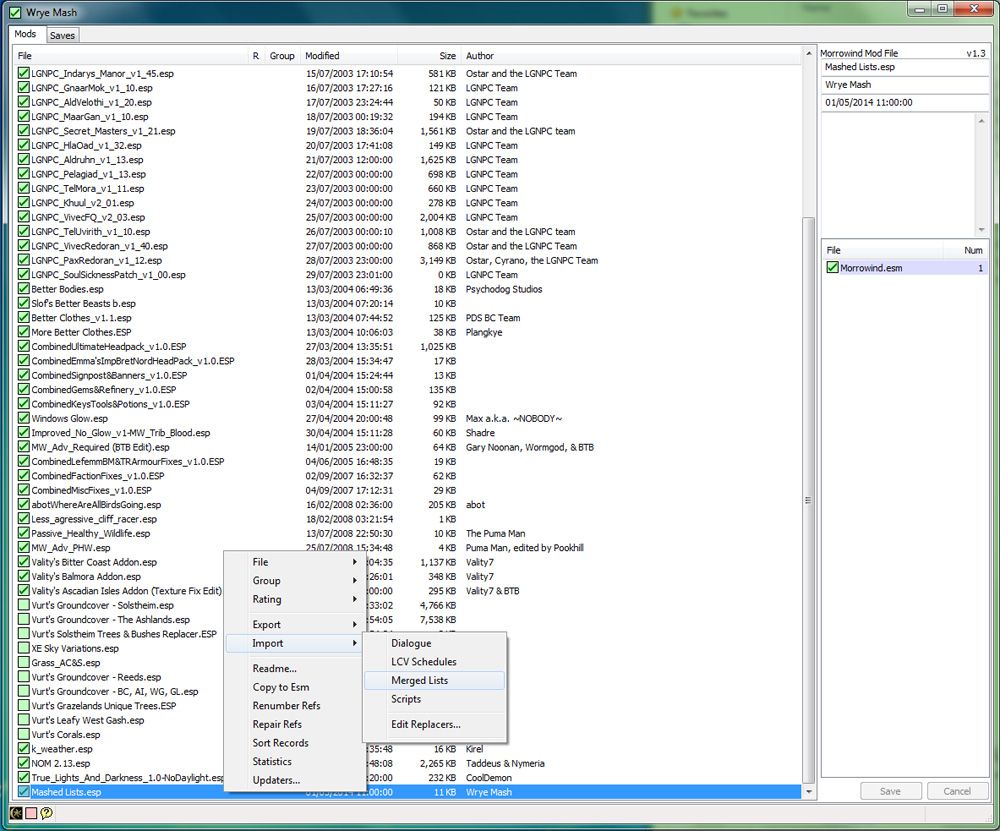
Finally the other important function you will use Wrye Mash for is to Merge your leveled lists, using the Import>Merged Lists function. Right click on the Mashed Lists.esp as shown to do this:

What this does is to ensure many different objects in the game that appear in the leveled lists (stuff like creatures and items) all coexist together rather than simply write over one another depending on load order. It allows you to have much more content in your game. Now from my starting mod list shown in that screen there is not a lot to merge, a few things from abots where are all the birds going and abot Water life. But once i add creature packs and weapon packs that will change.

Start with Gothic 1. Great world and exploration, no hand holding, great quests, no level scaling, no compass, great sense of progression. Same with Gothic 2 and Risen.

Yes, yes i know i could just run MGSO, or play Oblivion on the Xbox, or even just ‘give in’ and run Steam to play Skyrim. All those are the quick, easy path, but not necessarily to the greatest happiness.

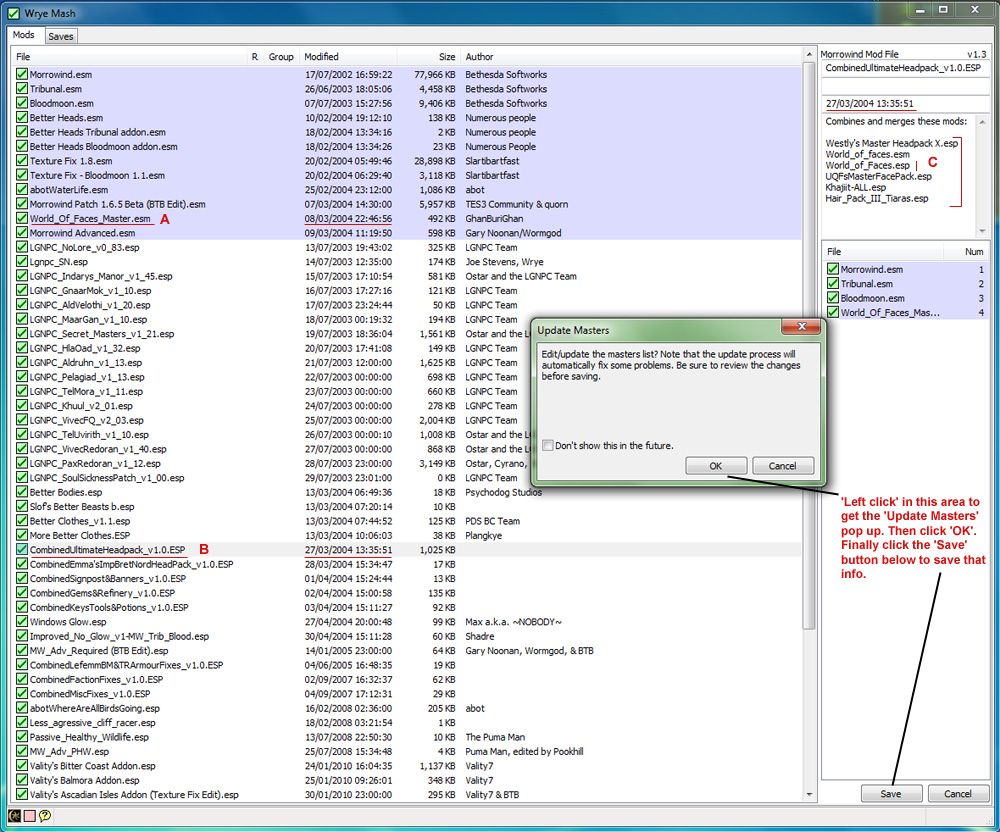
So if you are still with me we have one last (but probably the most important part) of Wrye Mash to cover, and that is using it to manage your load order, which is incredibly important in Morrowind, and probably as much magic as hard science. So to aid us i have this screenshot i will try to explain:

Look at entry ‘A’ for me. It reads ‘World_Of_Faces_Master.esm’ with a date time stamp of: 08/03/2004 22:46:56

What that ultimately means is any file depending on that Master (esm) file MUST have it’s date time stamp set later. It could just be by 1 sec, but mostly i use 1 day. Like Morrowind, Tribunal and Bloodmoon.esm files this is a Master file, meaning other files will depend on it loading FIRST for that mod to function. All your mod files will need their date time stamps set later than Morrowind.esm and depending on if they require them, Tribunal and Bloodmoon esm files also.

Now look at entry ‘B’. This is ‘CombinedUltimateHeadpack_v1.0.esp’ and it’s date time stamp is: 27/03/2004 13:35:51. This is LATER than the World_Of_Faces_Master.esm file which is as it should be because if we cast our eyes over to the ‘C’ area for a second, you can see all the files that make up this ‘CombinedUltimateHeadpack_v1.0.esp’, and one of those is ‘World_of_faces.esp’, whose Master file is, well you can guess.

So even though all the other .esp files that go into the CombinedUltimateHeadpack file do not need to have their date time stamp later than World_Of_Faces_Master.esm, it’s accompanying World_of_faces.esp file does, so the whole combined headpack also must.

There is a debate to be had over combining all those specific mods (and even the World_Of_Faces_Master.esm! EDIT: ignore my remark here, i was drunk! When you create a plugin(.esp) file you off course need to select the esm files it will rely on), it is a test run to see what will happen, and so far everyone has a head that i have met in game, and no errors are reported on running the game or loading my saves, so i think it will be ok. This is where the ‘magic’ part comes into it, because probably it shouldn’t work. You got to ‘use the force’ sometimes when modding up Morrowind.

To make changes to the date time stamp you simply go upto that ‘C’ area and adjust the details to what you think you need, you can also add stuff in the text field like i did to list all the mods that went into making the CombinedUltimateHeadpack_v1.0.esp. Next step is in the red text. Left click in that area to get the ‘Update Masters’ prompt etc. Once you have hit ‘OK’ then ‘Save’ all those details will be saved into that specific mod. In this way you can easily adjust any mods date time stamp to ensure it fits into your mod build where it should (or where you think it should).

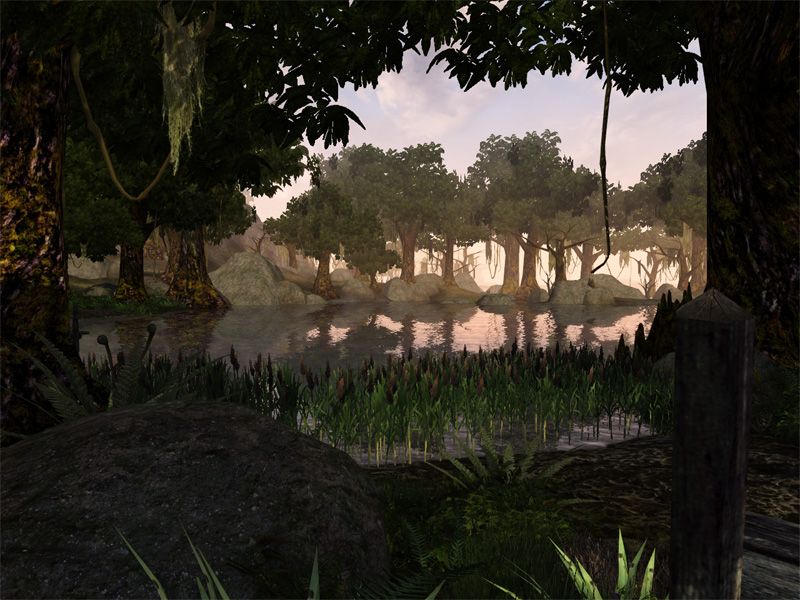
What? you want to go play Xbone now!!! Come on, this is good stuff, you’ll be happy once you got it, you really will. You can do amazing things, amazing awesome game building things. Ok look, here have another lovely picture to show how it is all worth it:

Yeah i was planning on Gothic 1 (they still have that on GOG), then the other two (plus community patch/patches etc). As for this ‘tutorial’, that is all you really need from Wrye Mash. Three main functions:

  1. Checking/Changing Load Order view the time date stamp, and ‘Updating Masters’ to save that info into the mod.

  2. Importing Merged Lists, for when you have all your content mods added and prior to playing.

  3. Cleaning your saved games as you play.

You can do a bunch of other things, but these are the basic most stable and useful functions i find.

With these installed, how is the performance of the game?

Oh wow. Well, firstly, good job on covering all this Zak. And great advice on using Wyre Mash. I installed, modded and played Morrowind for the first time a few years ago and without Wyre Mash I would have got myself in a real pickle. It’s essential!

However, secondly, all this brings back memories of weeks of researching, fiddling, tweaking and testing loads of mods only to realise when I finally started playing the game that I didn’t really like some of the basic stuff about it, like the combat and the dialogue and conversation system. Eeesh, that was a painful realisation after all the time I spent on it! I kept a lot of the visuals close to vanilla but it was still amazing just how long it took to get all the other stuff in. I worked from this extensive (and funny) mod list: http://btb2.free.fr/morrowind.html

Some would say I should have played it vanilla first, but I don’t tend to replay games much so I wanted to make sure my first experience was modded carefully. My modded Morrowind looked like this: http://imgur.com/a/qieZs#0 (vanilla almighty!)

Well there is not much installed so far, and keeping in mind i edit the ini file to cap Fps at 60, i’m getting between 32-60 fps. 32 is when looking directly at the center of Seyda Neen, for some reason that place is demanding! Balmora (with some incredible trees stuff i’ll show later at some point!) is in the mid 40’s fps, and in general it’s ticking along between 50-60 fps. It’s smooth, much more so than my previous modded Morrowind using the FPS Optimizer 1.96 program (both this and MGE XE are about extending the default view distance). The PC i’m running this on is an i5 @3.1 Ghz with a GTX 750 Ti GPU, nothing overclocked.

@ geggis, yeah i guess between Morrowind, Oblivion and Skyrim there are different systems for many parts of the game, and if you are used to one over another that can have an effect on ones preference. I’ve always preferred Morrowinds CRPG system (skills based/rolls based on skills = success or failure), rather than the systems they used in Oblivion or Skyrim, and also i prefer the text based dialogue (with just a few spoken verbalization’s from the NPC’s, it’s just so much quicker and less repetitive, better for modding quests too). nice pics, even default Morrowind had a very appealing visual design to it.

Haha, it was my first and last TES experience so I came in with very few preconceptions! I don’t play many RPGs so I tend to cherry pick the very highly regarded ones.

Yeah, I was a big fan of Morrowind’s esoteric visual design; its barren vistas, foggy pallour and unusual structures (and creatures like the silt striders!). And that theme tune… wow, one of the greats for sure. Brr, gives me chills.

Tools - Continued

Ok we got Wyre Mash covered, the things you’ll mostly use it for. Nice and simple really (and powerful too). So what next?

2. TESTOOL

One of the oldest tools, and used pretty much exclusively back in the day. You can see from my screenshots that i have it installed. But don’t bother with it, i haven’t actually used it in years and just installed it to test out why i don’t use it anymore. It has a bit of a reputation for messing things up, and many of the features that we all used years ago (Merge Leveled Lists - Wrye Mash does that better/safer, Merge Dialogs - can mess stuff up, JUST FIX IT! - causes lots of problems) are in general now no longer recommended. Even cleaning of ESP/ESM files now is better handled by other tools. Even the Merge Objects function, which is unique from what Wrye Mash offers is a dubious call. It seems it can mash things up in a rather messy manner, and the debate on having a Merged_Objects.esp to go along side your Mashed Lists.esp has mostly shifted towards saying no. But that can be down to user preference, and if you know deeply what you are doing, what files you can Merge Objects safely, then sure go for it. I haven’t used it for that in a good long while.

3. TES Plugin Conflict Detector - TESPCD

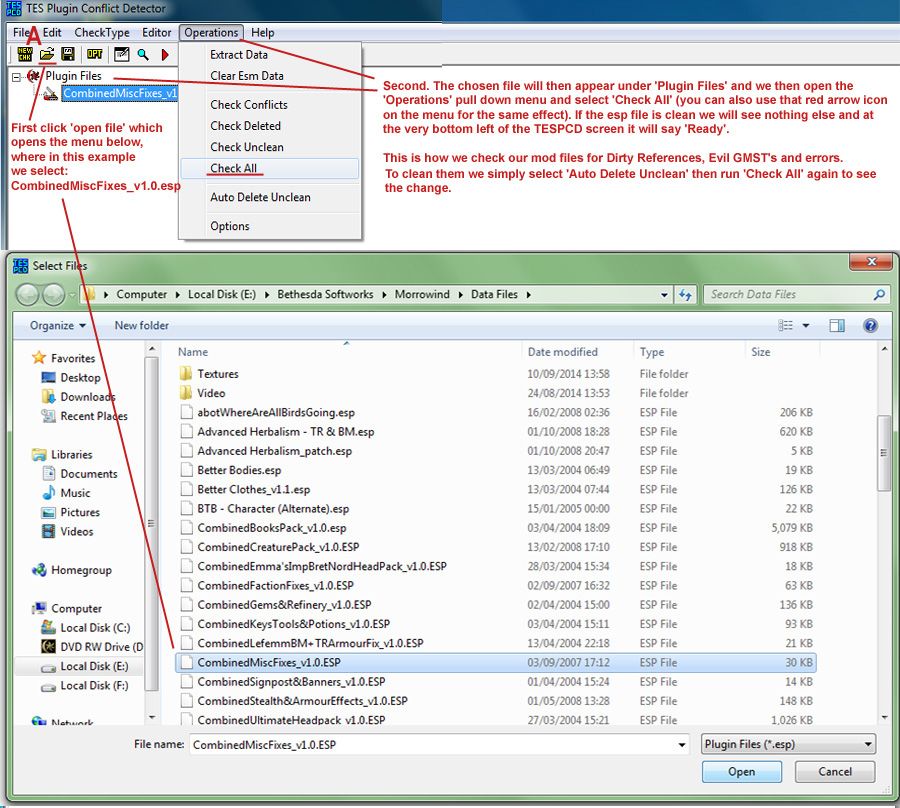
Does what it says, shows conflicts between selected .esp files, to better aid you in sorting your load order. It also is great at cleaning out dirty file references, and i mostly use it for that. Load your .esp file in click the red ‘arrow’ icon (or select ‘Check All’ from the ‘Operations’ pull down menu). If the mod is clean you will see nothing (which is best). If you see stuff you then have an ‘Auto Delete Unclean’ option from that same ‘Operations’ pull down menu, so click it and it will try to clean what it found. It won’t clean everything, not all the time, but it gets rid of many of the worst types of clutter in a mod file. I run ALL my mods through this cleaning process before using them, most are already clean but you’ll always find a few that are not. You can get it from Nexus:

Using TESPCD:

The picture above is a montage of the base options we use for checking if a mod (esp/plugin) is clean before using it in out modlist, or after we have created it. Starting in the top left section near that red letter A, the most important icon is the ‘open file’ one (underlined). We click that to open the ‘Select Files’ screen shown in the bottom half of this screenshot. It opens your \Data Files directory where all your mods are in your game, so if you want to check your mods before installing them, just navigate on that screen like you would normally to get to your mod section to select the file you want to check.

If after following the instruction on the screenshot you find you have a ‘Dirty’ mod, it will report all the issues where the ‘Second’ part of my added red text is displayed. Once you have run the ‘Auto Delete Unclean’ option you should see all (or nearly all, it won’t remove ‘deleted’ file references) the main errors have gone. If you had a bunch of Evil GMST’s or even regular GMST’s it might be a good idea to run it through the command line tes3cmd cleaning as well. This is a personal call, and i won’t always do this based on these critera.

  1. I have been warned in the mods readme that the mod needs the GMST’s to function.

  2. The modmaker is well known, experienced and reading up on the mod there are not lots of mentions of the issue of it being ‘Dirty’ and needing cleaning.

Now outside of those situations, i always will do the cleaning, especially if the modder is new and inexperienced. Heck i might not even try those mods if they are too large and complex AND full of dirty references. So there is no hard and fast rule here.

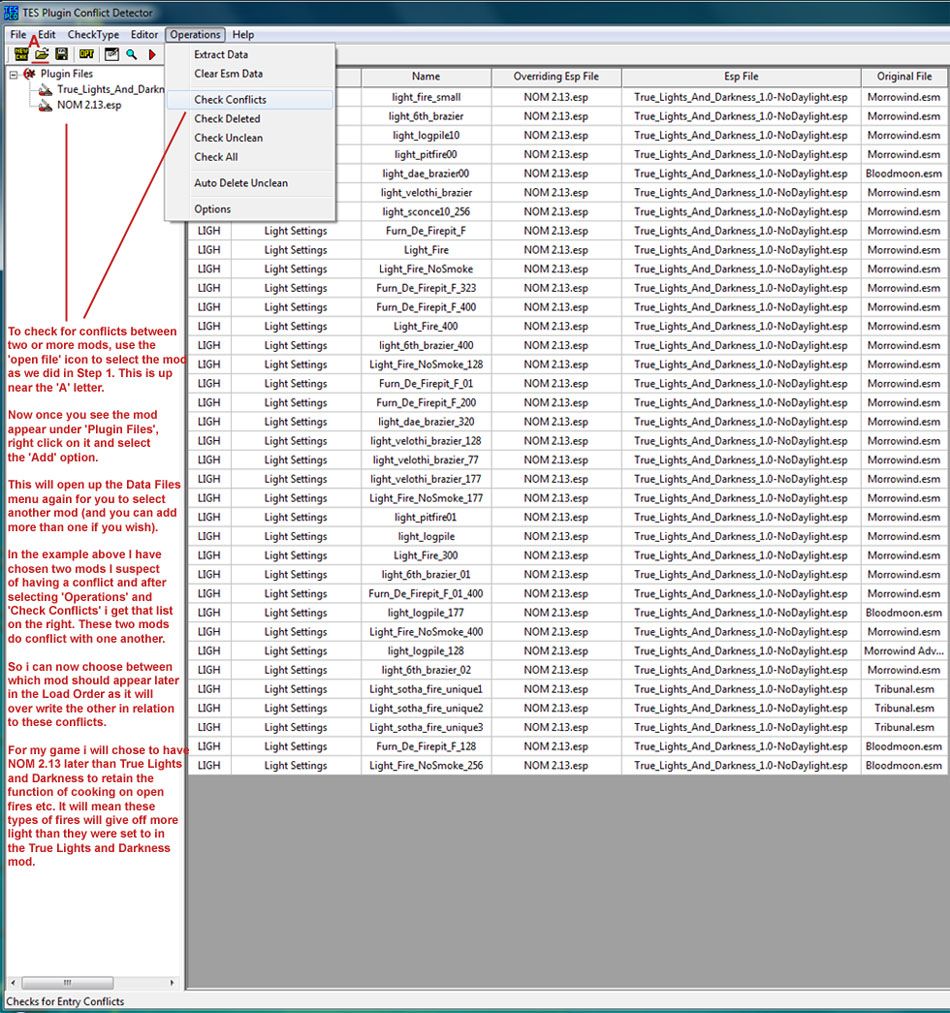
In that second screeshot i’m exploring the issue of a conflict i found between two mods i was running. The issue manifested itself in my game when i got around to adding the Needs of Morrowind mod (NOM 2.13 in this case) onto my test build that already had the True Lights and Darkness mod. Suddenly lights were brighter than they were before.

So i knew something was up and as i had just added NOM that seemed the place to check. And the result is clear they do conflict. So what to do about it. In the longterm i could go into the NOM mod via the construction set and copy the light values from True Lights and Darkness into it? Could be a bit of work, and the main reason i have the True Lights and Darkness mod is for when i’m in unlite places (like caves etc) so the conflict does not manifest itself there. In the end i decided to give NOM 2.13 precedence to keep it’s cooking on fire scripts correct by loading it after True Lights and Darkness. In general you want NOM near the end of your load order anyway.

So that covers the two most useful and common uses of TESPCD.

4. tes3cmd

Scary, a command line tool! But the best most current way to clean for GMST’s. If i find stuff in TESPCD, i also run the mod file through this tool as it is the ‘stronger’ tool for that job. It comes with a readme, but if you are new to the tool you need more info so i made some for myself that i will put here and you can copy/paste it into tes3cmd’s readme file. Assuming you have read the read me and installed it etc:

To run: Start button>search for ‘cmd’ (to find the cmd prompt tool in windows), click the search result cmd icon (a black dosbox like thing). Or this may depend on your OS, Win Xp you use Run in the start menu then type cmd to run the program, and off course you can probably find the application icon in either your control panel or via ‘Accessories’.

in the cmd.exe window type E: (or whatever directory letter your Morrowind install is in) then use cd (as in type ‘cd’ (without the quotes)) to get to the correct place where you installed tes3me (should be in your Morrowind/Data Files). So in my install on my E: drive i type this (in the cmd.exe window):

cd Bethesda Softworks\Morrowind\Data Files

And hitting Enter gives me this in the cmd.exe window:

E:\Bethesda Softworks\Morrowind\Data Files>

I’m now in the right place to run the tes3cmd tool, so type

tes3cmd
to run the tool, and then type this for cleaning Evil GMST’s references:

tes3cmd clean --gmsts “name of mod.esp file here”
(and yes use the quotes here! natural spaces as in the example too.) and hit ‘Enter’ to run the cleaning.

To clean normal GMST entries just type this:

tes3cmd clean --gmst “name of mod.esp file here”

  • notice you just drop the ‘s’ of the end of --gmsts. Hit ‘Enter’ to clean. When you are finished with this tool just type ‘Exit’ to leave the command prompt and get back to your desktop.

Now if i find a dirty mod file in TESPCD, i clean it in that program, if the mod file is very dirty (lots of error remarks etc) then run the same file through both of tes3cmd’s cleaning functions. If TESPCD just reports on ‘Evil GMST’s’ then just run the ‘Evil GMST’ clean. This way i can be 100% sure the mod is clean, and safe to use in my mod list. You can get tes3cmd from the link at the UESP:

http://www.uesp.net/wiki/Tes3Mod:Tes3cmd

That is the end of the Tools section. It is just three tools you need, Wrye Mash, TESCPD and tes3cmd, to help set up a stable and clean Morrowind mod list. I’m not that keen on tools that do everything for you, i think using these three tools will ensure you get a deeper understanding on how modding Morrowind works and why. You can use tools like mlox (available on Nexus) to auto-sort your mod list order for you, and maybe that is a good choice for someone starting out with modding? I prefer the hands-on freedom (to make my mistakes and learn from them) of choosing my own load order, and of course you should use guides for that like this one:

http://mw.yacoby.net/Tuts/LoadOrder/LoadOrderTut.htm

Phew, dry stuff! so have some candy before we get on the next step:

Recap

  1. We have installed Morrowind GOTY (outside of C:\Program Files and if using Windows 7(8) making sure to manually copy/paste the Data Files contents from the Tribunal and Bloodmoon CD/DVDs, or whatever works if using a Steam version etc).

  2. We have also installed MGE XE (look for the latest version on Nexus). Look for MGEXEgui in your main \Morrowind directory, this is the tool we use to run the settings we want.

  3. We have downloaded and installed the three main Tools that will help us build and run modded Morrowind, those being Wrye Mash, TESCPD and tes3cmd.

At this stage if you have not yet, it is a good idea to try to launch the game, make sure you have read and understood using MGE XE. If your game runs and looks like a worse version of the screenshots in this thread, you are on track. If you have errors or issues, then go through the info in this thread again and read the instructions for MGE XE. If you are using a Steam version you will have to figure that out yourself as i have no way of trying it to be of help!

You good? Ok…we still have a few things to cover before piling on the mods of Epicness.

Morrowind ini

The ini file is located in your main \Morrowind directory and under Windows 7 it is called ‘Morrowind’ and is a type ‘Configuration settings’. Some info on the ini is here:

http://www.uesp.net/wiki/Morrowind:Ini_Settings

http://www.fliggerty.com/phpBB3/viewtopic.php?f=63&t=4856#p83324

Depending on what mods you use in your Modded Morrowind will determine largely what your ini file will look like.

For example here are some sections from mine with a description after the //:

[General]
Show FPS=1 // Adds Morrowinds own discrete fps count to the bottom right. If you use a UI mod or prefer to see it someplace else, MGE XE has it’s own you can activate that will show on the top left, and third party options like FRAPS give more choice. Morrowinds own is my preferred choice.

Max FPS=60 // default is 240! a waste of resources and current theory holds that matching the fps cap (which this sets) with your monitor refresh rate is best. Certainly a value of 100 should be your max choice here.

Interior Cell Buffer=12 // These are default values and over the years i’ve seen suggestions to both
Exterior Cell Buffer=32 // increase or decrease them. So i suggest have a go at both, play the game and see what suits your setup best. Values of 4, 8, 12, 16, 32, 48, 64 are probably best here.

allowyestoall=1 // Add this yourself, it avoids a lot of clicks in the process of modding!
AllowMultipleEditors=1 // Add this also to improve MW’s stability if you run other programs at the same time (like System Monitoring software, FRAPS, Wrye Mash etc). These two additions go at the bottom of the ‘General’ section of the ini, i put them after Werewolf FOV=100.

[LightAttenuation]
UseConstant=1
ConstantValue=0.382
;
UseLinear=1
LinearMethod=1
LinearValue=1
LinearRadiusMult=1
;
UseQuadratic=1
QuadraticMethod=2
QuadraticValue=2.619
QuadraticRadiusMult=1
;
OutQuadInLin=0

//One of the mods i use, True Lights and Darkness, suggests these settings for that mod. In general the default lighting used just the UseLinear option and would make things brighter overall (easier to see), but could reduce atmosphere a little. UseQuadratic adds a bit more ‘light flicker’ from torches and fires etc. Anyway these settings are due to the mod so are what i play with, it makes the game pretty dark and it really is necessary to carry torches or use nighteye in logically dark places.

[Blood]
Model 0=BloodSplat.nif
Model 1=BloodSplat2.nif
Model 2=BloodSplat3.nif

Texture 0=Tx_Blood.tga
Texture 1=Tx_Blood_White.tga
Texture 2=Tx_Blood_Gold.tga
Texture 3=PLX_CBbug_blood.tga
Texture 4=PLX_CBoil_blood.tga
Texture 5=PLX_CByellow_blood.tga
Texture 6=PLX_CBstone_blood.tga

Texture Name 0=Default (Red)
Texture Name 1=Skeleton (White)
Texture Name 2=Metal Sparks (Gold)
Texture Name 3=Bug Blood (Brown)
Texture Name 4=Dark Blood (Black)
Texture Name 5=Yellow Blood
Texture Name 6=Stone flakes (Gray)

//Most of these are added by hand as recommended in the readme of the creature/monster mods i use. Reading a mods readme can save a whole bunch of issues from happening.

[Archives]
Archive 0=Tribunal.bsa
Archive 1=Bloodmoon.bsa
Archive 2=Authentic Signs IT.bsa
Archive 3=Windows Glow TR.bsa

//This section will be where required bsa files are registered, if you have mods that require you to run BSAReg, you can check they installed fine here. The mod readmes will inform you if you need to do this.

Just to give you some idea of parts that will change after adding mods and what that looks like. In general the Morrowind.ini is an important part of running your modded game and the VERY FIRST THING you should now do is BACK IT UP and put it somewhere safe. I have a whole copy of a fresh install of Morrowind GOTY in a back up folder called ‘Morrowind Orig Backup’, and that includes the Morrowind.ini file if i ever need to get hold of a new clean one.